
The Pop-up Blocker, Security Settings, Cookies, and Privacy Policy MUST be changed in Internet Explorer® for users who have Windows® XP Service Pack 3 or Windows® Vista Service Pack 1 installed on their machines before logging into the Dealer Portal. This is to ensure that you can log in to the Dealer Portal, generate quotation reports, specifications, and attend the web cast training.
Pop-up Blockers for the Google® toolbar, the Yahoo!® toolbar, McAfee®, and Norton Internet Security MUST also be disabled. You may find yourself locked out of the Dealer Portal if:
both of the Google® and Yahoo!® toolbars have the Pop-Up Blocker enabled when you click the red wrench on the Quote tab of the quote window Displays the Quote Number:, Unit Information:, Customer Information:, Dealer Reference:, Date Information: and Quote Actions: sections. to enter the Configurator on a new or existing quote
Disabling the Google® toolbar Pop-Up Blocker
Disabling the Yahoo!® Toolbar Pop-Up Blocker
Disabling the McAfee® Pop-Up Blocker
Disable Pop-up Blocking in Norton AntiSpam from Norton Internet Security 2005 and 2006
Setting up Internet Explorer® - Method 1
Setting up Internet Explorer® - Method 2
Additional software that needs to be installed from the Info Library/Downloads tab
E-mail confirmation after joining the E-ONE Dealer Portal
Logging into the Dealer Portal
Open Internet Explorer®.
Look for the Google® logo near the Menu Bar and Standard Toolbars.
Click the Settings button at the far right of the Google toolbar.

A menu will appear.

Highlight and click Options with your mouse. The Toolbar Options dialog box appears.
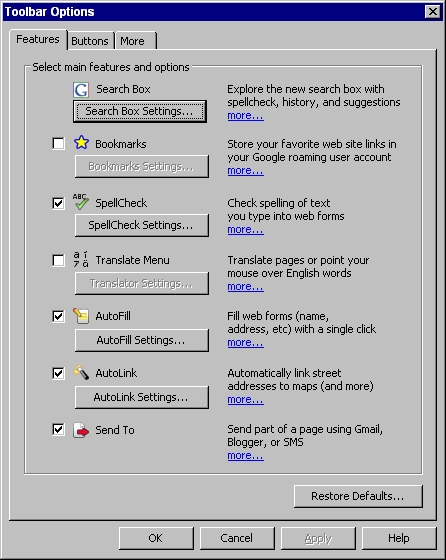
Click the More tab.
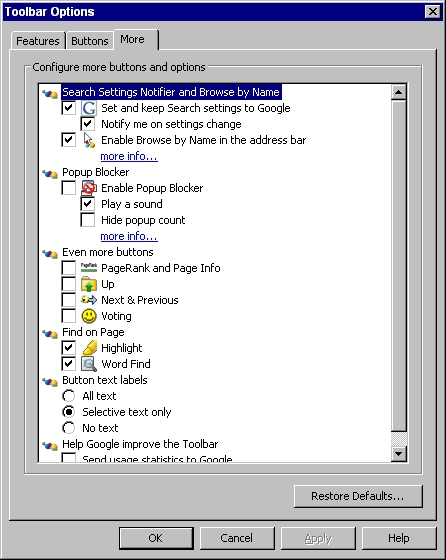
Uncheck the Enable Popup Blocker checkbox under the Pop-Up Blocker section.
Click the OK button.
(This example is version 6.2.4.0. Your version may differ than what is shown.)
Look for the Y! logo near the Menu Bar and Standard Toolbars.

Click the Toolbar Settings or pencil icon to the right of the Y! logo.

A menu will appear.
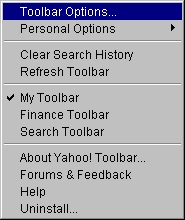
Highlight and click Toolbars Options with your mouse. The Yahoo! Toolbar Options dialog box appears.
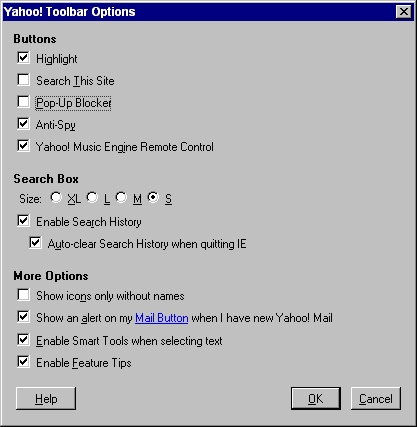
In the Buttons section, uncheck the box Pop-Up Blocker.
Click the OK button.
If you have McAfee® have installed on your computer, you will have an M icon in your system tray at the bottom right hand corner of your desktop next to the clock.
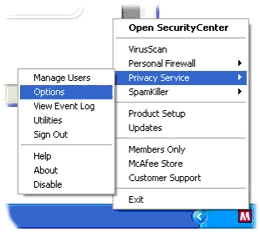
Right click on the M icon and select Privacy Services > Options. The McAfee® Privacy Services window is displayed.
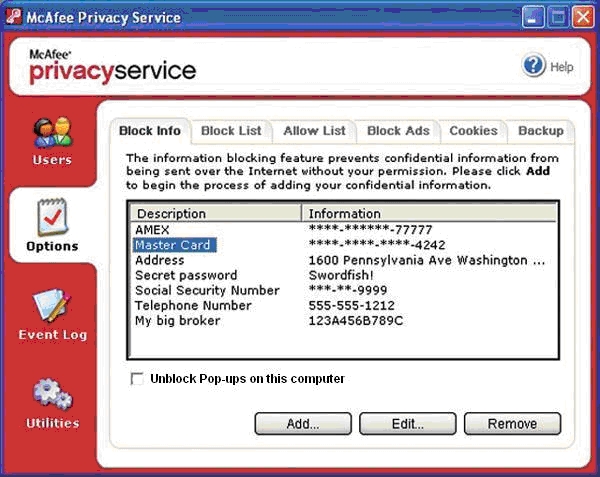
Uncheck the box Block Pop-ups on this computer.
Click the Apply button.
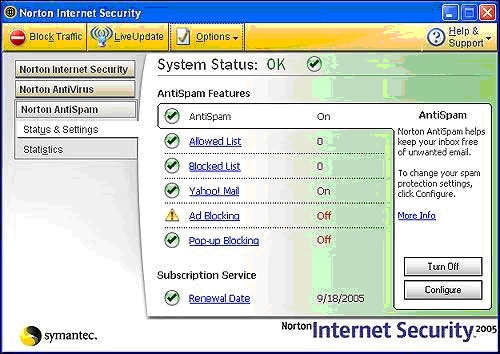
Right click the yellow globe in your system tray at the bottom right hand corner of your desktop next to the clock. The Norton Internet Security window is displayed.
In the main window, on the left side click Norton AntiSpam.
Click Pop-up Blocking > Turn Off.
Dealer Systems Registry Check
This program will automatically do the following to Internet Explorer®:
adds mc.iconf.net and e-one.com domain names to the Pop-Up Blocker Settings
sets the Internet Zone to Medium and the Trusted Sites Zone to Low
adds the e-one.com domain to the Per Site Privacy Actions
Click the link below to download and run the Dealer Systems Registry Check program. You may need WinZip installed to open, otherwise Windows XP or Vista will open the file. WinZip is available here as a trial download.
The File Download dialog box is displayed. Click the Open button to open the .ZIP file.

The WinZip window appears with the file DealerSystemsRegistryCheck.exe displayed.
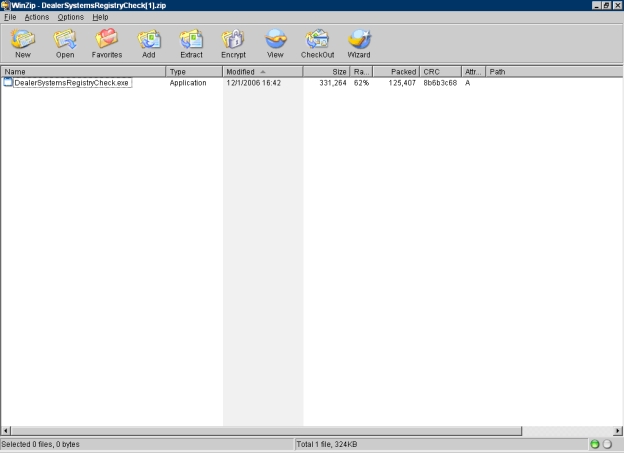
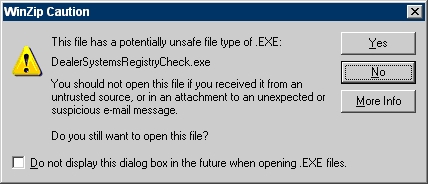
Double click the executable to run the file. Click the Yes button to the WinZip Caution dialog box that appears.
The Dealer Systems Registry Check dialog box appears. Click the Yes button.

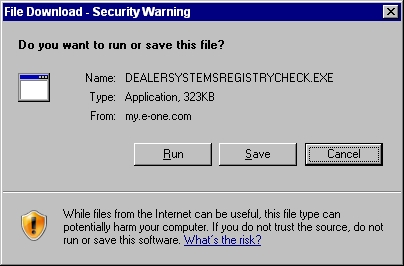
The Internet Explorer Security Warning dialog box will appear. Click the Run button.

The File Download dialog box is displayed. Click the Run or Open button.
The Internet Explorer - Security Warning dialog box appears. Click the Run button.

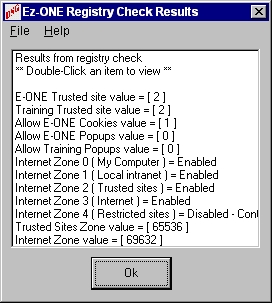
The Ez-ONE Registry Check Results dialog box appears. Click the Ok button. Close the WinZip window.
Open Internet Explorer.
Click Tools > Pop-up Blocker > Pop-up Blocker Settings. The Pop-up Blocker Settings dialog box appears.
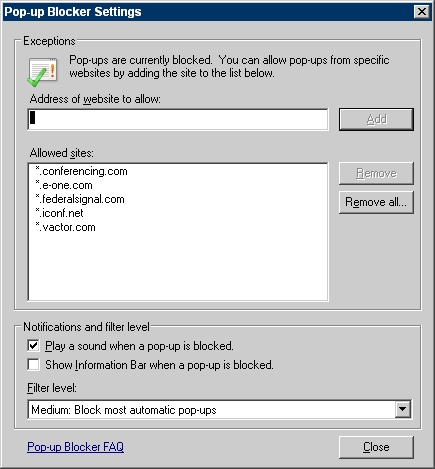
Uncheck the box marked 'Show Information Bar when a pop-up is blocked'.
Set the Filter Level: drop down list to 'Medium: Block most automatic pop-ups'.
Type *.conferencing.com in the 'Address of Web site to allow:' field.
Click the Add button.
Click the Close button.
In Internet Explorer, click Tools > Internet Options > Security tab. The Internet Options dialog box appears and you are on the Security tab.

Click on the Trusted sites icon to highlight it.
Click the Sites... button. The Trusted sites dialog box appears.
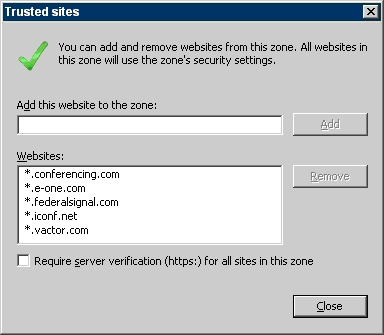
Uncheck the box 'Require server verification (https:) for all sites in this zone'.
Type *.conferencing.com into the 'Add this Web site to the zone:' field.
Click the Add button.
Click the OK button.
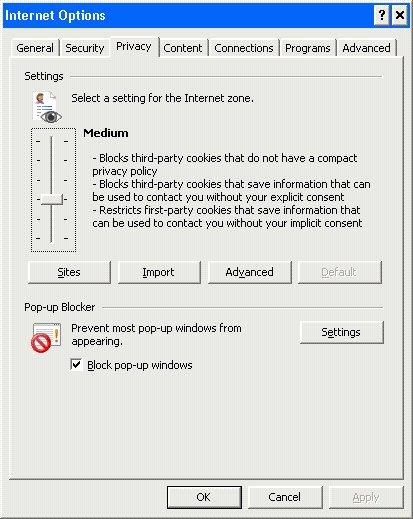
Click the Privacy tab in the Internet Options dialog box.
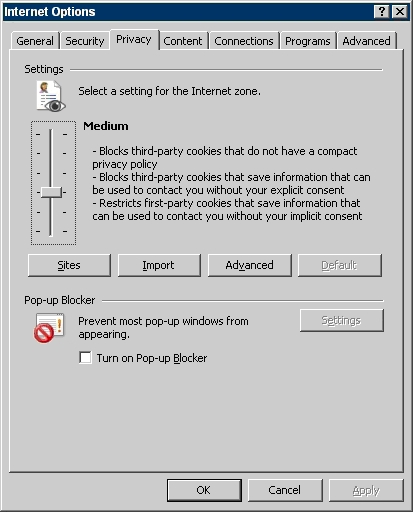
With your mouse move the slider to Medium.
Click the Sites button. The Per Site Privacy Actions dialog box appears.
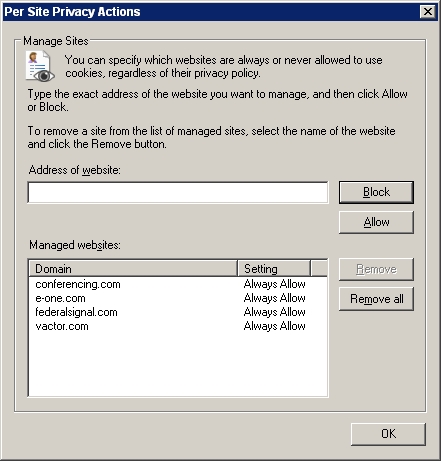
In the Address of Web site: field, enter conferencing.com.
Click the Allow button.
Click the OK button.
Click the Apply and the OK buttons in the Internet Options dialog box.
Close Internet Explorer for these settings to take effect.
Process is complete.
Note: These additional directions are for Internet Explorer 7 only and resolve an EzONE2go issue with uploading config files.
In Internet Explorer click Tools > Internet Options.
Click the Security tab.
Click Trusted Sites.
Click the Custom level... button.
Scroll down to ActiveX controls and plugins
Set Allow previously unused ActiveX controls to run without prompting to Enable
Set Allow Scriptlets to Enable.
Set Automatic prompting for Active X controls to Enable.
Set Binary and script behaviors to Enable.
Set Display video and animation on a webpage that does not use an external media player to Disable.
Set Download signed ActiveX controls to Enable.
Set Download unsigned ActiveX controls to Enable.
Set Initialize and script ActiveX controls not marked as safe for scripting to Enable.
Set Run ActiveX controls and plug-ins to Enable.
Set Script ActiveX controls marked safe for scripting to Enable.
Scroll down to Scripts section.
Set Active scripting to Enable.
Set Allow Programmatic clipboard access to Enable.
Allow status bar updates via script to Enable.
Allow websites to prompt for information using scripted windows to Enable.
Click OK from Security Setting - Trusted Sites Zone.
Click OK when prompted to accept the security settings.
Click OK from Internet Options.
Close Internet Explorer for these settings to take effect.
To find what version of Windows® you have installed on your machine, right click on My Computer on your desktop or click on Start > My Computer.

Right click on Properties. The System Properties dialog box appears. You are on the General tab.
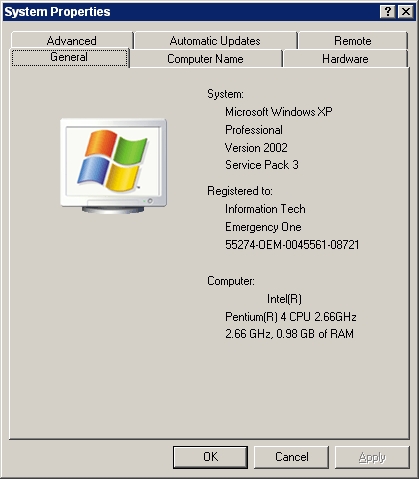
Make a note of the version of Windows® you have. Click the OK button.
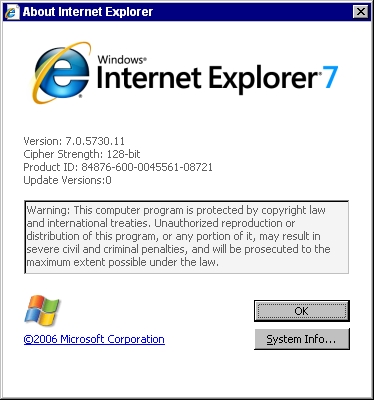
Open Internet Explorer®.
From the menu bar, click Help > About Internet Explorer.
Make a note of the version of Internet Explorer you have. Click the OK button.
Click Tools > Pop-up Blocker > Pop-up Blocker Settings. The Pop-up Blocker Settings dialog box appears.
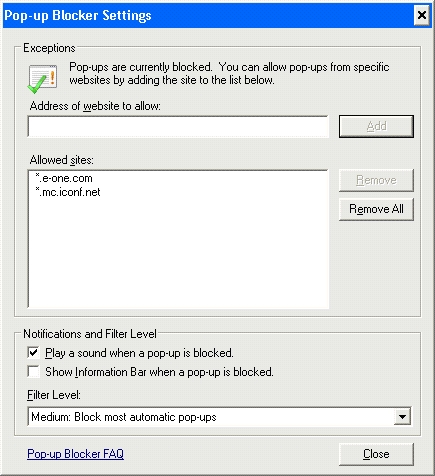
Uncheck the box marked 'Show Information Bar when a pop-up is blocked'.
Set the Filter Level: drop down list to 'Medium: Block most automatic pop-ups'.
Type *.conferencing.com in the 'Address of Web site to allow:' field.
Click the Add button.
Type *.e-one.com in the 'Address of Web site to allow:' field.
Click the Add button.
Type *.mc.iconf.net in the 'Address of Web site to allow:' field.
Click the Add button.
Click the Close button.
In Internet Explorer, click Tools > Internet Options > Security tab. The Internet Options dialog box appears and you are on the Security tab.

Click on the Internet icon to highlight it.
Click the Default Level button to set the Security Level to Medium.
Click on the Trusted sites icon to highlight it.
Click the Custom Level button. The Security Settings Trusted sites Zone dialog box appears.
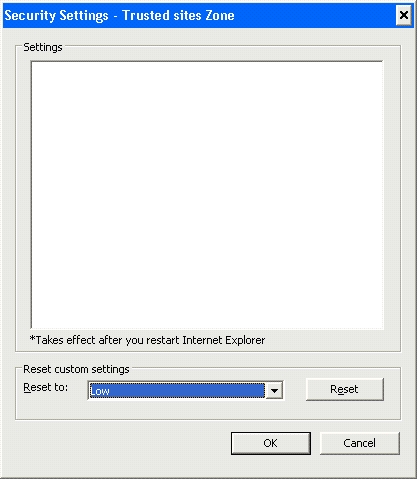
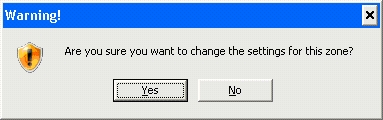
From the Reset to: drop down list, select Low and click the Reset button. The Warning! dialog box appears with the message Are you sure you want to change the settings for this zone?.
Click the Yes button.
Click the Sites... button. The Trusted sites dialog box appears.

Uncheck the box 'Require server verification (https:) for all sites in this zone'.
Type *.conferencing.com into the 'Add this Web site to the zone:' field.
Click the Add button.
Type *.e-one.com into the 'Add this Web site to the zone:' field.
Click the Add button.
Type *.mc.iconf.net into the 'Add this Web site to the zone:' field.
Click the Add button.
Click the OK button.
Click the Privacy tab in the Internet Options dialog box.
With your mouse move the slider to Medium.
Click the Sites button. The Per Site Privacy Actions dialog box appears.

In the Address of Web site: field, enter conferencing.com.
Click the Allow button.
In the Address of Web site: field, enter e-one.com.
Click the Allow button.
Click the OK button.
Note: These additional directions are for Internet Explorer 7 only and resolve an EzONE2go issue with uploading config files, otherwise skip to step 62.
Click the Security tab.
Click Trusted Sites.
Click the Custom level... button.
Scroll down to ActiveX controls and plugins
Set Allow previously unused ActiveX controls to run without prompting to Enable.
Set Allow Scriptlets to Enable.
Set Automatic prompting for Active X controls to Enable.
Set Binary and script behaviors to Enable.
Set Display video and animation on a webpage that does not use an external media player to Disable.
Set Download signed ActiveX controls to Enable.
Set Download unsigned ActiveX controls to Enable.
Set Initialize and script ActiveX controls not marked as safe for scripting to Enable.
Set Run ActiveX controls and plug-ins to Enable.
Set Script ActiveX controls marked safe for scripting to Enable.
Scroll down to Scripts section.
Set Active scripting to Enable.
Set Allow Programmatic clipboard access to Enable.
Allow status bar updates via script to Enable.
Allow websites to prompt for information using scripted windows to Enable.
Click OK from Security Setting - Trusted Sites Zone.
Click OK when prompted to accept the security settings.
Click the Apply and the OK buttons in the Internet Options dialog box.
Close Internet Explorer® for these settings to take effect.
EzONE Setup 1.0.54 - new users only
EzONE Setup will run/install the following files/programs for the Dealer Portal under Windows 2000, XP, or Vista:
Cincom 8.3.0.2905 Configurator Runtime Setup
Crystal Reports ActiveX Control Manual Install
Dealer Systems Registry Check
EzONE Local Catalog Setup 7-3-08
EzOne 2Go Setup
Java Runtime Environment (JRE) 6 Update 7
Latest .XRAs Installer 1.0.57 for Windows 2000, XP, and Vista
Spec Format Macros
Windows Script 5.7 for Windows 2000
Windows Script 5.7 for Windows XP
Log into the Dealer Portal.
Click the Info Library and Downloads tabs.
In the EzONE Setup section, click the EzONE setup link.
Click the Run or Open button.
Follow the system prompts.
If you have any problems and/or questions about this setup, call the Dealer Systems Support Group at (352) 861-6800. If you have a laptop, it is recommended to run this.
Individual installations
Note for new users: If you have already run the EzONE Setup from the Info Library / Downloads tab , then you wont need to run the individual programs listed below.
Log into the Dealer Portal.
Click the Info Library and Downloads tabs.
The Crystal Reports ActiveX Control Manual Install link will install the ActiveX control for the E-One Report Viewer. Some users may need to install this if the E-One Report Viewer doesn't display reports in its own window. Click the link to begin the install process. The File Download dialog box appears. Click the Run button to run the file.
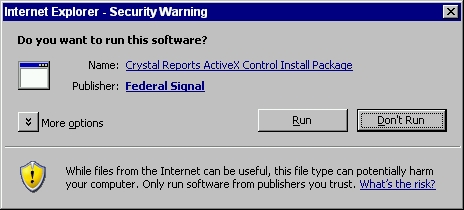
You will see this Internet Explorer - Security dialog box. Click the Run button to continue with the software installation.
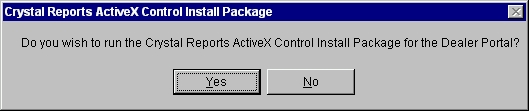
You will be prompted to install the Crystal Reports ActiveX Control Install Package. Click the Yes button to continue. You will see the InstallShield Wizard and the Command Prompt appear briefly and disappear. The software is installed.
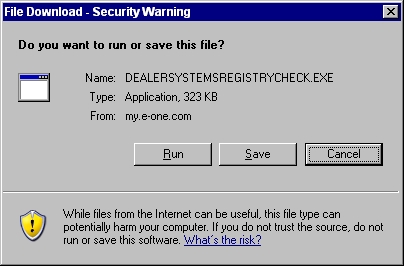
Clicking the Dealer Systems Registry Check link will do the following for Internet Explorer:
adds mc.iconf.net and e-one.com domain names to the Pop-Up Blocker Settings
sets the Internet Zone to Medium and the Trusted Sites Zone to Low
adds the e-one.com domain to the Per Site Privacy Actions
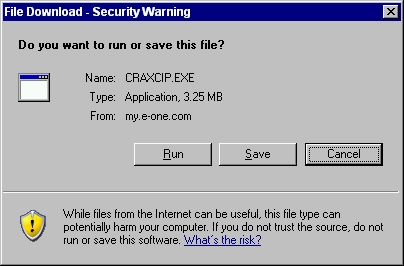
The File Download - Security Warning dialog box appears. Click the Run button.
An Internet Explorer - Security Warning dialog box appears. Click the Run button to continue.
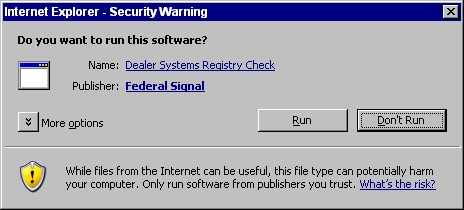
The Ez-ONE Registry Check Results dialog box appears. Click the Ok button.
Clicking the Cincom 8.3.0.2905 Configurator Runtime Setup link will manually install the Cincom® binaries so that the Tradition, Mainline, and ARFF Configurator windows will open successfully whenever any of these conditions are met:
Red wrench icon is clicked and a Product Line is selected for a new quote with no configuration
Red wrench icon is clicked for an existing quote with no configuration
Red wrench icon with an existing quote with a partial configuration such as a Mainline Product.
The green wrench icon is clicked on an existing quote with a complete configuration.
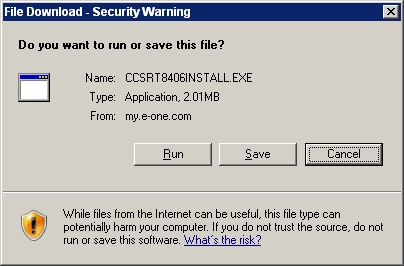
At the File Download - Security Warning dialog box, click the Run button.
Click the Run button when prompted by the Internet Explorer - Security Warning dialog box.
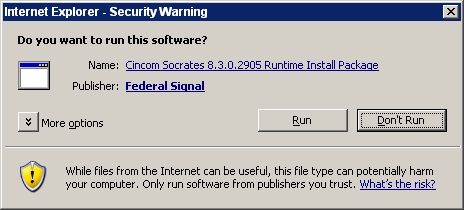
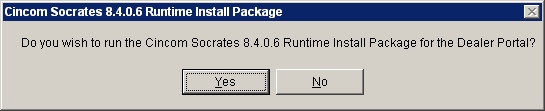
Click the Yes button when prompted to install the Cincom 8.3.0.29 Runtime Install Package for the Dealer Portal.
You will see the InstallShield Wizard and the Command Prompt appears briefly and then disappears. The software is installed.
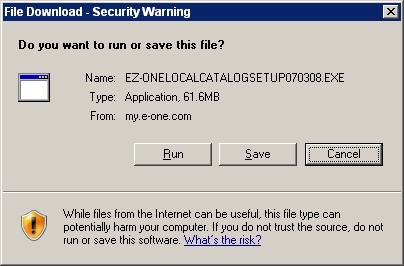
Click on the Ez-ONE Local Catalog Setup link to install the Product Catalog . The File Download - Security Warning dialog box appears. Click the Run button to install the software.
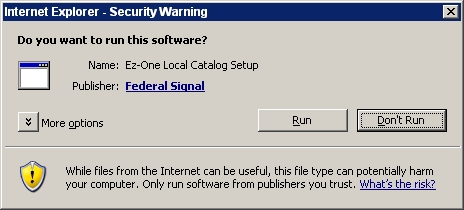
The Internet Explorer - Security Warning dialog box appears. Click the Run button to run the software.
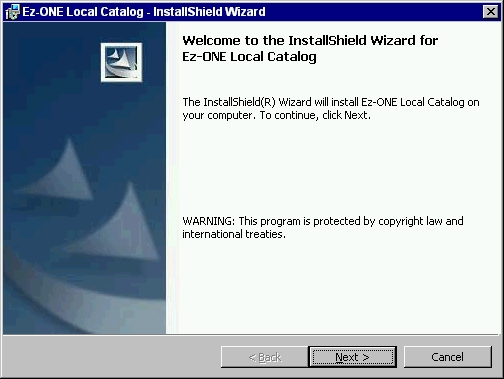
The InstallShield® Wizard appears. Click the Next button to continue the installation.
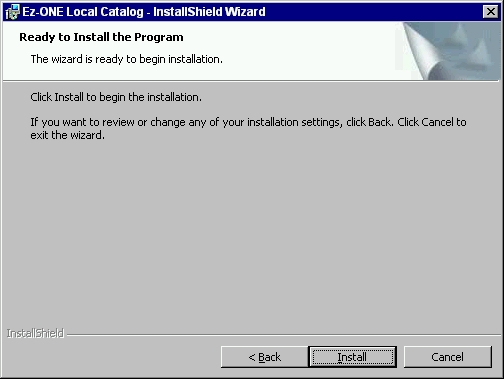
Click the Install button to begin the installation.
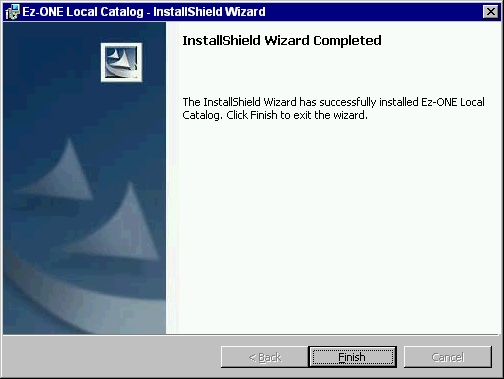
Click Finish to complete the installation and exit the wizard.
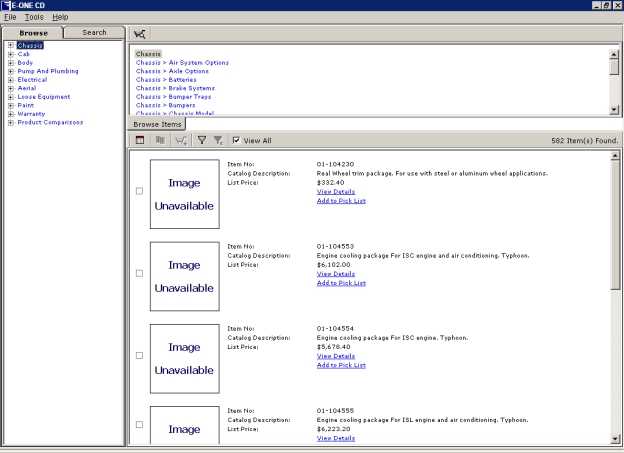
Double-click the Ez-ONE Local Catalog icon to run the Product Catalog. The E-ONE CD window appears.
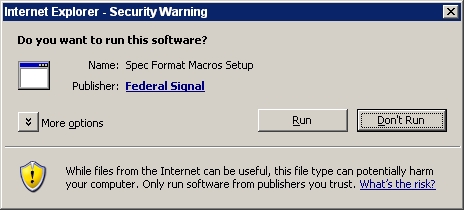
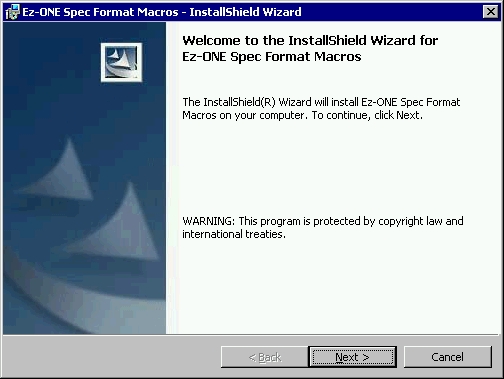
Click on the Spec Format Macros link to install the Ez-ONE Spec Format Macros in Word. The File Download - Security Warning dialog box appears. Click the Run button to run the file. This macro is for the Quick Specs section in the Reports tab of the quote window, that allows the user to generate a spec with a table of contents, page frames, bidder comply table, and boilerplates based on the selections made.

The Internet Explorer - Security Warning dialog box appears. Click the Run button to run the file.
The InstallShield® Wizard appears. Click the Next button to continue the installation.
Click the Install button to begin the installation.

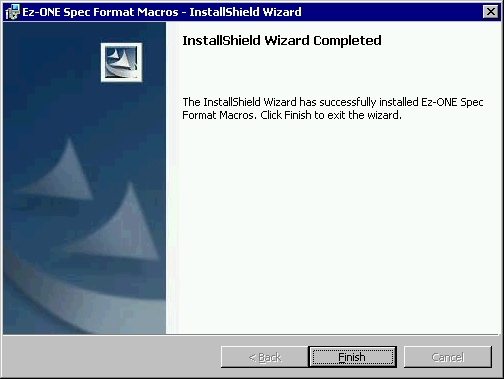
Click Finish to complete the installation and exit the wizard.
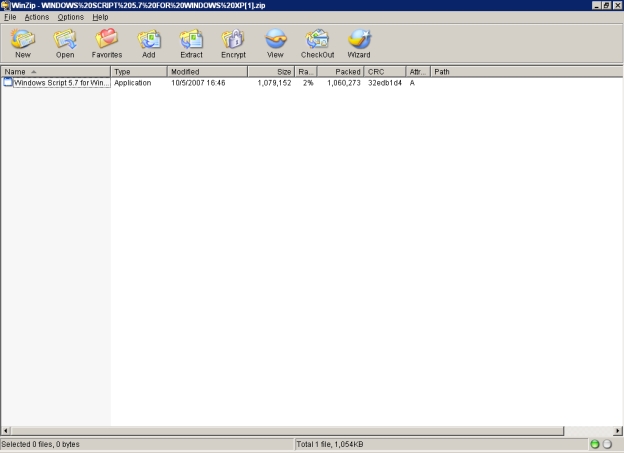
Click the Windows Script 5.7 link for Windows 2000 or XP to install the Windows Script Host. The File Download dialog box appears.
Note: Installing Windows Script 5.7 will resolve the Error: "ActiveX component can't create object" in either the Spec Format Macro or the Product Catalog.
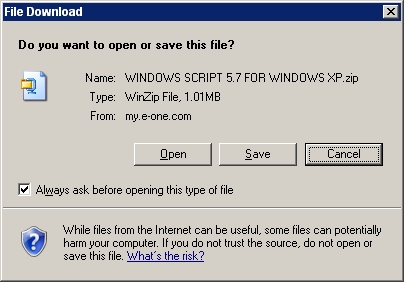
Click the Open button to open the .ZIP file. The WinZip window appears with the file Windows Script 5.7 for Windows 2000.exe or Windows Script 5.7 for Windows XP.exe displayed.
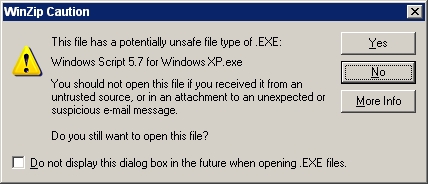
Double click the executable to install Windows Script Host. Click the Yes button to the WinZip Caution dialog box that appears.
Click the Yes button to the second WinZip Caution dialog box that appears.

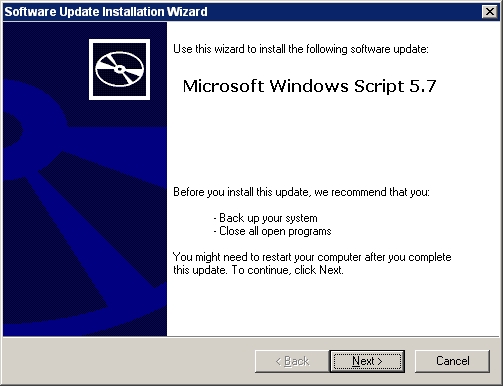
Click the Next button to the Software Update Installation Wizard dialog box that appears.
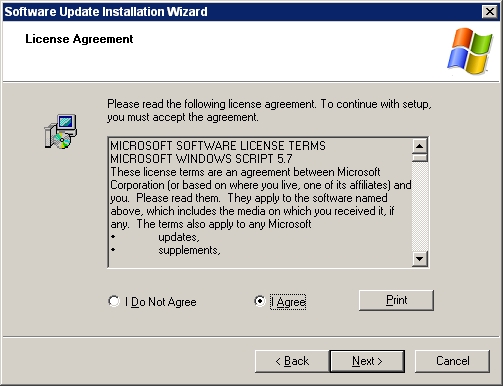
Click the I Agree radio button to accept the license agreement when the second Software Update Installation Wizard dialog box that appears. Click the Next button to continue.
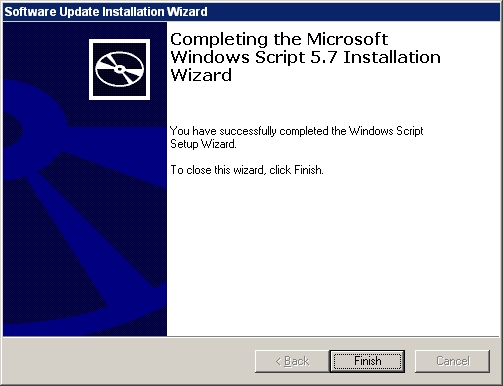
Click the Finish button to the Software Update Installation Wizard dialog box that appears.
You will be sent an e-mail with your credentials similar to the one below.
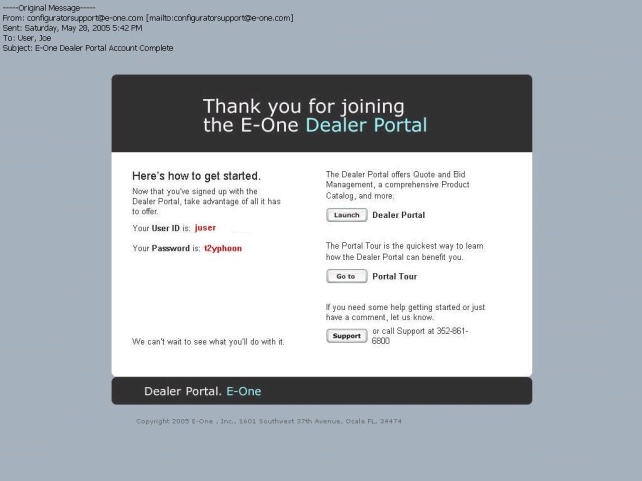
Make a note of your User ID and Password.
Click the Launch button to enter the Dealer Portal or
Click the Go to button to enter the Portal Tour or
Click the Support button if you need help in using the Dealer Portal.
Connect to the Internet from your Internet Service Provider (ISP).
Open Internet Explorer®.
In the Address bar type http://my.e-one.com and press the Enter key or click the Go button in Internet Explorer®. The E-ONE Central log in page for the E-ONE Dealer Portal appears. Optional: At this point, press Ctrl and the D key together to add the page to your bookmarks or Favorites.
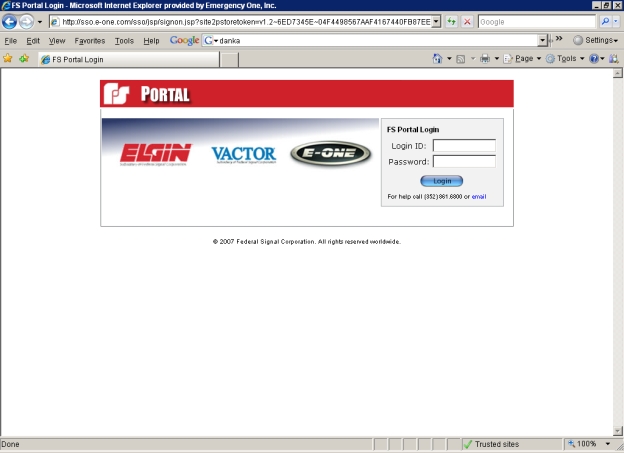
Log into the Dealer Portal using the User Name and Password assigned to you by your Dealer Portal Administrator and click the Log In button. The Dealer Portal appears.
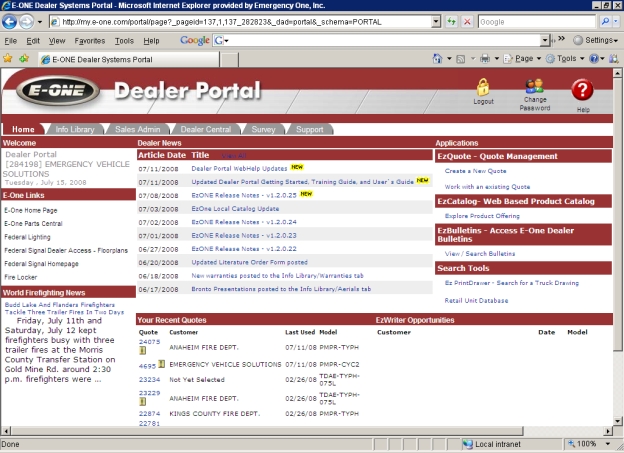
The Dealer Portal is divided into 6 sections called tabs:
Note: The tabs available to you will be based on your login - all users have access to Home, Info Library tab, Dealer Central, Survey, and Support.
The Home tab Displays the Home page and the Press Releases, Dealer News from E-ONE, Your Recent Quotes, and the E-ONE links. displays the Home page, Dealer News from E-ONE, Your Recent Quotes, and the E-ONE links.
Dealer News section: This area lists all of the recent news items that are posted every week to keep the dealers informed and updated about recent changes to the sales tool. Clicking on one of the links displays a new window with a description. Clicking on the View All link displays the E-ONE Dealer News window with all past new items posted. Clicking on a blue news article link displays the news item in a new window.
Applications section:
EzQuote - Quote Management section: This area allows a dealer to click on the one of the following links: Create a New Quote or Work with an existing Quote.
EzCatalog - Web Based Product Catalog section: This section allows a dealer to Explore Product Offering using the Product Catalog.
EzBulletins - Access E-One Dealer Bulletins: This section allows dealers to View / Search Bulletins.
Search Tools section: Access Ez-ONE Active Bid drawings from Search for a Truck Drawing and the Retail Unit Database.
World Fire Fighting News section: This area has news stories of fire fighting events from around the world through news feeds. Clicking on a blue link displays the article in a new window.
Your Recent Quotes section: This area displays up to the 10 most recent quotes that have been worked by the dealer. Each quote has a number assigned to it and may have a customer picked and/or a truck configured and a bid number associated with it. Clicking on the number link displays the quote window.
EzWriter Opportunities section: This area lists all the sales leads for the dealer when they successfully complete a configuration and submit it for a quote.
The Info Library tab displays the Info Library page. Here you will find these links on the Forms tab :
2007 Leasing Presentation
Dealer Portal Getting Started
These links are on the Info Library / Downloads tab :
Dealer Systems Registry Check
Ez-One 2 Go Setup 1.0.0.6
Java (TM) Runtime Environment 6 Update 7
Latest .XRAs Installer 1.0.61 for Windows 2000, XP, and Vista
Windows Script 5.7 for Windows 2000
Windows Script 5.7 for Windows XP Note: You must have WinZip installed to run this application.
Windows XP Style/Theme Manifest
Spec One Web Install June 15, 2008
Spec One Installation Instructions
EzONE Setup 1.0.62 New users only
The E-ONE Training Schedule appears on the Info Library / Training Tab.
These links are on the Info Library / Aerial Info tab Clicking this tab from the Info Library tab will display these links: E-One 95-Platform vs. Pierce Platforms, E-One HP75 Vs. Pierce 75 HAL, and Ground Ladder Storage Guide.:
Aerial White Paper
These links are on the Info Library / Pumper Info tab Clicking this tab from the Info Library tab will display these links: Aluminum Pumper Configuration Guide and Stainless Pumper Configuration Guide.:
These links are on the Info Library / Classic Fire tab This tab will display these links: FireRaider1 Configuration sheet, FireRaider2 Configuration sheet, and FireRaider3 Configuration sheet.:
FireRaider 3 Priced Order Form
FireRanger Fire Configuration sheet
FireRanger Mini Pumper Configuration sheet
FireRanger Mini Pumper Xtreme Configuration sheet
FireRanger Rescue Configuration sheet
FireRanger Rescue Raised Roof Configuration sheet
FireScout Configuration Sheet 1-11-06
FireTrooper Configuration sheet
These links are on the Info Library / ARFF tab Clicking this tab will display this link: ARFF Radio Survey.:
ARFF Radio Survey
These links are on the Info Library / Rescues tab Clicking this link will display these links: 2007 Rescue Sales Presentation, E-ONE HRT system presentation 03-07, Rescue Sales Presentation 03-07 Generator selection, and 2007 E-ONE Hybrid Energy - PowerPoint.:
2008 FDIC CommsONE Kiosk Presentation
2008 FDIC MCC Kiosk Presentation
These links are on the Info Library / Chassis tab Clicking this tab will display these links: Cummins ISC Spec Sheet, Cummins ISL Spec Sheet, Cummins ISM Spec Sheet, Cyclone 2 - 07 Cooled EGR ISM450, Cyclone 2 - 07 Cooled EGR ISM500 Trans Eng, Cyclone 2 - 07 ISL425 Certification, DDEC Engine Coolant Selections, DDEC Engines Lube Oil Fuel Requirements, DDEC Series 60 Limited Warranty, DDEC Series 60 Spec Sheet, MBE 900 Engine Brouchure, MBE 900 Limited Warranty, and Typhoon 07 ISL425 Certification.:
Cummins ISC Spec Sheet
Cummins ISL Spec Sheet
Cummins ISM Spec Sheet
Cyclone 2 - 07 Cooled EGR ISM450
Cyclone 2 - 07 Cooled EGR ISM500 Trans Eng
Cyclone 2 - 07 ISL425 Certification
DDEC Engine Coolant Selections
DDEC Engines Lube Oil Fuel Requirements
DDEC Series 60 Limited Warranty
DDEC Series 60 Spec Sheet
MBE 900 Engine Brouchure
MBE 900 Limited Warranty
Typhoon 07 ISL425 Certification
Crash Worthiness Test - Cyclone II Pics
Crash Worthiness Test - Cyclone II
Crash Worthiness Test - Typhoon Pics
Crash Worthiness Test - Typhoon
These links are on the Info Library / Service tab Clicking this tab will display these links: VIC Firmware Update 1.0.2515, Config.ini Extraction Procedure, Config Upload Procedure, Video Extraction Procedure, Video Deletion Procedure, and Manuals Upload Procedure.:
VIC Firmware Update 1.0.2823
Config.ini Extraction Procedure
Config Upload Procedure
Video Extraction Procedure
Video Deletion Procedure
Manuals Upload Procedure
VIC Manual 2008
These links are on the Info Library / Collateral / Sales Sheets tab:
50 ft Teleboom Sales Sheet
Bronto RLP Sales Sheet
Brush Truck Sales Sheet
Aerial Sales Presentation Template - PowerPoint
ARFF Sales Presentation Template - PowerPoint
Pumper Sales Presentation Template - PowerPoint
Quick Attack Sales Presentation Template - PowerPoint
Rescue Sales Presentation Template - PowerPoint
Tanker Sales Presentation Template - PowerPoint
Tradition Sales Presentation Template - PowerPoint
These links are on the Info Library / Collateral / Brochures tab Located on the Info Library / Collateral tab Clicking this tab will display these links: 50 ft Teleboom Sales Sheet, Bronto RLP Sales Sheet, Brush Truck Sales Sheet, Aerial Sales Presentation Template - PowerPoint, ARFF Sales Presentation Template - PowerPoint, Pumper Sales Presentation Template - PowerPoint, Quick Attack Sales Presentation Template - PowerPoint, Rescue Sales Presentation Template - PowerPoint, Tanker Sales Presentation Template - PowerPoint, Tradition Sales Presentation Template - PowerPoint, Crash Worthiness Test - Cyclone II Pics, Crash Worthiness Test - Cyclone II, Crash Worthiness Test - Typhoon Pics, and Crash Worthiness Test - Typhoon.: The links displayed are E-ONE Training Guide Brochure and Product Guide.Collateral tab : The links displayed are E-ONE Training Guide Brochure and Product Guide.Collateral tab : The links displayed are E-ONE Training Guide Brochure and Product Guide.Collateral tab : The links displayed are E-ONE Training Guide Brochure and Product Guide.Collateral tab : The links displayed are E-ONE Training Guide Brochure and Product Guide.Collateral tab : The links displayed are E-ONE Training Guide Brochure and Product Guide.Collateral tab : The links displayed are E-ONE Training Guide Brochure and Product Guide.Collateral tab : The links displayed are E-ONE Training Guide Brochure and Product Guide.Collateral tab : The links displayed are E-ONE Training Guide Brochure and Product Guide.Collateral tab : The links displayed are E-ONE Training Guide Brochure and Product Guide.Collateral tab : The links displayed are E-ONE Training Guide Brochure and Product Guide.Collateral tab : The links displayed are E-ONE Training Guide Brochure and Product Guide.Collateral tab : The links displayed are E-ONE Training Guide Brochure and Product Guide.Collateral tab : The links displayed are E-ONE Training Guide Brochure and Product Guide.Collateral tab : The links displayed are E-ONE Training Guide Brochure and Product Guide.Collateral tab : The links displayed are E-ONE Training Guide Brochure and Product Guide.Collateral tab : The links displayed are E-ONE Training Guide Brochure and Product Guide.Collateral tab : The links displayed are E-ONE Training Guide Brochure and Product Guide.Collateral tab : The links displayed are E-ONE Training Guide Brochure and Product Guide.Collateral tab : The links displayed are E-ONE Training Guide Brochure and Product Guide.Collateral tab : The links displayed are E-ONE Training Guide Brochure and Product Guide.Collateral tab : The links displayed are E-ONE Training Guide Brochure and Product Guide.:
E-ONE Training Guide Brochure
Product Guide
The Info Library / Collateral /Ads and Signs tab This tab contain these tabs: Advertisements, Banner Designs, Direct Mail Designs, E-ONE Logos. contain these tabs:
Advertisements
Banner Designs
Direct Mail Designs
E-ONE Logos
These links are on the Info Library / Warranties tab Clicking on this tab will display the current warranties.:
1 Year Standard
10 Year Structural
10 Year Limited Paint
15 Year Stainless Structural
20 Year Structural Warranty
Lifetime Frame
Stainless Steel Plumbing 10 Year
Warranties
The Sales Admin tab Displays the Sales Admin page and Settings, User Administration Management, Access Dealer Quotes (All Reps), and Template Management sections. This tab is for Sales Administration only. is for Sales Administration only. On this tab is the Admin Menu tab with these items as follows:
Settings and Dealer Default Settings link
User Administration Management and Maintain Dealership Users link
Access Dealer Quotes (All Reps) and Retrieve any Dealership Quote link
Manage Dealer Addon Items and Maintain (Add and Edit) your dealer addon database link
View Print Sales Order and View Print Sales Order (EzONE Only) link
Spec Management and Edit Specification Print Sort Order link
Template Management and Management Dealership Templates link
Pricebook Report and View / Print / Export EzONE Pricebook by model link
Also available is the Reports tab.
The Internal Admin tab Displays the News Editor page and the Portal News Editor News entries can be viewed, edited and posted to the Dealer Portal, similar to a word processor. The editor is available from the Internal Admin and News Editor tabs. Dealer Porta A Web based server application that runs in Microsoft® Internet Explorer® utilizing Web services on the Internet. This application improves and simplifies your sales process.l, similar to a word processor. The editor is available from the Internal Admin and News Editor tabs. Dealer Porta A Web based server application that runs in Microsoft® Internet Explorer® utilizing Web services on the Internet. This application improves and simplifies your sales process.l, similar to a word processor. The editor is available from the Internal Admin and News Editor tabs. Dealer Porta A Web based server application that runs in Microsoft® Internet Explorer® utilizing Web services on the Internet. This application improves and simplifies your sales process.l, similar to a word processor. The editor is available from the Internal Admin and News Editor tabs. Dealer Porta A Web based server application that runs in Microsoft® Internet Explorer® utilizing Web services on the Internet. This application improves and simplifies your sales process.l, similar to a word processor. The editor is available from the Internal Admin and News Editor tabs. Dealer Porta A Web based server application that runs in Microsoft® Internet Explorer® utilizing Web services on the Internet. This application improves and simplifies your sales process.l, similar to a word processor. The editor is available from the Internal Admin and News Editor tabs.. This tab is for Internal Administration only.Portal News Editor . This tab is for Internal Administration only.Portal News Editor . This tab is for Internal Administration only.Portal News Editor . This tab is for Internal Administration only.Portal News Editor . This tab is for Internal Administration only.Portal News Editor . This tab is for Internal Administration only.Portal News Editor . This tab is for Internal Administration only.Portal News Editor . This tab is for Internal Administration only.Portal News Editor . This tab is for Internal Administration only.Portal News Editor . This tab is for Internal Administration only.Portal News Editor . This tab is for Internal Administration only.Portal News Editor . This tab is for Internal Administration only.Portal News Editor . This tab is for Internal Administration only.Portal News Editor . This tab is for Internal Administration only.Portal News Editor . This tab is for Internal Administration only.Portal News Editor . This tab is for Internal Administration only.Portal News Editor . This tab is for Internal Administration only.Portal News Editor . This tab is for Internal Administration only.Portal News Editor . This tab is for Internal Administration only.Portal News Editor . This tab is for Internal Administration only. is for Internal Administration only. It displays these links on the Applications tab:
Access and View Quote Activity and Detail
View Print Sales Order (EzONE Only)
View/Print/Export EzONE Pricebook by model
Template Trucks Administration
On the News Editor tab is the Portal News Editor link.
The Dealer Central tab is for the dealers to obtain information on trucks that are available for purchase.
General Info tab - Contains an updated Dealer Directory, that is sent out via e-mail, E-ONE Firelocker, and Sigma Marketing for E-ONE.
The Survey tab This tab has Rescue Product survey. has a EzDraw survey.
The Support tab Displays the Support page and the Issues and Enhancements section. Feel free to e-mail or call us if you have problems and/or questions with the Dealer Portal. E-mail: configuratorsupport@e-one.com. Phone: 352-861-6800 displays the Support page. Feel free to e-mail or call us if you have problems and/or questions with the Dealer Portal. The Issues and Enhancements section is for dealers to send their issues, enhancements, and comments to the Dealer Systems Support Group.
To log out of the Dealer Portal, click the gold lock icon or Logout icon. You will be redirected back to the E-ONE Central Login.

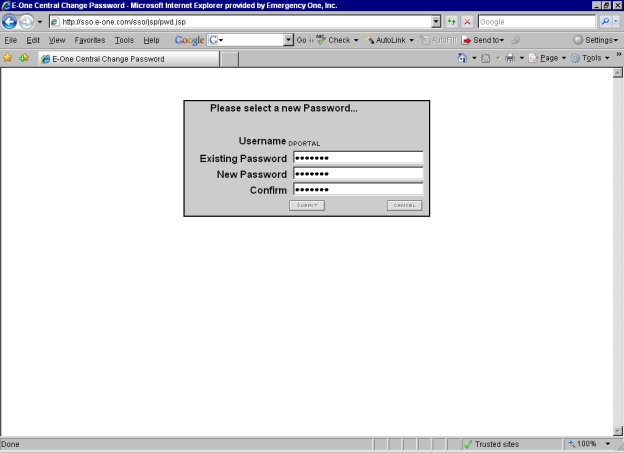
To change your password, click the people icon or Change Password icon.
Note: Once you receive the e-mail confirmation after joining the E-ONE Dealer Portal, your password will be valid for 59 days and will expire on the 60th day. Please change it as soon as you log in. This will change the maximum password age from 60 days to 3000 days and will prevent your password from expiring and locking you out of the Dealer Portal.

The E-ONE Central Change Password page appears. Enter your old password once, new password twice, and click the Submit button. Your password is changed and you are brought back to the Dealer Portal.
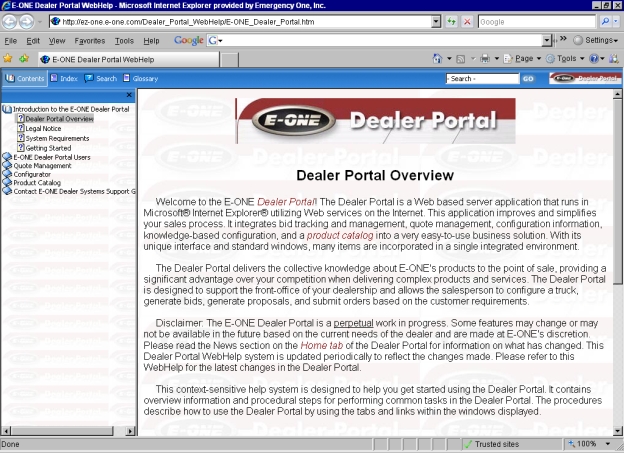
To access the E-ONE Dealer Portal WebHelp, click the red button with the white question mark icon labeled Help. The E-ONE Dealer Portal WebHelp appears in a new window.
Note: Utilize the online WebHelp system as your first resource for questions and answers.

If you have any questions and/or problems with these procedures, please call the Dealer Systems Support Group at (352) 861-6800 or e-mail configuratorsupport@federalsignal.com or use the Issues and Enhancements section on the Support tab.
Related topics:
Contact E-ONE Dealer Systems Support Group