This section covers the following:
Taking Ownership of a Quote Sales Administrators Only
Giving Ownership of a Quote Sales Administrators Only
Request Drawing aka Ez-Draw Ez-Draw is an online drawing generator that can be used to produce conceptual bid drawings based on your Ez-ONE quotations.
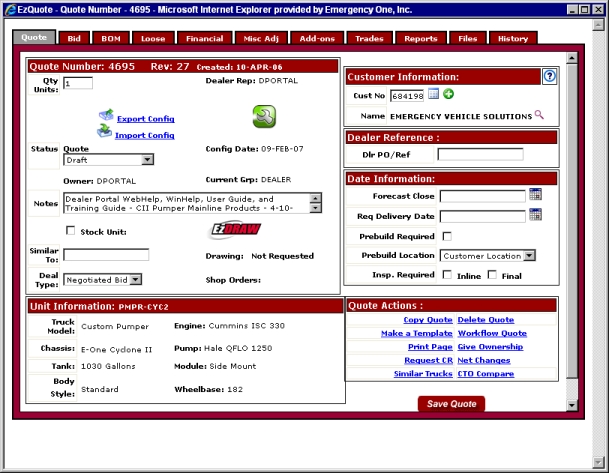
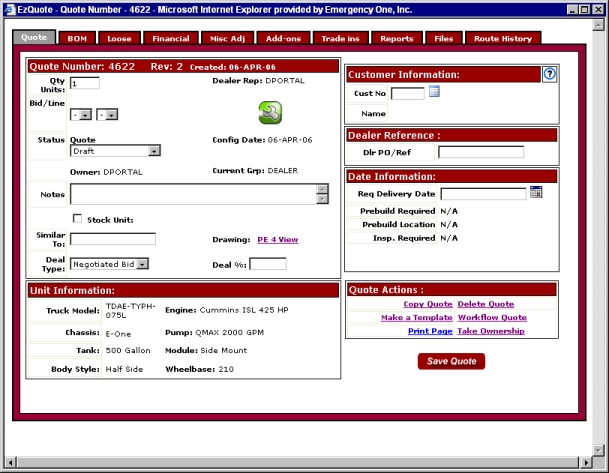
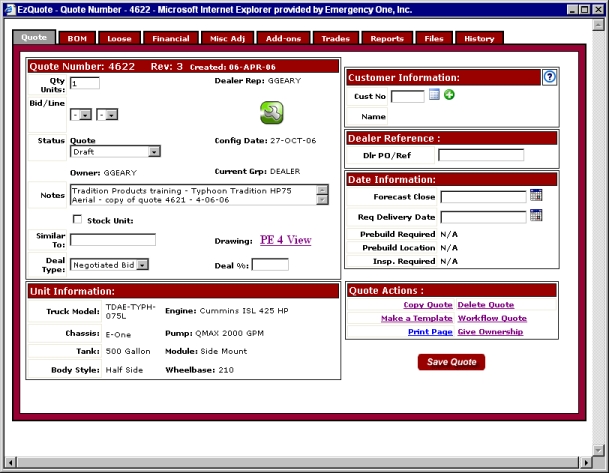
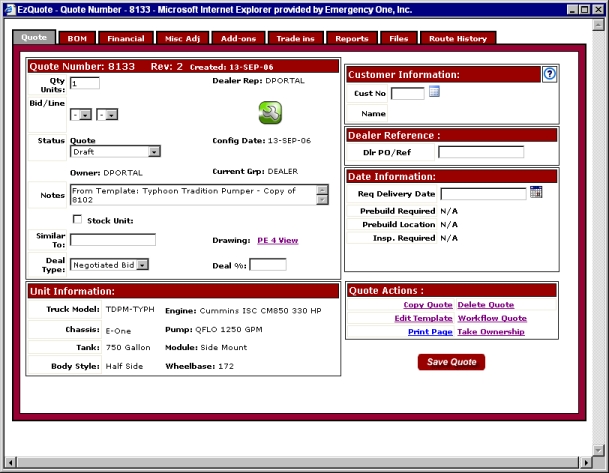
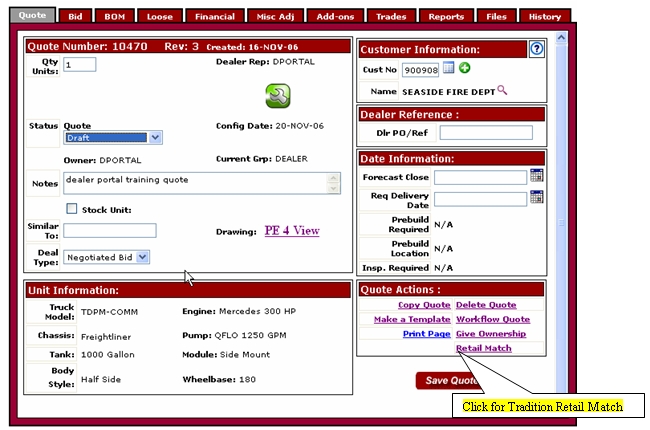
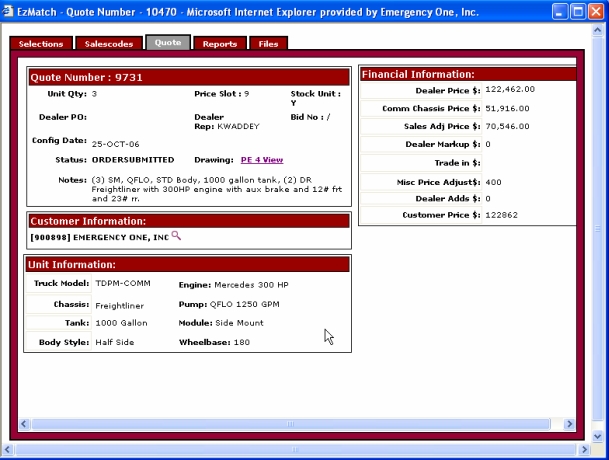
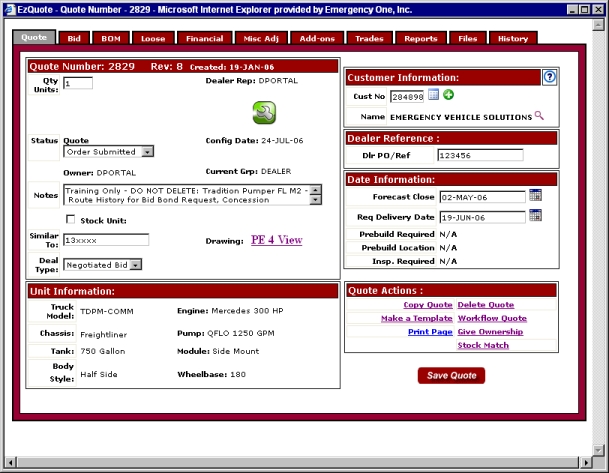
On the Quote tab there are six sections, Quote Number:, Customer Information:, Dealer Reference:, Date Information:, Unit Information:, and Quote Actions:. At any point during the creation of the quote, feel free to click the Save Quote button.
After a truck has been configured in the Configurator Creates a new configuration from a new quote. Creates a new configuration from a new quote., the Quote tab will display the Quote Number, Revision Number, Date Created, Unit Information, Customer Information, Dealer Reference, Date Information, and Quote Actions. Note that the red icon with the wrench has turned green meaning a truck has been configured in the Configurator Creates a new configuration from a new quote..

The Quote Number: section displays eight fields, three drop down lists, a check box and a link.
Qty Units: field: Displays how many units are on this quote.
Dealer Rep: field: The salesperson who generated the quote.
Status Quote drop down list: Displays the current status of the quote as either Inactive, Draft, CR Pending, Bid Review, Customer Submit, Cust Approved, or Order Submitted.
Config Date: field: The date the configuration was created.
Owner: : Who currently owns the quote.
Current Grp: field: The current group that has the quote usually Dealer, Sales Administration, or Internal.
Notes field: Enter any notes that you feel are necessary for the quote here.
Stock Unit: check box: Check this box if the apparatus is a stock unit.
Similar To: field: Enter information if the apparatus is similar to another model. e.g. past Shop Order number
Deal Type: drop down list: Select from the following: Negotiated Bid, No Bid, or Contract.
Deal %: field: Deal percentage.
Drawing: A Mainline quote will have the Ez-Draw logo displayed.
Shop Orders: field: The shop order will appear after a quote has been workflowed back from Order Entry The final step in the Workflow Workflow is the electronic method used to send a quote for a bid bond request, concession request and/or as an order to the appropriate group. This will speed up the turnaround time for requests on quotes. process.Workflow process.Workflow process.Workflow process.Workflow process.Workflow process.Workflow process.Workflow process.Workflow process.Workflow process.Workflow process.Workflow process.Workflow process.Workflow process.Workflow process.Workflow process.Workflow process.Workflow process.Workflow process.Workflow process.Workflow process.Workflow process.Workflow process.Workflow process.Workflow process..
The Unit Information: section consists of eight fields.
Truck Model: Displays the model in the quote.
Engine: The type of engine, including make, model, and horsepower.
Chassis: Make of chassis.
Pump: Make of pump and gallons per minute.
Tank: Size of tank.
Module: The type of pump module, usually Top Mount or Side Mount.
Body Style: The type of body style.
Wheelbase: The measurement in inches from the center of the front wheel hub to the center of the rear wheel hub. A longer wheelbase results in a smoother ride.
The green cross icon or Add/Edit Customer icon when clicked will display the Customer Information Request window. Select Customer Status and Department Type from their respective fields. Next, fill in the yellow fields and also the fields marked with an asterisk (*). Finally, click the Submit Email button to send the form or click the Reset Form button to clear all the fields and start over.
Each text field has a number beside it indicating how many characters the field will hold. E.g. The Name field will allow only 35 characters.
Note: Request your new customers or update your existing customers early. Do not wait until it is time to Workflow your order.

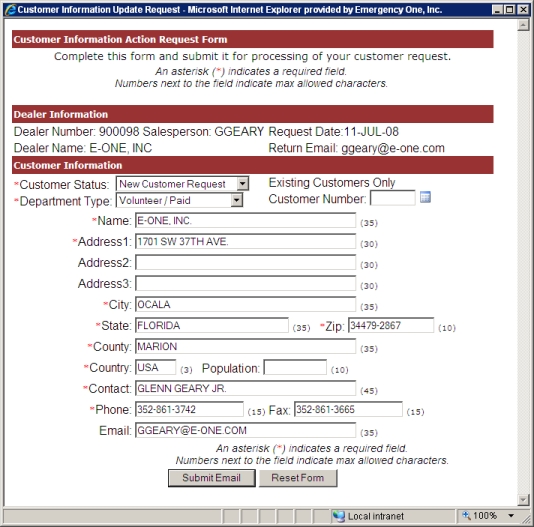
If you select a customer and then realize that you chose the wrong one, selecting a new customer does not clear the form before attempting to re-populate the form with new information. Click the Reset Form button before you change customers and the form will clear itself.
Once you click the Submit Email button, the Customer Information Update window appears. Click the Send Now button to send the form or Cancel to cancel the request.
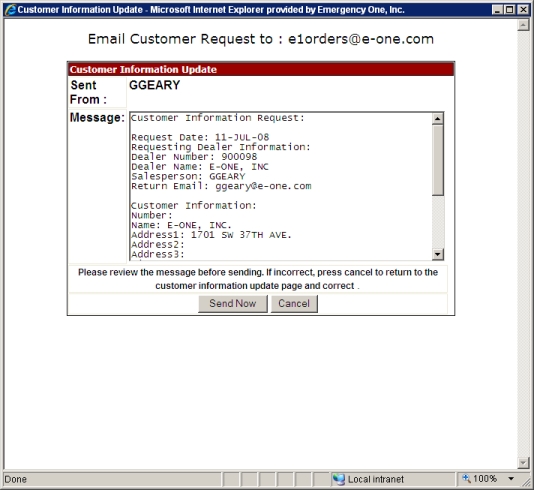
After you click the Send Now button, a message will appear stating that the request has been sent. Click the Close Page button to close the window. You will receive an e-mail that your request has been processed.

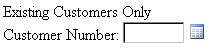
You can also click the Select Customer icon from the Customer Information Update Request window to bring up the Customer Retrieval window This window is displayed when the Selected Customer icon is clicked. This window is displayed when the Selected Customer icon is clicked. and select your customer from the list. This will populate the fields and you can update the customer information in this way before submitting it.
The Customer Information: section consists of the Customer Number field, Select Customer icon, Name field, and Help icon Click this Question mark icon to get help from the Dealer Portal A Web based server application that runs in Microsoft® Internet Explorer® utilizing Web services on the Internet. This application improves and simplifies your sales process. WebHelp. A help window will appear.Dealer Portal WebHelp. A help window will appear.Dealer Portal WebHelp. A help window will appear..
Customer Number field: Displays the customer number selected from the Customer Retrieval window
The Select Customer icon when clicked will display the Customer Retrieval window .

Name field: Displays the name of the customer selected from the Customer Retrieval window .
Help icon Click this Question mark icon to get help from the Dealer Portal WebHelp. A help window will appear.Dealer Portal WebHelp. A help window will appear.Dealer Portal WebHelp. A help window will appear.Dealer Portal WebHelp. A help window will appear.Dealer Portal WebHelp. A help window will appear.Dealer Portal WebHelp. A help window will appear.Dealer Portal WebHelp. A help window will appear.Dealer Portal WebHelp. A help window will appear.Dealer Portal WebHelp. A help window will appear.Dealer Portal WebHelp. A help window will appear.Dealer Portal WebHelp. A help window will appear.Dealer Portal WebHelp. A help window will appear.Dealer Portal WebHelp. A help window will appear.Dealer Portal WebHelp. A help window will appear.Dealer Portal WebHelp. A help window will appear.Dealer Portal WebHelp. A help window will appear.Dealer Portal WebHelp. A help window will appear.Dealer Portal WebHelp. A help window will appear.Dealer Portal WebHelp. A help window will appear.Dealer Portal WebHelp. A help window will appear.Dealer Portal WebHelp. A help window will appear.Dealer Portal WebHelp. A help window will appear.Dealer Portal WebHelp. A help window will appear.Dealer Portal WebHelp. A help window will appear.Dealer Portal WebHelp. A help window will appear.Dealer Portal WebHelp. A help window will appear.Dealer Portal WebHelp. A help window will appear.Dealer Portal WebHelp. A help window will appear.Dealer Portal WebHelp. A help window will appear.Dealer Portal WebHelp. A help window will appear.Dealer Portal WebHelp. A help window will appear.Dealer Portal WebHelp. A help window will appear.Dealer Portal WebHelp. A help window will appear.Dealer Portal WebHelp. A help window will appear.Dealer Portal WebHelp. A help window will appear.Dealer Portal WebHelp. A help window will appear.Dealer Portal WebHelp. A help window will appear.Dealer Portal WebHelp. A help window will appear.Dealer Portal WebHelp. A help window will appear.Dealer Portal WebHelp. A help window will appear.Dealer Portal WebHelp. A help window will appear.Dealer Portal WebHelp. A help window will appear.Dealer Portal WebHelp. A help window will appear.Dealer Portal WebHelp. A help window will appear.Dealer Portal WebHelp. A help window will appear.Dealer Portal WebHelp. A help window will appear.Dealer Portal WebHelp. A help window will appear.Dealer Portal WebHelp. A help window will appear.Dealer Portal WebHelp. A help window will appear.Dealer Portal WebHelp. A help window will appear.Dealer Portal WebHelp. A help window will appear.Dealer Portal WebHelp. A help window will appear.Dealer Portal WebHelp. A help window will appear.Dealer Portal WebHelp. A help window will appear.Dealer Portal WebHelp. A help window will appear.Dealer Portal WebHelp. A help window will appear.Dealer Portal WebHelp. A help window will appear.Dealer Portal WebHelp. A help window will appear.Dealer Portal WebHelp. A help window will appear.Dealer Portal WebHelp. A help window will appear.Dealer Portal WebHelp. A help window will appear.Dealer Portal WebHelp. A help window will appear.Dealer Portal WebHelp. A help window will appear.appear. Dealer Portal A Web based server application that runs in Microsoft® Internet Explorer® utilizing Web services on the Internet. This application improves and simplifies your sales process. WebHelp. A help window will appear.Dealer Portal WebHelp. A help window will appear.Dealer Portal WebHelp. A help window will appear.Dealer Portal WebHelp. A help window will appear.Dealer Portal WebHelp. A help window will appear.Dealer Portal WebHelp. A help window will appear.Dealer Portal WebHelp. A help window will appear.Dealer Portal WebHelp. A help window will appear.Dealer Portal WebHelp. A help window will appear.Dealer Portal WebHelp. A help window will appear.Dealer Portal WebHelp. A help window will appear.Dealer Portal WebHelp. A help window will appear.Dealer Portal WebHelp. A help window will appear.Dealer Portal WebHelp. A help window will appear.Dealer Portal WebHelp. A help window will appear. Dealer Portal WebHelp. A help window will appear. Dealer Portal WebHelp. A help window will appear. Dealer Portal WebHelp. A help window will appear. Dealer Portal WebHelp. A help window will appear. Dealer Portal WebHelp. A help window will appear. Dealer Portal WebHelp. A help window will appear.: Click the Question mark or Help icon to get help from the Dealer Portal WebHelp. A help window will appear.

The Customer Retrieval window is displayed when the Selected Customer icon is clicked and consists of a search field, the search results, and two buttons; Search and Show all.
Search button: Enter the customer's name and click this button. The results will look similar to the screen shot below.
Show all button: When this button is clicked, a % is entered automatically in the search field and all possible results are displayed.
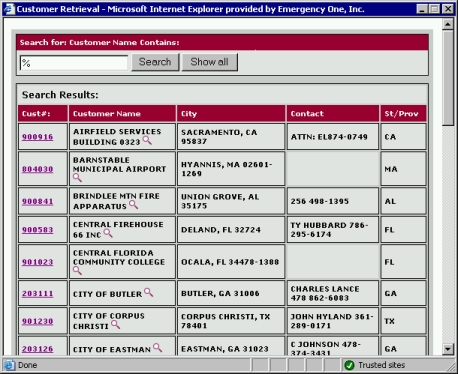
Search results: displays the following information in a table, Cust #, Customer Name, City, Contact, and St/Prov.
Cust #: This is the customer number link for the dealer and if clicked on will insert the customer number and customer into the Cust No and Name fields respectively on the quote.
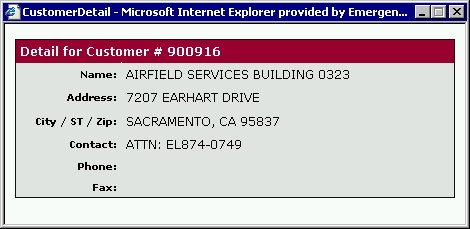
Customer Name: Displays the name of the customer and also has a magnifying glass icon called Detail Customer Info.

Detail Customer Info: This magnifying glass icon when clicked on will display a CustomerDetail window with more information about the customer. Click on the 'X' in the upper right corner of the CustomerDetail window to close it.
City: Displays what city, state, and zip code the customer is located in.
Contact: The contact person and phone number of the customer.
St/Prov.: The state or province of the customer.
The Dealer Reference section contains the Dlr / PO Ref field.
Dlr / PO Ref: Enter the Dealer Reference information here.
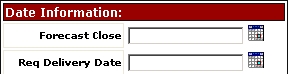
Date Information: section contains the Forecast Close and Req Deliver Date fields and a calendar icon or Request Delivery Date icon, Prebuild Required checkbox, Prebuild Location, and Insp. Required field with the Inline and Final check boxes.
Forecast Close: Displays the forecast close date.
Req Delivery Date: Displays the required delivery date of the apparatus.
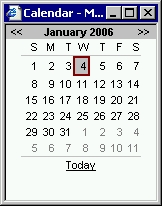
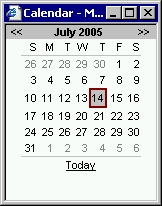
Request Delivery Date icon: When this icon is clicked on a window is displayed with a calendar and highlighted date. Click the << to decrease the months or click the >> to increase the months. If you click on a day, the window will disappear and the Req Deliver Date field will insert the date you selected in this format: 15-JUN-05. Note: You must click the icon to insert the date in the field.
Prebuild required check box: Check this box if you want a Prebuild Conference to take place.
Prebuild Location: Select None Needed if none is required, Ocala FL USA for Ocala, FL, Red Deer ON CAN, Customer Location, or Dealer Location.
Insp. Required: Check the Inline check box if you want an Inline inspection. Check the Final check box if you want a Final Inspection.
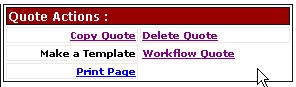
The Quote Actions section contains four links and one button.
Copy Quote link: To make a copy of the quote, click this link and the Copy Quote window will appear. Click the Go to Quote Now button When this button is clicked the EzQuote window appears and you are on the Quote tab.Quote tab Displays the Quote Number:, Unit Information:, Customer Information:, Dealer Reference:, Date Information: and Quote Actions: sections on the quote window..Quote tab .Quote tab .Quote tab .Quote tab .Quote tab .Quote tab .Quote tab .Quote tab .Quote tab .Quote tab .Quote tab .Quote tab .Quote tab .Quote tab .Quote tab .Quote tab . EzQuote window Displays the Quote Number:, Unit Information:, Customer Information:, Dealer Reference:, Date Information: and Quote Actions: sections. appears and you are on the Quote tab .EzQuote window appears and you are on the Quote tab .EzQuote window appears and you are on the Quote tab .EzQuote window appears and you are on the Quote tab .EzQuote window appears and you are on the Quote tab .EzQuote window appears and you are on the Quote tab .EzQuote window appears and you are on the Quote tab .EzQuote window appears and you are on the Quote tab .EzQuote window appears and you are on the Quote tab .EzQuote window appears and you are on the Quote tab .EzQuote window appears and you are on the Quote tab .EzQuote window appears and you are on the Quote tab .EzQuote window appears and you are on the Quote tab .EzQuote window appears and you are on the Quote tab .EzQuote window appears and you are on the Quote tab .EzQuote window appears and you are on the Quote tab .EzQuote window appears and you are on the Quote tab .EzQuote window appears and you are on the Quote tab .EzQuote window appears and you are on the Quote tab .EzQuote window appears and you are on the Quote tab .EzQuote window appears and you are on the Quote tab .EzQuote window appears and you are on the Quote tab .EzQuote window appears and you are on the Quote tab .EzQuote window appears and you are on the Quote tab .EzQuote window appears and you are on the Quote tab .EzQuote window appears and you are on the Quote tab .EzQuote window appears and you are on the Quote tab .EzQuote window appears and you are on the Quote tab .EzQuote window appears and you are on the Quote tab .EzQuote window appears and you are on the Quote tab .EzQuote window appears and you are on the Quote tab .EzQuote window appears and you are on the Quote tab .EzQuote window appears and you are on the Quote tab .EzQuote window appears and you are on the Quote tab .EzQuote window appears and you are on the Quote tab .EzQuote window appears and you are on the Quote tab .EzQuote window appears and you are on the Quote tab .EzQuote window appears and you are on the Quote tab .EzQuote window appears and you are on the Quote tab .EzQuote window appears and you are on the Quote tab .EzQuote window appears and you are on the Quote tab .EzQuote window appears and you are on the Quote tab .EzQuote window appears and you are on the Quote tab .EzQuote window appears and you are on the Quote tab .EzQuote window appears and you are on the Quote tab .EzQuote window appears and you are on the Quote tab .EzQuote window appears and you are on the Quote tab .EzQuote window appears and you are on the Quote tab .EzQuote window Displays the Quote Number:, Unit Information:, Customer Information:, Dealer Reference:, Date Information: and Quote Actions: sections. appears and you are on the Quote tab Displays the Quote Number:, Unit Information:, Customer Information:, Dealer Reference:, Date Information: and Quote Actions: sections on the quote window Displays the Quote Number:, Unit Information:, Customer Information:, Dealer Reference:, Date Information: and Quote Actions: sections. ..EzQuote window window appears and you are on the Quote tab .EzQuote window window appears and you are on the Quote tab .EzQuote window window appears and you are on the Quote tab .EzQuote window window appears and you are on the Quote tab .EzQuote window window appears and you are on the Quote tab. to access the copy made.
Note: A new quote number will be assigned and the configuration will be retained. First, the red wrench icon will need to be clicked to enter the Configurator. Next, Configure each of the modules by clicking on one of the buttons and click the Apply and Exit button. Then, click the Save and Exit button from the Mainline Configurator. Finally, the Configurator window will disappear and the red wrench icon turns green on the quote window that validates a configured truck. Click the Save Quote button to save the quote.

Click the Sales Admin tab Displays the Sales Admin page and Settings, User Administration Management, Access Dealer Quotes (All Reps), and Template Management sections. This tab is for Sales Administration only. on the Dealer Portal page.
Click the Retrieve Any Dealership Quote link. The Quote Retrieval window appears.
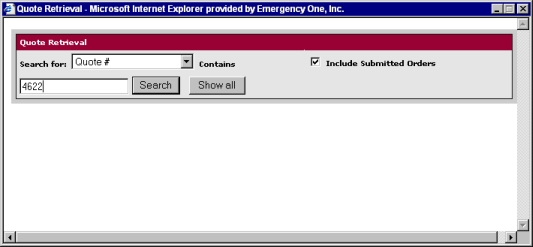
From the Search For: field select Quote # or Dealer Rep.
Enter the quote number or Sales Rep Username in the search field and click the Search button or enter nothing and click the Search All button. The Search Results: table appears.
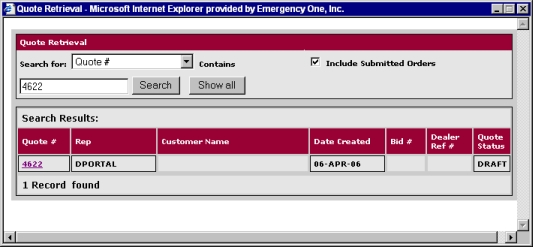
Click the Quote number link and the Quote window appears.
On the Quote tab, in the Quote Actions section, click the Take Ownership link. The Take Ownership window appears.
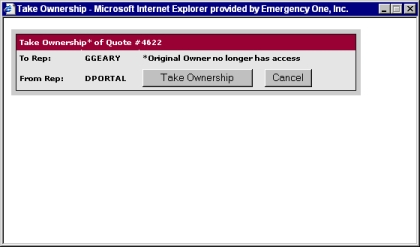
The To Rep: field is populated with the Sales Admin`s Username and the From Rep: field is populated with the Sales Rep`s Username.
Click the Take Ownership button to take ownership of the quote or click the Cancel button and close the window.
The Owner: field, above the Notes field on the Quote tab of the quote window, now has the Sales Admin`s Username and has ownership of the quote.
Keep in mind that once the Take Ownership button is clicked, the quote remains with the Sales Admin.
Click the Sales Admin tab Displays the Sales Admin page and Settings, User Administration Management, Access Dealer Quotes (All Reps), and Template Management sections. This tab is for Sales Administration only. on the Dealer Portal page.
Click the Retrieve Any Dealership Quote link. The Quote Retrieval window appears.
From the Search For: field select Quote # or Dealer Rep.
Enter the quote number or Sales Rep Username in the search field and click the Search button or enter nothing and click the Search All button. The Search Results: table appears.
Click the Quote number link and the Quote window appears.
On the Quote tab, in the Quote Actions section, click the Give Ownership link. The Give Ownership window appears.
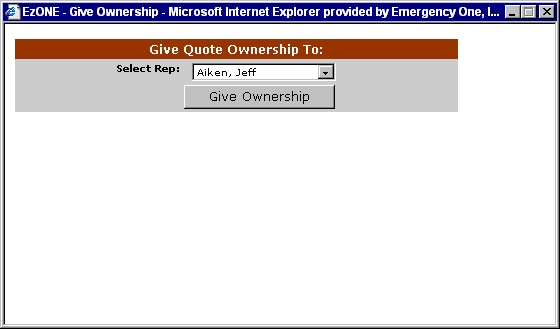
In the Select Rep: drop down list, select the rep to give ownership to and click the Give Ownership button. The transfer is logged in the History tab This tab on the quote window, displays the workflow summary of the quote. of the Quote window.
Save Quote button: Click this button to save the quote. Your changes are saved
Platform: field: Displays the platform.
Model: field: Displays the model.
Template Class: Select Base or Premium from this field.
Template Desc: Enter a template description here.
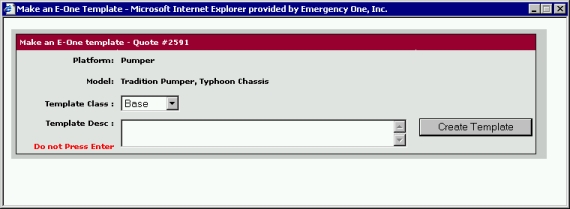
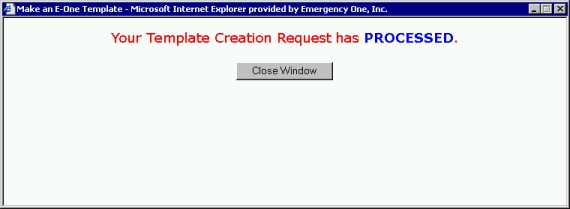
Select a Base, enter a template description, and click the Create Template button.
Click the Close Window button at the 'Your Template Creation Request has PROCESSED.' prompt.
A new quote number is assigned and appears in the Quote Retrieval window after the Manage Dealership Templates When this link is clicked, the Quote Retrieval window opens with the Work With Templates page and allows a Sales Admin to access stored quotes which are standard configurations for a truck. link is clicked from the Sales Admin tab.
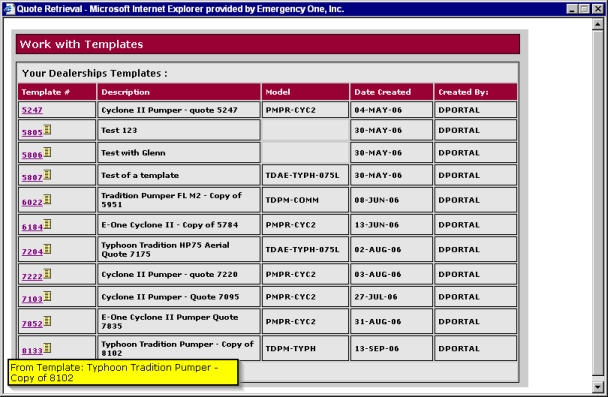
Alternately the template can be found by clicking the Work with an existing Quote link from the Dealer Portal page and clicking on the Show All button from the Quote Retrieval window to display the template.
Validating the template:
Click the quote number link to open the template. The truck will still need to be validated by clicking the red wrench icon.
If it is a Mainline Product, then do the following:
Configure each of the modules by clicking on one of the buttons and click the Apply and Exit button or make no changes.
Next, be sure four green checkmarks appear on the Ez-ONE Hub page.
Then, click the Save and Exit button from the Mainline Configurator.
Finally, click the Save Quote button to save the configuration with the template.
Applying the template to the quote:
Click the Create a New Quote link from the Dealer Portal page.
The Create Quote window appears with a new quote number. Click the Go to Quote Now button.
The Quote window appears.
Click on the red wrench icon to bring up the Configuration Selection Menu.
Click the Start with a Template link. The Quote Retrieval window appears.
Select the Template Type, Platform, Model, and Template Description form each of the fields.
Click the Get Template button. The Message: Your Template Use Request has PROCESSED. Please Launch the configurator now. appears. Click the Close Window button.
The quote window appears. The truck will still need to be validated by clicking the red wrench icon.
If it is a Mainline Product, then do the following:
Configure each of the modules by clicking on one of the buttons and click the Apply and Exit button or make no changes.
Next, be sure four green checkmarks appear on the Welcome to Ez-ONE Mainline page.
Then, click the Save and Exit button from the Mainline Configurator.
Finally, click the Save Quote button to save the configuration with the template.

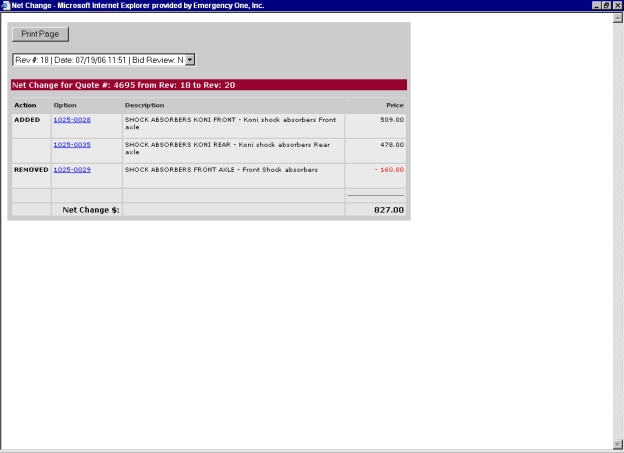
Net Changes link: When this link is clicked, it will allow you to access all option changes to each saved revision from Ez-ONE. The history collection began at 1:00 PM on July 18, 2006. Every time you click the Save/Exit button from the Configurator, the option details are saved to history. This will allow you to access net changes from a selected revision to your current configuration. You can select a revision to compare to. The system will show you the rev number, date/time, and whether the rev went to Bid Review. Just select the rev you wish to reference. There is also a Print Page button that allows you to print out the changes.
Click the Net Changes link under Quote Actions on the Quote tab of the quote window. The Net Change window appears.
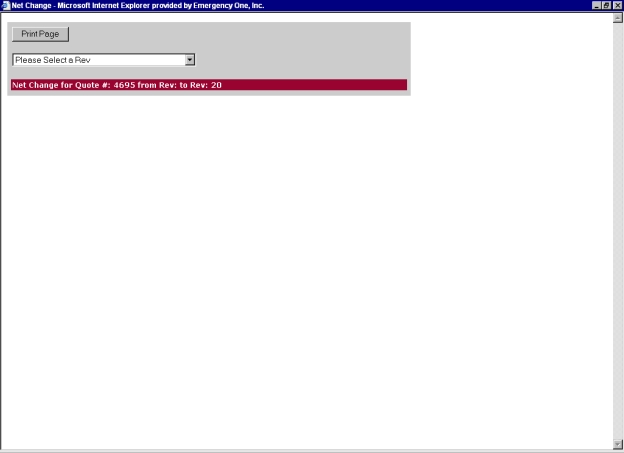
Click the drop down arrow next to the field Please select a Rev and select a rev to view.
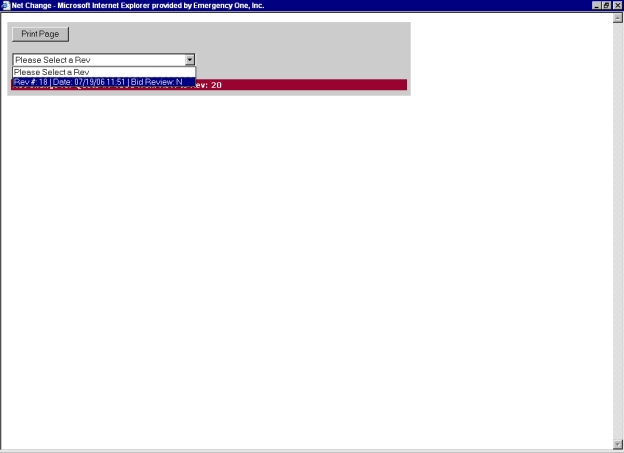
The Revision appears in the Net Change section for your quote. Click the Print Page button to the send the hard copy to the printer. Clicking on Option number will display the Product Catalog The Product Catalog is a database of options, grouped into detailed categories that can be searched and browsed utilizing a search engine by selecting a make and model of apparatus and "drilling down" into each category level. Items can be retrieved by selecting values for each item and search result. Finally, the attributes and properties of each item can be compared side-by-side such as sales codes, catalog descriptions, manufacturers, and list pricing. for the item.
Similar Trucks link: Clicking this link from the Quote Actions section of the Quote tab will display the Find an Active Bid Drawing window. You can click on the Get Config link to copy the configuration to a new quote and view the Officer and Driver drawings by clicking on either of the two View links.

Request Drawing link: Ez-Draw is an online drawing generator that can be used to produce conceptual bid drawings based on your Ez-ONE quotations. Ez-Draw does not eliminate the Bid Review Workflow process, a full bid drawing will be created there. Mainline Pumpers are included in our first release with Aerials.
From the Quote Management page of the Dealer Portal, click the Request Drawing link or Ez-Draw logo for your valid Mainline quote. Your drawing request will be placed in an electronic queue to be processed.

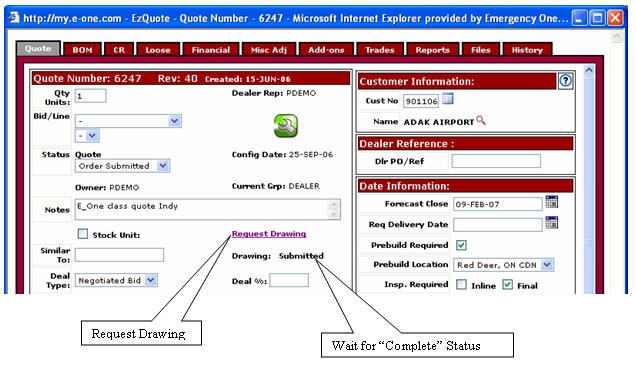
The drawing will take approximately 5 to 10 minutes to generate, after which time, you will receive an alert on screen and an e-mail (in case you do not wish to wait). Once generated, your drawing status will indicate Complete and you will find your generated drawings on the Files tab This tab on the quote window, allows you to add individual files to a quote. .
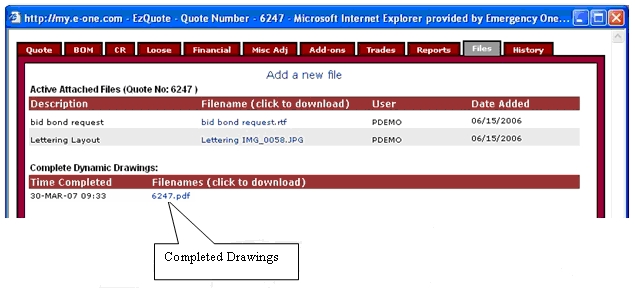
Click on the quote number link to download your auto-generated bid drawings for officer and driver sides. The automated drawings will include the following features for Mainline Pumpers:
Custom Cabs Medium, Long, Extended
Commercial Cabs Freightliner M2, International 2 & 4 Door 4400, and Spartan
Air Conditioners
Mirrors
Front Mud Flaps
Bumpers
Bumper Extensions
Air Horns
Q2B Sirens
Light Bars
Pump Modules, Top and Side Mount
Speed lays
Transverse Modules
Body half, ¾, Full Height
Compartments Rollup, Lift-up, Double
Deck Gun
Fill Tower
Zico Over Hose Bed Rack
Adjustable Ladder Tracks
Fuel Fill
Wheel Well SCBA
Rear Discharges
Rear Dumps
Warning Light Packages
Hose Bed Lights
Rear Scene Lights
Door Chart
Dimensions
Wheelbase
Overall Length and Height
Front and Rear Height
Rear Overhang
Try Ez-Draw on a quote that you are working on today and provide feedback through the support tab Displays the Support page and the Issues and Enhancements section. Feel free to e-mail or call us if you have problems and/or questions with the Dealer Portal. E-mail: configuratorsupport@e-one.com. Phone: 352-861-6800 on the Dealer Portal. On the Support tab in the Issues and Enhancements section, select Ez-Draw Feedback from the support drop down list and give us your comments. Your input helps us to improve the system so that it better meets your business needs.
EzDraw Enhancements:
The Quest Cab
Non Vista
12 in. Vista
20 in. Vista
Low Hosebed (Pumper/Rescue Pumper)
Hard suction hoses (Pumper/Rescue Pumper)
Compartment Tops
Ladder Rack
Adjustable Rack
Compartment offsets
Tradition Models
Pump Modules
Bodies
Cabs
American Eagle
Pump Modules
Bodies
Cabs
Upper Rear Warning Lights (Pumper/Rescue Pumper)
Deck Lights (Pumper/Rescue Pumper)
DOT Lights (Pumper/Rescue Pumper)
Scene Lights on cab (C2, Quest, Typhoon)
Warning lights/turn light/head light bezel configuration (C2, Typhoon)
We have also added features to add more detail to the drawings like side views of lights, diamond plate and updated views of objects. Keep looking forward to new and updated content that we are putting into your configuration drawings. Please continue to give us your feedback as we continue to improve the Ez-Draw tool.
Retail Match link: You can now find a retail unit and print the quote details, drawings and specifications without having to rely on internal E-One personnel. Tradition quotes can be compared to the trucks listed on the Retail Unit Database. This great feature will let you find a Tradition similar to your quote contents.
Create a Quote selecting the sales options our customer desires.
Click on the Retail Match link.
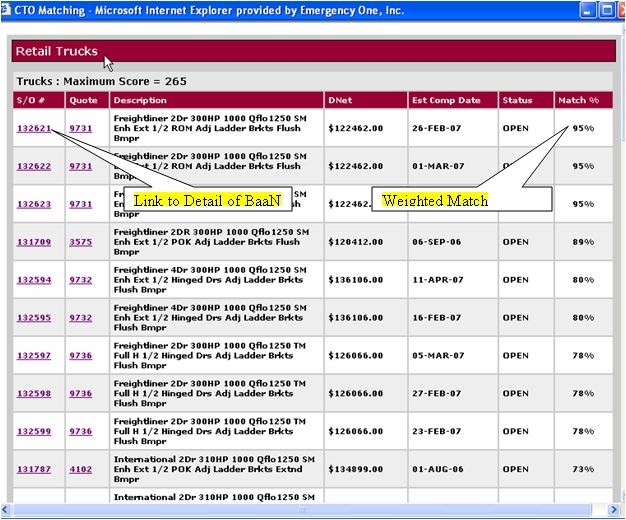
Review the list of returned Retails Trucks
S/O #: The BaaN order. This is a link so that you can print the quote, drawings and specifications.
Quote: The Ez-ONE quote uploaded to BaaN. Note that the same quote may have been uploaded for multiple trucks.
Description: Identifies key features of the truck.
DNet: Dealer price
Est Comp Date: Estimated truck completion date
Status: Open means the truck is available for purchase.
Click on the S/O # link to review the truck that best matches your quote
The quote window will have 5 tabs: Selections, Sales Codes, Quote, Reports, and Files.
Selections tab: Lists key values of Your Quote compared to the Retail Tradition SO you selected.
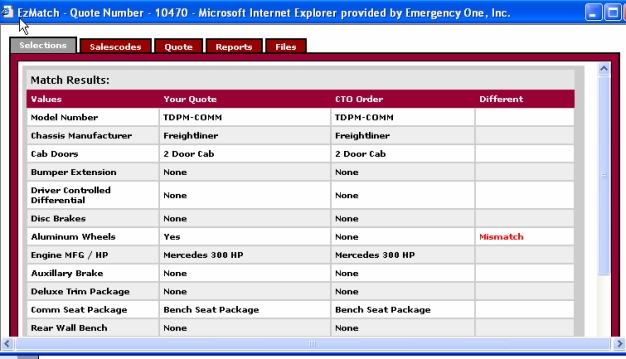
Salescodes tab: Lists your quote Sales Options detail with a Mismatch identifier to the right.
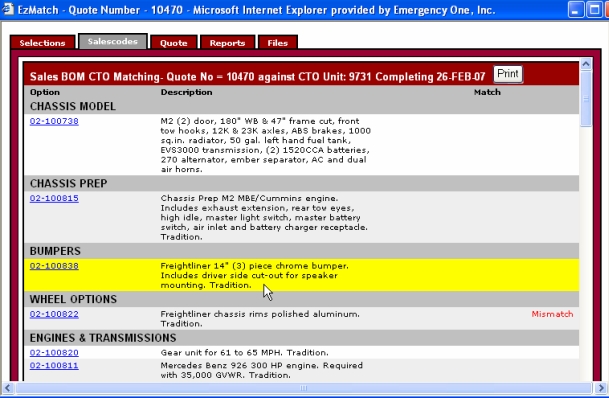
Quote tab: Allows you to print PE 4 View drawings.
Reports tab: Allows you to print the quote, drawings, and specifications of the sales order you selected.
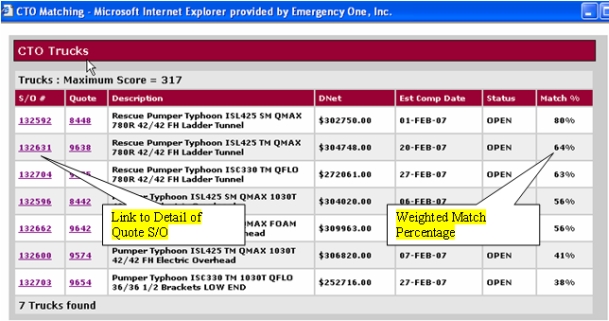
CTO / AE Compare link: This link empowers you to research our retail units and print the quote details, drawings and specifications without having to rely on internal E-One personnel. The comparison of your pre-configured customer quote to the CTO quote will also identify options that have been coded as Changeable and the time fence allowing the changes.
CTO pumpers have been configured with the most frequently requested features. Approximately 800 sales options have been identified as changeable within predetermined time slots. Each CTO quote will display the current estimated finish and remaining days of allowable change. We must keep in mind that the days remaining for Changeable options is live and a firm purchase order must be received with a change order request as soon as possible. Additional items may be quoted by Plant 6 staff to be modified after delivery and invoicing of the original truck.
Advantages to the sales rep:
Less time specing apparatus and more time in front of customers
Opportunity for quicker commissions and more sales
Fewer prebuilds and inspection trips taking away from other sales opportunities
Advantages for the customer:
Quicker delivery
Possible pricing advantage through standardized product offering
New apparatus placed into service quicker with reduced maintenance costs of older apparatus
Our customers should be offered these quicker delivery trucks as an alternative to their Engineer to Order configuration. They can not make a decision if they are not aware of the alternative trucks available.
You must create a Quote selecting the sales options our customer desires. Starting from a CTO Template is your quickest start.
Click on the CTO / AE Compare link.
Review the list of returned Retail Trucks:
S/O #: the BaaN order. This is a Link so you can print the quote, drawings and specifications
Quote: the Ez-ONE quote uploaded to BaaN. Note that the same quote may have been uploaded for multiple trucks.
Description: identifies key features of truck
DNet: Dealer price
Est Comp Date: Estimated Truck Completion Date
Status: Open means the truck is available for purchase
Match %: This is only a guide of quote to quote key component comparisons to help identify quotes similar to your quote.
Click on the S/O # link to review the truck that best matches your quote. You may need to review a few quotes.
The quote window will have 5 tabs: Selections, Sales Codes, Quote, Reports, and Files.
Selections tab: Lists key values of Your Quote compared to the Retail Mainline SO you selected.
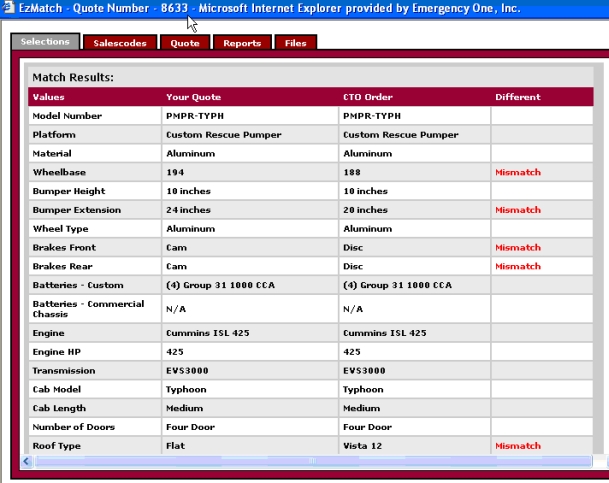
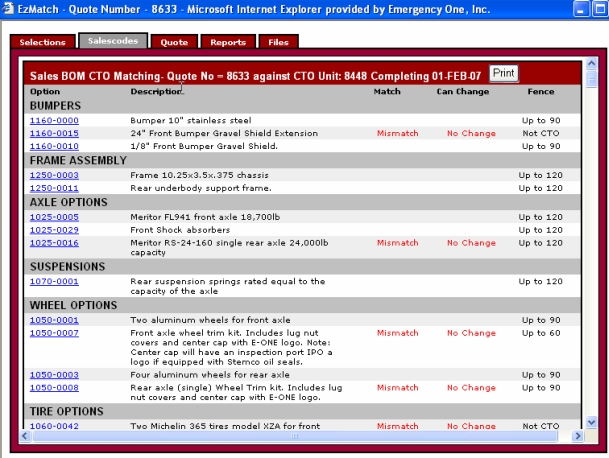
Salescodes tab: Lists your quote Sales Options detail with a Mismatch identifier to the right.
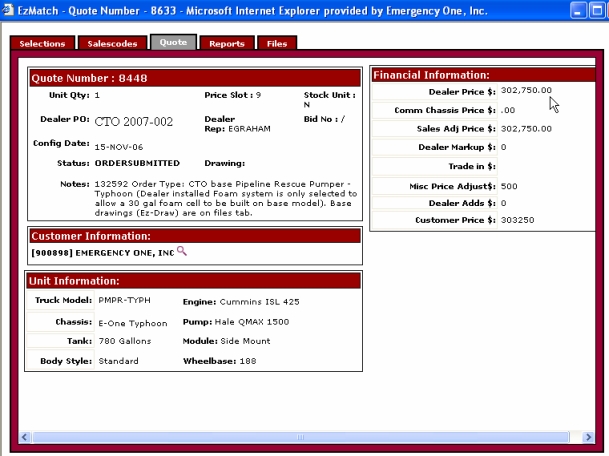
Quote tab: Allows you to see a general summary.
Reports tab: Allows you to print the quote, drawings, and specifications of the sales order you selected.
There are currently 7 mainline Pumper Typhoons in progress. Again, these were configured using feedback from the Regional Directors, conversations with many of you and the review of sales code usage. We will continue to develop changeable options as we get the program underway. Please compare some of your quotes against the 7 quotes to see how the tool works.
Effective with the release of Mainline Pumpers in Ez-ONE, the Customer Request Process will be the method used to obtain approval, specifications and pricing for any special requests not currently available in the sales tool. The CR Process will be the enterprise control system for all product definition and data management.
CR Process Definition:
A CR is a request for an option either structural or bolt-on (not currently in Ez-ONE)
The CR Process will be the mechanism utilized to process any request that may affect customer choices (i.e.: Option availability, pricing or specifications) while configuring an order
The CR Process will facilitate building a Business Case for all requests prior to entry into the Ez-ONE sales tool
A CR can be initiated by anyone with Dealer Portal access
Advantages to the dealer:
Popular (previously SPQd) options can be made available in the sales tool for repetitive use when approved
Clean, precise order details
Eliminates specification issues as E-ONE will create specifications
Consistent, managed pricing
Model compatibility check
Improved delivery times through better product definition
Note: As a quote is generated in the Ez-ONE sales tool, only options with existing sales code numbers established by the Product Managers will be available for selection in the quote. Should there be requests for options not currently in the quote system, you will need to initiate a Customer Request (CR) form for review and approval by the Product Manager and E-ONE team prior to completing your quote. All efforts will be made to expeditiously approve or decline a CR, allowing time for input into the quote as requested or with an approved alternative. A separate CR will be required for each special request as it will ultimately have its own unique sales code number, specification, model availability coding and price. Please strive to complete all CRs related to your quote at the same time so we may review the options as they relate to your specific truck.
Request CR link: Click this link to generate a CR Request. The Customer Salescode Request window appears. This link only appears after a quote is created and an apparatus is configured with a valid Mainline Product configuration.
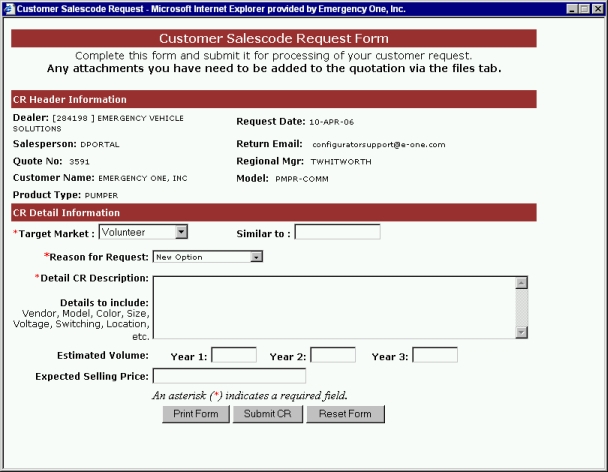
Complete the fields with as much detail as possible. Drop down lists have been created to assist with general information supporting your request. Missing details may slow the processing of the request.
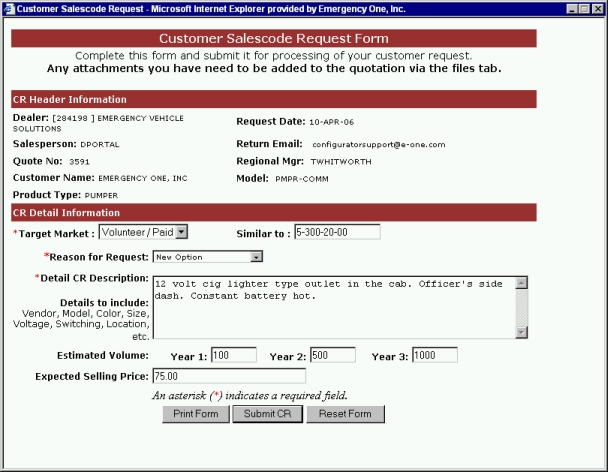
Click the Print Form button and the hard copy will be sent to the printer.
Clicking the Reset Form button will clear the form.
Click the Submit CR button Clicking this button after all the fields have been completed will send your request to E-ONE for review. and your request will be sent to E-ONE for review.
The Product Managers will review each request upon submission. If declined, a reason and an alternative will be offered within two business days.
When the CR is approved, the sales code will be entered into Ez-ONE and made available for selection. You will be contacted via e-mail when it is available for entry into your quote.
Workflow is the electronic method used to send a quote for Bid Bond requests, Bid Review workflows, Concession requests, Performance Bond requests, Penalty Clause authorizations, and/or as Order entries to the appropriate group. This will speed up the turnaround time for requests on quotes. Be sure all information is complete on the Quote and Financial tabs. Complete any supporting forms and attach them and document files to the Files tab of the Quote window.
Workflow quote link: Click this link to begin the workflow process.
Note: The Quotation Summary, Dealer Financial Summary, and Customer Financial Summary are now automated reports with the current information of the Quote and Financial tabs. Much of the data will be merged from the Quote and Financial tabs automatically.
These are live documents and do not need to be saved or attached. Do not fax/send the old forms unless you don't have a way to scan, save, and attach them as files.
Internal workflow groups will print the documents, sign and notarize if required. The document will be scanned and attached to the quote on the Files tab prior to Workflow approval and returned. A note should be entered stating if a hard copy is sent via mail per department procedures.
In order to improve Quote to Order process times an enhancement to the EzONE Electronic Workflow has been released. Users can workflow a quote to more that one group.
When you workflow a quote to any group you can then immediately workflow it to another group. Good uses for this are: Workflow a quote to bid bond request, then to regional manager for discount, and then to bid review. This will reduce the overall time it takes to process the quotation.
There is one notable exception: You can not workflow to Bid Review and Order Entry at the same time.
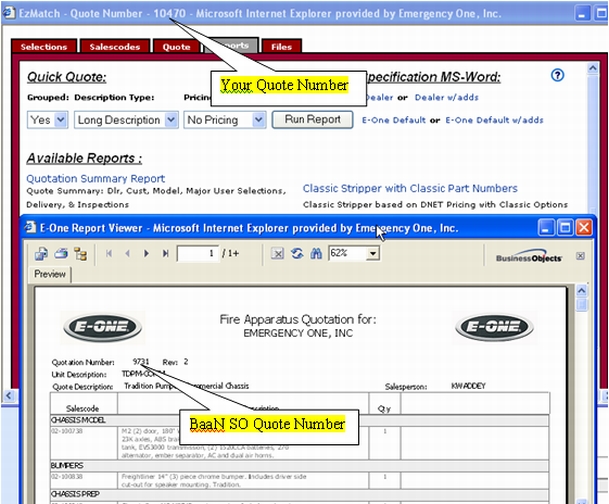
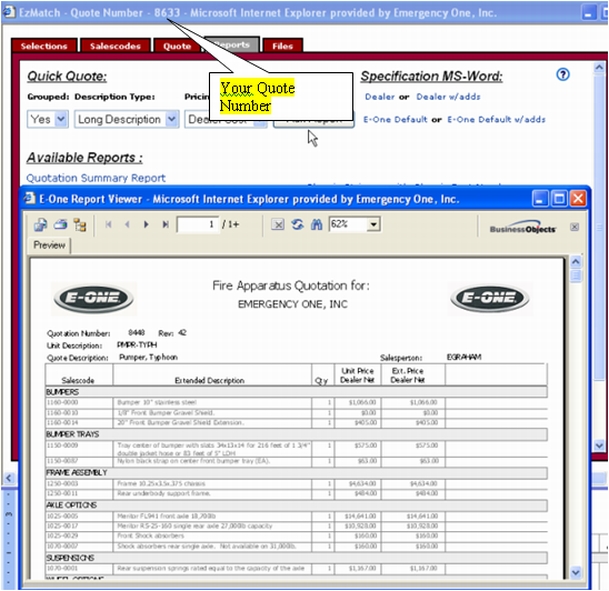
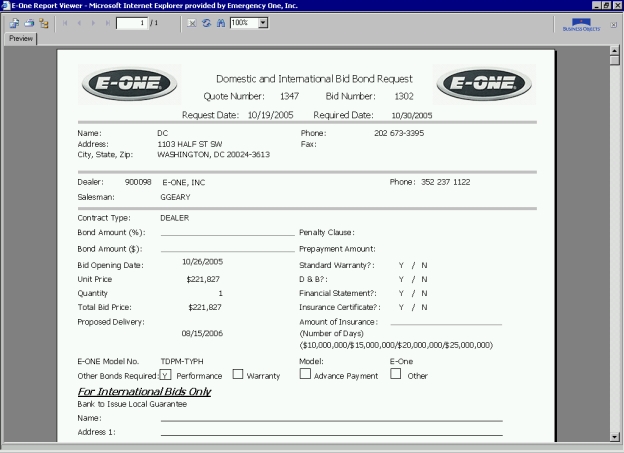
On the Quote window, click the Reports tab.
Click on the Bid Bond Request Form link When this link is clicked from the Reports tab The Reports tab on the quote window, allows you to generate twelve quick quotes, four quick specifications, seven reports, four forms, a Turning Radius report, an AMP Draw report, and a cover page. of the Quote window, the E-ONE Report View window Displays the generated Bid Bond Request Form, Bid Summary Report w/ tabs, a quote or a proposal. appears with the generated form.Reports tab of the Quote window, the E-ONE Report View window appears with the generated form.Reports tab of the Quote window, the E-ONE Report View window appears with the generated form.Reports tab of the Quote window, the E-ONE Report View window appears with the generated form.Reports tab of the Quote window, the E-ONE Report View window appears with the generated form.Reports tab of the Quote window, the E-ONE Report View window appears with the generated form.Reports tab of the Quote window, the E-ONE Report View window appears with the generated form.Reports tab of the Quote window, the E-ONE Report View window appears with the generated form.Reports tab of the Quote window, the E-ONE Report View window appears with the generated form.Reports tab of the Quote window, the E-ONE Report View window appears with the generated form.Reports tab of the Quote window, the E-ONE Report View window appears with the generated form.Reports tab of the Quote window, the E-ONE Report View window appears with the generated form.Reports tab of the Quote window, the E-ONE Report View window appears with the generated form.Reports tab of the Quote window, the E-ONE Report View window appears with the generated form.Reports tab of the Quote window, the E-ONE Report View window appears with the generated form.Reports tab of the Quote window, the E-ONE Report View window appears with the generated form.Reports tab of the Quote window, the E-ONE Report View window appears with the generated form.E-ONE Report View window appears with the generated form.E-ONE Report View window appears with the generated form.E-ONE Report View window appears with the generated form.E-ONE Report View window appears with the generated form.E-ONE Report View window appears with the generated form.E-ONE Report View window appears with the generated form.E-ONE Report View window appears with the generated form.E-ONE Report View window appears with the generated form.E-ONE Report View window appears with the generated form.E-ONE Report View window appears with the generated form.E-ONE Report View window appears with the generated form.E-ONE Report View window appears with the generated form.E-ONE Report View window appears with the generated form.E-ONE Report View window appears with the generated form.E-ONE Report View window appears with the generated form.E-ONE Report View window appears with the generated form.E-ONE Report View window appears with the generated form.E-ONE Report View window appears with the generated form.E-ONE Report View window appears with the generated form.E-ONE Report View window appears with the generated form.E-ONE Report View window appears with the generated form.E-ONE Report View window appears with the generated form.E-ONE Report View window appears with the generated form. to generate the form.
The E-ONE Report Viewer appears with the generated form.
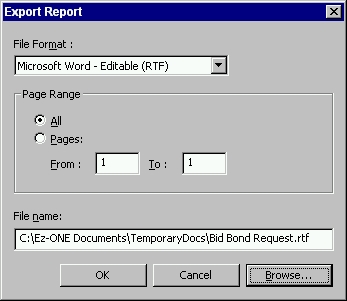
To export the report to Microsoft® Word® Rich Text Format (RTF), click the Export Report icon When this icon is clicked, it allows you to export a quote or a proposal to seven different file formats. The most popular format is Microsoft® Word® Rich Text Format (RTF). in the E-ONE Report View window.

The Export Report dialog box appears. Select Microsoft Word - Editable (RTF) from the File Format drop down list.
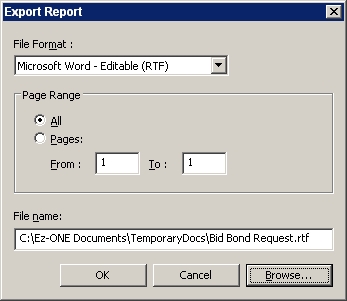
Enter the path for the file name in the File name: field (e.g. C:\My Documents\Bid Bond Request.rtf) and click the OK button or click the Browse... button and navigate to folder where you want to save the file, enter a filename, click the Save button from the Save As dialog box, and then click OK from the Export Report dialog box. The Report Viewer Export dialog box appears.
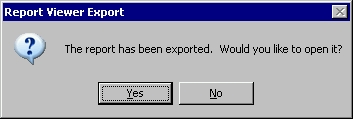
Click the Yes button to open the report. The report appears in Word®.
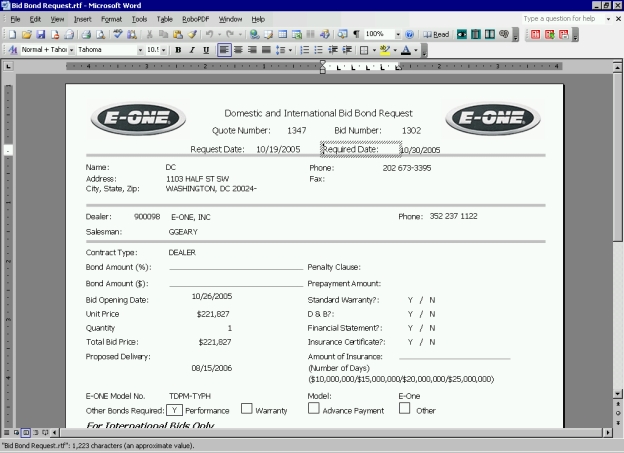
Fill in the pertinent data for Workflow.
Save the form using File > Save As from the menu bar in Word®.
Print out and sign the form and scan it in a as file.
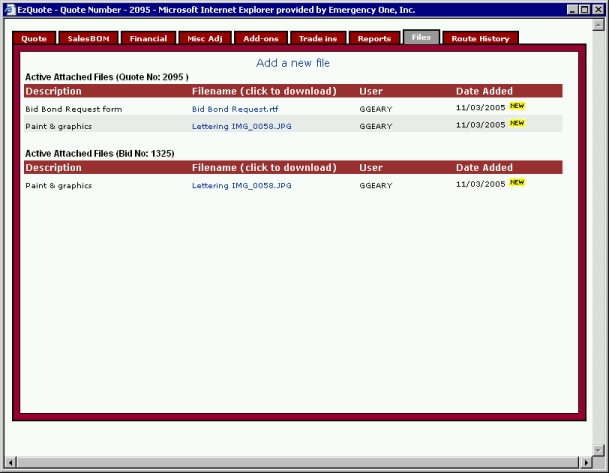
Click the Files tab of the Quote window.
Click the Add a new file link at the top of the window to attach the file. The Upload Download window appears.
In the File Desc: field, enter the description of the file you want to attach to the quote.
Click the Browse button to navigate to folder where the scanned file resides. The Choose File window After the Browse button is clicked this window appear so that you can navigate to folder where the file resides and attach it to the quote. appears.
Select the scanned file you want to attach and click the Open button. The path and filename appears in the File field.
Click the Add a new file link at the top of the window to attach the file. The Upload Download File window appears.
In the File Desc: field, enter the description of the file you want to attach to the quote.
Click the Browse button to navigate to folder where the scanned file resides. The Choose file window appears.
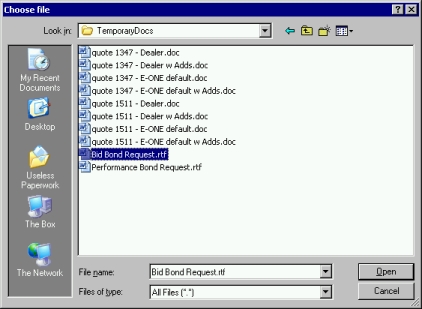
Select the scanned file you want to attach and click the Open button. The path and filename appears in the File field.
Click the Add a new file link to attach the scanned file to the quote. The Files window now displays the information about the scanned file you attached to the quote and bid.
Clicking File > Print from the menu bar in Word® will send the hard copy to the printer.
In the E-ONE Report Viewer window, click the Print Report icon and from the Print dialog box, click Print to also send the hard copy to the printer.

Click the 'X' in the upper right corner to close the E-ONE Report Viewer window.
On the Quote window, click the Financial tab Displays the monetary values and information associated with the quote along with the Quote Number, Information Requiring Approval and the Adjustment sections.. The Financial page appears.
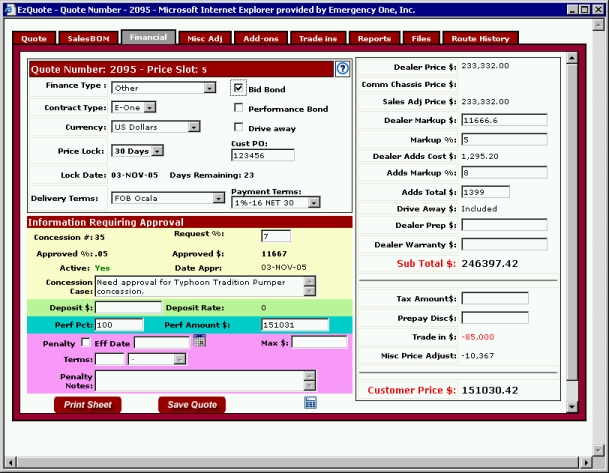
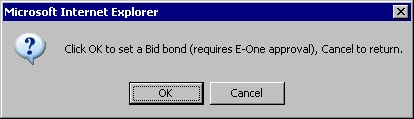
Check Bid Bond box for Bid Bond on this quote. Click the OK button from the dialog box to set the Bid Bond.
Price lock the quote from the Price Lock: drop down list. Select either 30 Days or 45 Days from this drop down list. The Lock Date: field is automatically filled in and counts down each day the price is locked. This will prevent an issue on a price increase when a new price slot is posted to the Dealer Portal.
Click the Save Quote button.
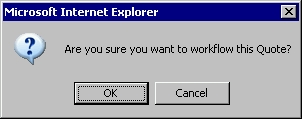
Click the Quote tab. Click the Workflow Quote link to Workflow the quote for a Bid Bond Request. The Microsoft Internet Explorer dialog box appears. Click the OK button to confirm.
The Workflow Quote window appears with a drop down list, two fields, an icon, two check boxes, and two buttons.
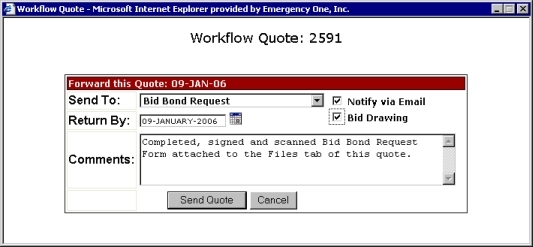
Send To: Choose Bid Bond Request in the drop down list.
Notify via Email check box: Check this box to be notified by the appropriate person or group by e-mail that the request was received and approved or denied.
Bid Drawing check box: Check this box to request a Bid Review Drawing from the Bid Review Team.
Return By: field: This field is automatically filled in by the Requested Return Date icon Clicking this icon will allow you to change the date you want the quote returned to you after you have submitted it for Workflow. when a date is selected.
Requested Return Date icon: When this icon is clicked on a window is displayed with a calendar and highlighted date. Click the << to decrease the months or click the >> to increase the months. If you click on a day, the window will disappear and the Return By: field will insert the date you selected in this format: 15-JUN-05. Note: You must click the icon to insert the date in the field.

Comments: Enter any comments you feel are necessary in this area.
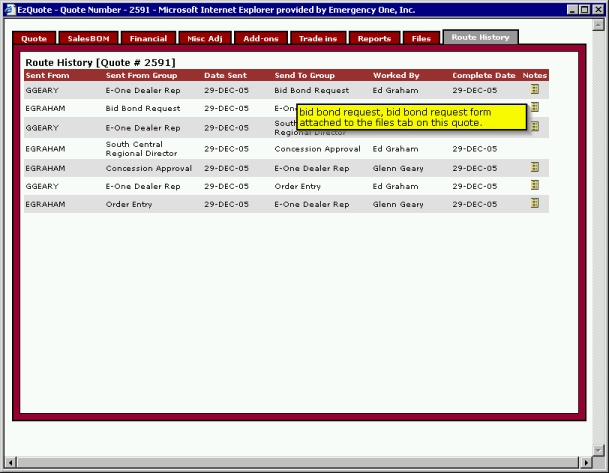
Send Quote button: Click this button to send the quote to the Bid Review group. The History tab of this quote will be updated.
When the quote is in Workflow, the configuration will be locked. The Quote tab will have a green wrench icon with a yellow lock indicating the quote is locked and cannot be changed. You will no longer be the owner of the quote and the Current Group is changed.

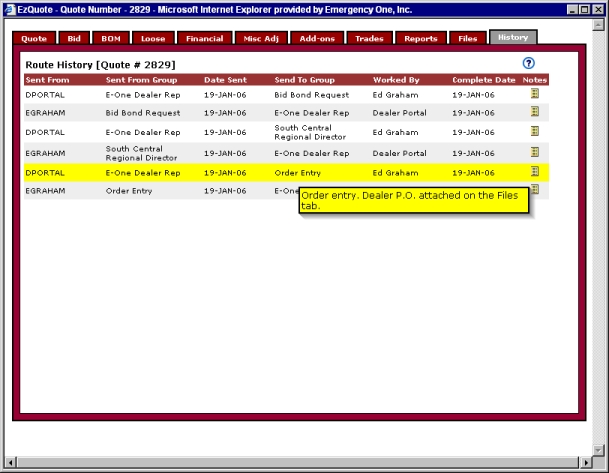
Follow the status of your quote while it is in Workflow through the History tab.
Move your mouse over the Notes icon to display the comments entered on the Comments: field of the Workflow this quote window.

A copy of your Bid Bond will be notarized, scanned and attached to the Files tab of the Quote window and the hard copy is sent via mail per department procedures.
Mainline Product quotes (Custom / Commercial Pumpers and Rescue Pumpers) must be workflowed through Bid Review for configuration and pricing validation.
Commercial Chassis SPQ form, on the Info Library of the Dealer Portal page, must be completed and attached electronically to the Ez-ONE quote via the Files tab of the Quote window.
Steps to workflow your quote to Bid Review are as follows:
Retrieve the quote and review that you have completed all information in the Bid, Quote and Financial tabs (dates, competitors, similar to, file attachments, etc.).
Note: Request new customers or update your existing customer information early. You can not workflow without a customer selected.
Change the Status Quote field: to Bid Review. Click the Save Quote button.
Note: If this is a Commercial Chassis quote, then you will have to download, fill out and attach the Commercial Chassis Request form from the Info Library tab of the Dealer Portal page and attach it to the Files tab of the quote window.
Click the Info Library tab of the Dealer Portal page.
Click on the Commercial Chassis Request Form link When this link is clicked Info Library tab Displays the Info Library page., the form is downloaded and generated in Microsoft® Excel®. This form is used for quote and pricing.Info Library tab , the form is downloaded and generated in Microsoft® Excel®. This form is used for quote and pricing.Info Library tab , the form is downloaded and generated in Microsoft® Excel®. This form is used for quote and pricing.Info Library tab , the form is downloaded and generated in Microsoft® Excel®. This form is used for quote and pricing.Info Library tab , the form is downloaded and generated in Microsoft® Excel®. This form is used for quote and pricing.Info Library tab , the form is downloaded and generated in Microsoft® Excel®. This form is used for quote and pricing.Info Library tab , the form is downloaded and generated in Microsoft® Excel®. This form is used for quote and pricing.Info Library tab , the form is downloaded and generated in Microsoft® Excel®. This form is used for quote and pricing.Info Library tab , the form is downloaded and generated in Microsoft® Excel®. This form is used for quote and pricing.Info Library tab , the form is downloaded and generated in Microsoft® Excel®. This form is used for quote and pricing.Info Library tab , the form is downloaded and generated in Microsoft® Excel®. This form is used for quote and pricing. to generate the form if required for the quote. The File Download dialog box appears. Click the Open button to open the form. The form is downloaded and generated in Microsoft® Excel®.
Fill out the form and save to a folder on your hard drive.
Click the Files tab of the Quote window.
Click the Add a new file link. The Upload Download File window appears.
In the File Desc: field, enter Commercial Chassis Request Form.
Click the Browse button to navigate to folder where the file resides. The Choose file window appears.
Select the Commercial Chassis Request Form file in the folder you saved it to and click the Open button. The path and filename appears in the File field.
Click the Add File Now button Attaches the file you selected to the quote. The Files window now displays the information about the Commercial Chassis Request Form you attached to the quote.
Click the Workflow Quote link. A dialog box appears. Click the OK button to confirm.
The Workflow Quote window appears with a drop down list, two fields, an icon, two check boxes, and two buttons.
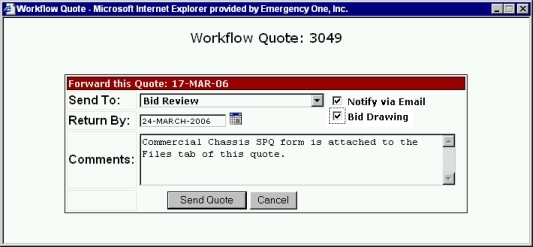
Send To: Choose Bid Review in the drop down list. Be sure to leave the checkmark in the Notify via Email check box.
Bid Drawing check box: Check this box to request a Bid Review Drawing from the Bid Review Team.
Return By: This field is automatically filled in by the Requested Return Date icon when a date is selected. Default is 10 days. You may change the date by clicking on the calendar icon and selecting a future date.
Note: You must click the Requested Return Date icon to modify the date in the field.
Comments: Enter any comments you feel are necessary in this area.
Send Quote button: Click this button to send the quote to the Bid Review group. The History tab of this quote will be updated.
When the quote is in Workflow, the configuration will be locked. The Quote tab will have a green wrench icon with a yellow lock indicating the quote is locked and cannot be changed. You will no longer be the owner of the quote and the Current Group is changed.
Follow the status of your quote while it is in Workflow through the History tab. You will receive an e-mail from the Bid Team acknowledging your submission.
When a request is completed, approved, or denied it will be returned to the original owner and an e-mail message will be sent that the quote was returned. Your bid-level concept drawing will be an attachment in the Files tab of the Quote window.
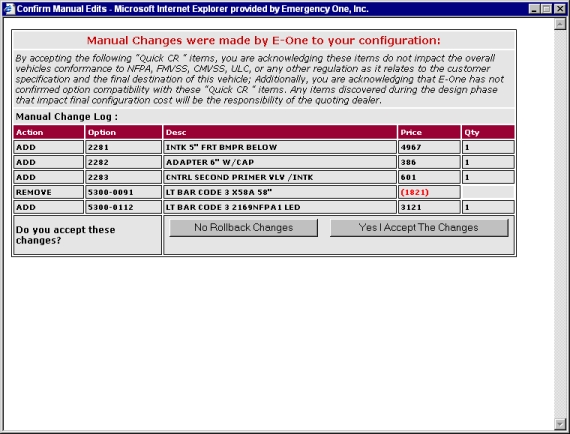
When you open the quote, the Confirm Manual Edits window AKA Ez-Pass - This window appears when a quote is opened after has been send back from Bid Review Workflow. Click the No Rollback Changes button to rollback the changes or the Yes I Accept The Changes to confirm. aka Ez-Pass The Confirm Manual Edits window appears when a quote is opened after has been send back from Bid Review Workflow. Click the No Rollback Changes button to rollback the changes or the Yes I Accept The Changes to confirm. appears. Click the No Rollback Changes button to rollback the changes or the Yes I Accept The Changes to confirm.
Concessions request path: Workflow Quote window to your Regional Director.
For a concession request on the quote, click the Financial tab Displays the monetary values and information associated with the quote along with the Quote Number, Information Requiring Approval and the Adjustment sections..
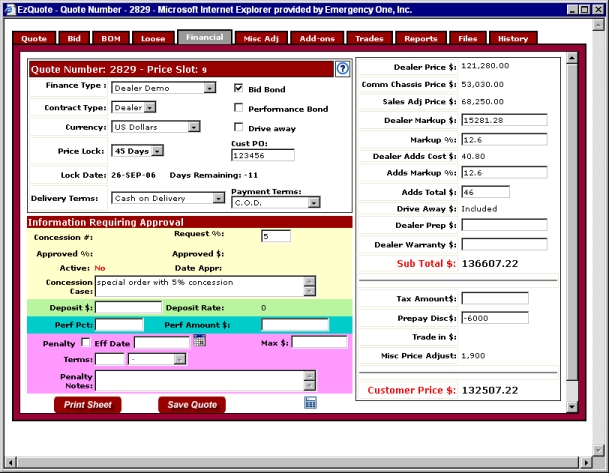
Enter the requested percentage request in the Request % field.
Enter the reason for the concession in the Concession Case field.
Price lock the quote from the Price Lock: drop down list. Select either 30 Days or 45 Days from this drop down list. The Lock Date: field is automatically filled in and counts down each day the price is locked. This will prevent an issue on a price increase when a new price slot is posted to the Dealer Portal.
Click the Save Quote button.
Click the Quote tab.
Click the Workflow Quote link. A dialog box appears. Click the OK button to confirm.
The Workflow Quote window appears with a drop down list, two fields, an icon, a check box, and two buttons.
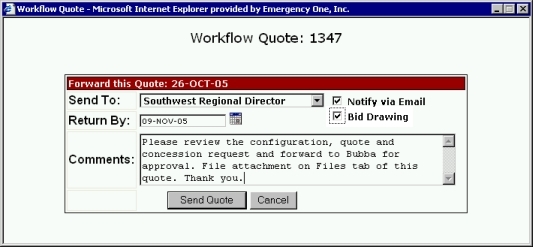
Send To: drop down list: Choose from the following to send the Workflow Quote to the appropriate authority: Regional Director, Concession Approval, International Concession Request, Penalty Clause Approval, Bid Bond Request, Performance Bond Request, Order Entry or Bid Review. In this example, select your Regional Director for a concession request.
Notify via Email check box: Check this box to be notified by the appropriate person or group by e-mail that the request was received and approved or denied.
Bid Drawing check box: Check this box to request a Bid Review Drawing from the Bid Review Team.
Return By: field: This field is automatically filled in by the Requested Return Date icon when a date is selected.
Requested Return Date icon: When this icon is clicked on a window is displayed with a calendar and highlighted date. Click the << to decrease the months or click the >> to increase the months. If you click on a day, the window will disappear and the Return By: field will insert the date you selected in this format: 15-JUN-05. Note: You must click the icon to insert the date in the field.
Comments: : Enter any comments you feel that are necessary in this area such as configuration, quote, concession request, attached files on the Files tab, etc.
Send Quote button: Click this button to send the quote to the appropriate workflow group. The History tab on the quote window will be updated. The Quote tab will have a green wrench icon with a yellow lock indicating the quote is locked and cannot be changed. You will no longer be the owner of the quote and the Current Group is changed.
When the quote is in Workflow, the configuration will be locked or not, depending on the group forwarded to.
Cancel button: Click this button to cancel the request and close the window.
Follow the status of your quote that is in Workflow through the History tab of the Quote window.
Move your mouse over the Notes icon to display the comments entered on the Comments: field of the Workflow this quote window.
When a request is completed, approved, or denied it will be returned to the original owner and an e-mail message will be sent that the quote was returned.
Order entry is the final step in the Workflow process.
Request new customers or update your existing customer information early. Do not wait until it is time to Workflow your order.
On the Quote tab of the quote window, click the green cross icon to open the New Customer Information Request Form. The Form appears in a new window.

or
Click the Info Library tab and then the New Customer Information Request Form link.
Retrieve the quote.
Change the Status Quote field: to Order Submitted.
Notes field: Enter any notes that you feel are necessary for the quote here.
Select Negotiated Bid, No Bid, or Contract from the Deal Type: drop down list.
Obtain a P.O. number.
Dlr / PO Ref: field: Enter the Dealer Reference information here.
Click the Request Delivery Date icon and select a date from the calendar.
Mainline Pumpers Only: Insp. Required: Check the Inline check box if you want an Inline inspection. Check the Final check box if you want a Final Inspection.
Click the Save Quote button.
Click the Financial tab.
Click the Financial tab of the quote window.
Select Dealer or E-One from the Contract Type: drop down list.
Price lock the quote from the Price Lock: drop down list. Select either 30 Days or 45 Days from this drop down list. The Lock Date: field is automatically filled in and counts down each day the price is locked. This will prevent an issue on a price increase when a new price slot is posted to the Dealer Portal.
Enter the Customer Purchase Order number in the Cust PO: field.
Select from the Delivery Terms: drop down list.
Select from the Payment Terms: drop down list: C.O.D.
Click the Save Quote button.
Click the Files tab.
Attach the P.O. to the Files tab.
If no P.O., either attach the E-ONE Agreement or the Dealer Agreement to the Files tab. Both of these forms are on the Info Library tab of the Dealer Portal page.
Attach any tax forms to the Files tab. If you aren't able to scan these in as files, then fax the forms to Contract Administration: 352-237-5309.
Attach any other business documents to the Files tab. If you aren't able to scan these in as files, then fax the forms to Contract Administration.
Click the Quote tab.
From the Status Quote drop down list, select Order Submitted.
Click the Save Quote button.
Click the Workflow Quote link. A dialog box appears. Click the OK button to confirm.
The Workflow Quote window appears with a drop down list, two fields, an icon, a check box, and two buttons.
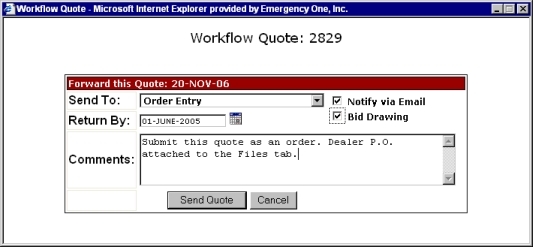
Send To: drop down list: Choose Order Entry to send the Workflow Quote to the appropriate authority.
Notify via Email check box: Check this box for e1orders@e-one.com and you will be notified of the order.
Bid Drawing check box: Check this box to request a Bid Review Drawing from the Bid Review Team.
Return By: field: This field is automatically filled in by the Requested Return Date icon when a date is selected.
Requested Return Date icon: When this icon is clicked on a window is displayed with a calendar and highlighted date. Click the << to decrease the months or click the >> to increase the months. If you click on a day, the window will disappear and the Return By: field will insert the date you selected in this format: 15-JUN-05. Note: You must click the icon to insert the date in the field.
Comments: : Enter any comments you feel that are necessary in this area such as configuration, quote, concession request, attached files on the Files tab, etc.
Send Quote button: Click this button to send the quote to the Order Entry group. The History tab on the quote window will be updated. The Quote tab will have a green wrench icon with a yellow lock indicating the quote is locked and cannot be changed. You will no longer be the owner of the quote and the Current Group is changed.
When the quote is in Workflow, the configuration will be locked or not locked, depending on the group forwarded to.
Cancel button: Click this button to cancel the request and close the window.
Follow the status of your quote that is in Workflow through the History tab of the Quote window. You will receive an e-mail with your shop order or S.O. number when the order is processed.
Move your mouse over the Notes icon to display the comments entered on the Comments: field of the Workflow this quote window.
When a request is completed, approved, or denied it will be returned to the original owner and a e-mail message will be sent that the quote was returned.
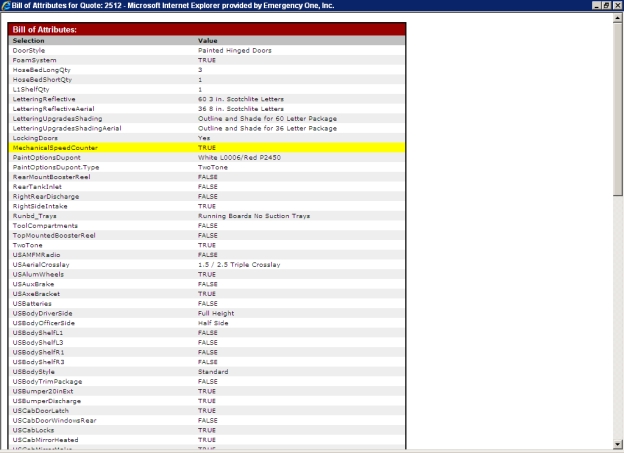
The Attributes BOM link when clicked will display the Bill of Attributes This is useful when checking the selection of items in a configuration without entering the Configurator on a quote. Clicking the Attributes BOM link in the Quotes Actions section on the Quote tab will display the Bill of Attributes window.Attributes BOM link Clicking the Attributes BOM link in the Quotes Actions section on the Quote tab will display the Bill of Attributes window. This is useful when checking the selection of items in a configuration without entering the Configurator on a quote. in the Quotes Actions section on the Quote tab will display the Bill of Attributes window. window. This is useful when checking the selection of items in a configuration without entering the Configurator on a quote.
Click the Attributes BOM link. The Bill of Attributes window is displayed.
Related Topics: