This section covers the following:
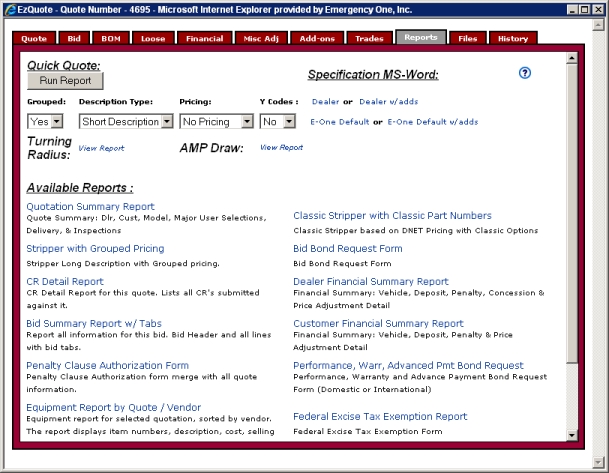
The Reports tab allows you to generate twelve quick quotes, four quick specifications, seven reports, four forms, a Turning Radius report, an AMP Draw report On the Reports tab for Mainline Pumpers and Aerials a new report has been added. The report summarizes the AC WATT and DC AMP Draw for the quote. It will tell you if you alternator or generator is underpowered for your configuration. This can be run with any valid configuration., and a cover page.
The Quick Quote: section consists of three drop down lists, one button, and a help icon Click this Question mark icon to get help from the Dealer Portal WebHelp. A help window will appear.Dealer Portal A Web based server application that runs in Microsoft® Internet Explorer® utilizing Web services on the Internet. This application improves and simplifies your sales process. WebHelp. A help window will appear.Dealer Portal WebHelp. A help window will appear.Dealer Portal WebHelp. A help window will appear.Dealer Portal WebHelp. A help window will appear.Dealer Portal WebHelp. A help window will appear.Dealer Portal WebHelp. A help window will appear.Dealer Portal WebHelp. A help window will appear.Dealer Portal WebHelp. A help window will appear.Dealer Portal WebHelp. A help window will appear.Dealer Portal WebHelp. A help window will appear.Dealer Portal WebHelp. A help window will appear.Dealer Portal WebHelp. A help window will appear.Dealer Portal WebHelp. A help window will appear.Dealer Portal WebHelp. A help window will appear.Dealer Portal WebHelp. A help window will appear.Dealer Portal WebHelp. A help window will appear.Dealer Portal WebHelp. A help window will appear.Dealer Portal WebHelp. A help window will appear.Dealer Portal WebHelp. A help window will appear.Dealer Portal WebHelp. A help window will appear.Dealer Portal WebHelp. A help window will appear.Dealer Portal WebHelp. A help window will appear.Dealer Portal WebHelp. A help window will appear.Dealer Portal WebHelp. A help window will appear.Dealer Portal WebHelp. A help window will appear.Dealer Portal WebHelp. A help window will appear.Dealer Portal WebHelp. A help window will appear.Dealer Portal WebHelp. A help window will appear.Dealer Portal WebHelp. A help window will appear.Dealer Portal WebHelp. A help window will appear.Dealer Portal WebHelp. A help window will appear.Dealer Portal WebHelp. A help window will appear.Dealer Portal WebHelp. A help window will appear.Dealer Portal WebHelp. A help window will appear.Dealer Portal WebHelp. A help window will appear.Dealer Portal WebHelp. A help window will appear.Dealer Portal WebHelp. A help window will appear.Dealer Portal WebHelp. A help window will appear.Dealer Portal WebHelp. A help window will appear.Dealer Portal WebHelp. A help window will appear.Dealer Portal WebHelp. A help window will appear.Dealer Portal WebHelp. A help window will appear.Dealer Portal WebHelp. A help window will appear.Dealer Portal WebHelp. A help window will appear.Dealer Portal WebHelp. A help window will appear.Dealer Portal WebHelp. A help window will appear.Dealer Portal WebHelp. A help window will appear.Dealer Portal WebHelp. A help window will appear.Dealer Portal WebHelp. A help window will appear.Dealer Portal WebHelp. A help window will appear.Dealer Portal WebHelp. A help window will appear.Dealer Portal WebHelp. A help window will appear.Dealer Portal WebHelp. A help window will appear.Dealer Portal WebHelp. A help window will appear.Dealer Portal WebHelp. A help window will appear.Dealer Portal WebHelp. A help window will appear.Dealer Portal WebHelp. A help window will appear.Dealer Portal WebHelp. A help window will appear.Dealer Portal WebHelp. A help window will appear.Dealer Portal WebHelp. A help window will appear.Dealer Portal WebHelp. A help window will appear.Dealer Portal WebHelp. A help window will appear.Dealer Portal WebHelp. A help window will appear.Dealer Portal WebHelp. A help window will appear.Dealer Portal WebHelp. A help window will appear.appear. Dealer Portal A Web based server application that runs in Microsoft® Internet Explorer® utilizing Web services on the Internet. This application improves and simplifies your sales process. WebHelp. A help window will appear.Dealer Portal WebHelp. A help window will appear.Dealer Portal WebHelp. A help window will appear.Dealer Portal WebHelp. A help window will appear.Dealer Portal WebHelp. A help window will appear.Dealer Portal WebHelp. A help window will appear.Dealer Portal WebHelp. A help window will appear.Dealer Portal WebHelp. A help window will appear.Dealer Portal WebHelp. A help window will appear.Dealer Portal WebHelp. A help window will appear.Dealer Portal WebHelp. A help window will appear.Dealer Portal WebHelp. A help window will appear.Dealer Portal WebHelp. A help window will appear. Dealer Portal WebHelp. A help window will appear. Dealer Portal WebHelp. A help window will appear. Dealer Portal WebHelp. A help window will appear. Dealer Portal WebHelp. A help window will appear. Dealer Portal WebHelp. A help window will appear..
Grouped: drop down list: Select Yes or No.
Description Type: drop down list: Select Short Description or Long Description.
Pricing: drop down list: Select No Pricing, Dealer Cost, or Selling Price.
Y Codes: Select Yes or No.
Run Report button Generate a quote from the Reports tab of the EzQuote window.Reports tab The Reports tab on the quote window, allows you to generate twelve quick quotes, four quick specifications, seven reports, four forms, a Turning Radius report, an AMP Draw report, and a cover page. of the EzQuote window.Reports tab of the EzQuote window.Reports tab of the EzQuote window.Reports tab of the EzQuote window.Reports tab of the EzQuote window.Reports tab of the EzQuote window.Reports tab of the EzQuote window.Reports tab of the EzQuote window.Reports tab of the EzQuote window.Reports tab of the EzQuote window.Reports tab of the EzQuote window.Reports tab of the EzQuote window.Reports tab of the EzQuote window.Reports tab of the EzQuote window.Reports tab of the EzQuote window.EzQuote window Displays the Quote Number:, Unit Information:, Customer Information:, Dealer Reference:, Date Information: and Quote Actions: sections..EzQuote window .EzQuote window .EzQuote window .EzQuote window .EzQuote window .EzQuote window .EzQuote window .EzQuote window .EzQuote window .EzQuote window .EzQuote window .EzQuote window .EzQuote window .EzQuote window .EzQuote window .EzQuote window .EzQuote window .EzQuote window .EzQuote window .EzQuote window .EzQuote window .EzQuote window .EzQuote window .EzQuote window .EzQuote window .EzQuote window .EzQuote window .EzQuote window .EzQuote window .EzQuote window .EzQuote window .EzQuote window .EzQuote window .EzQuote window .EzQuote window .EzQuote window .EzQuote window .EzQuote window .EzQuote window .EzQuote window .EzQuote window .EzQuote window .EzQuote window .EzQuote window .EzQuote window .EzQuote window .EzQuote window .EzQuotewindow. EzQuotewindow Displays the Quote Number:, Unit Information:, Customer Information:, Dealer Reference:, Date Information: and Quote Actions: sections..EzQuote window .EzQuote window .EzQuote window .EzQuote window .EzQuote window .EzQuote window .EzQuote window .EzQuote window .EzQuote window .EzQuote window .EzQuote window .EzQuote window . EzQuote window . EzQuote window . EzQuote window . EzQuote window .EzQuote window . EzQuote window . EzQuote window . EzQuote window . EzQuote window . EzQuote window . EzQuote window . EzQuote window . EzQuote window . EzQuote window . EzQuote window . EzQuote window . EzQuote window . EzQuote window .: Click this button to generate the quote.
Help icon: Click the Question mark or Help icon to get help from the Dealer Portal WebHelp. A help window will appear.

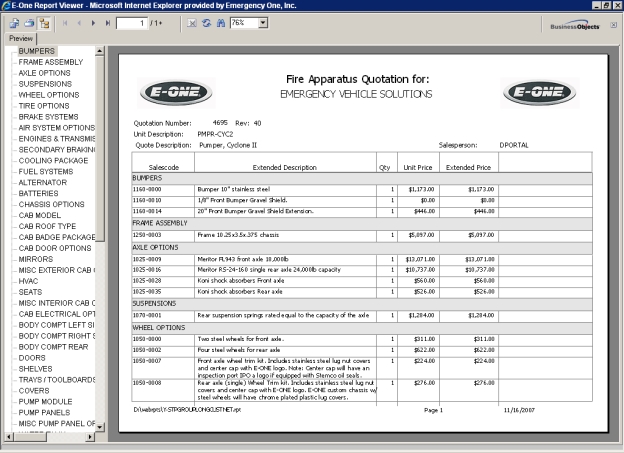
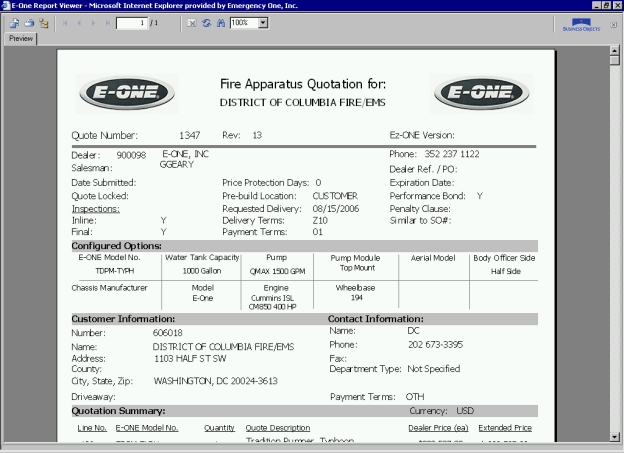
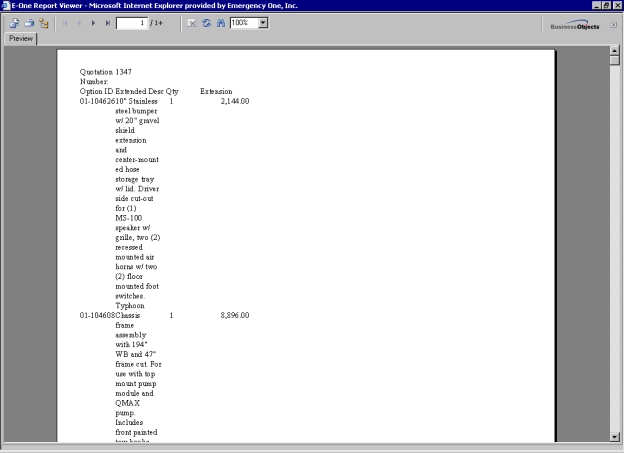
Click the Run Report button after you have selected from each of the drop down lists. The E-ONE Report Viewer displays the Quick Quote.
To export the report to Microsoft® Word® Rich Text Format (RTF), click the Export Report icon When this icon is clicked, it allows you to export a quote or a proposal to seven different file formats. The most popular format is Microsoft® Word® Rich Text Format (RTF).RTF). in the E-ONE Report Viewer window Displays the generated Bid Bond Request Form, Bid Summary Report w/ tabs, a quote or a proposal.w/ tabs, a quote or a proposal..

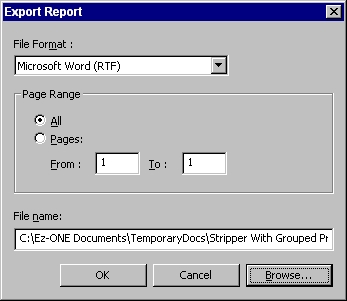
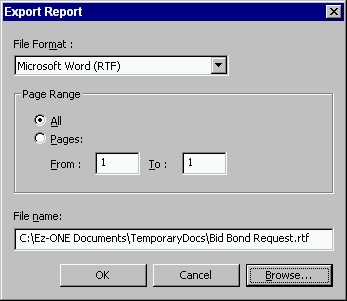
The Export Report dialog box appears. Select Microsoft Word - (RTF) from the File Format: drop down list.
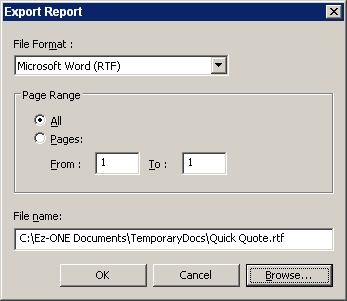
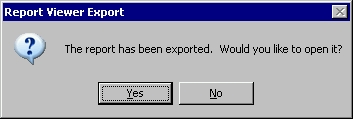
Enter a file name in the File name field and click the OK button. The Report Viewer Export dialog box appears.
Open Microsoft® Word®.
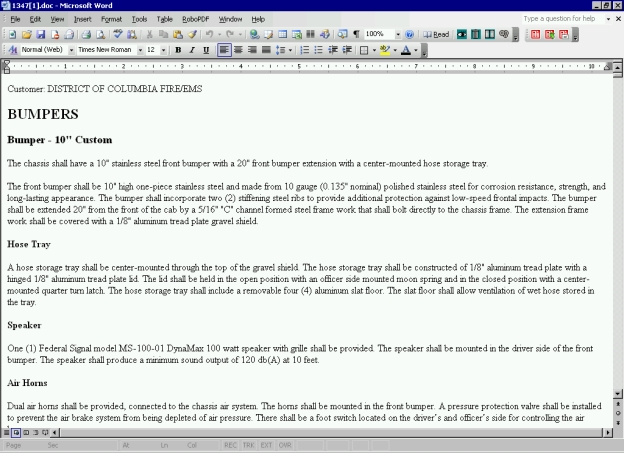
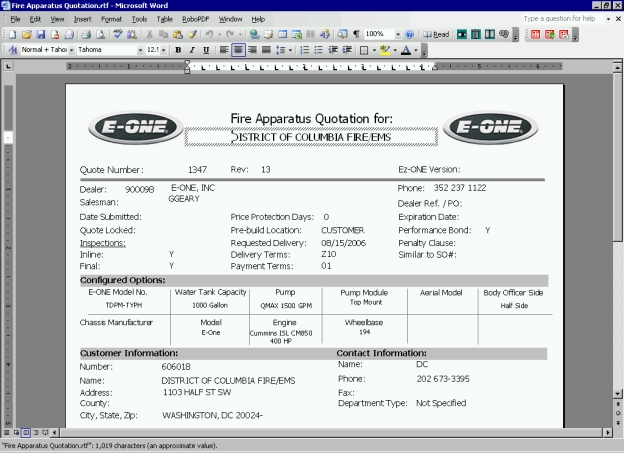
Click the Yes button to open the quick quote. The quick quote appears in Word®.
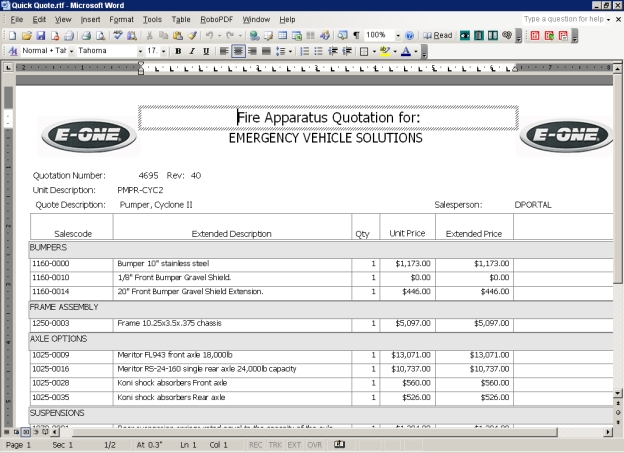
At this point you can save the quick quote by clicking File > Save As from the menu bar in Word®.
In the E-ONE Report Viewer window, click the Print Report icon and from the Print dialog box, click Print to send the hard copy to the printer.

Click the 'X' in the upper right corner to close the E-ONE Report Viewer window .
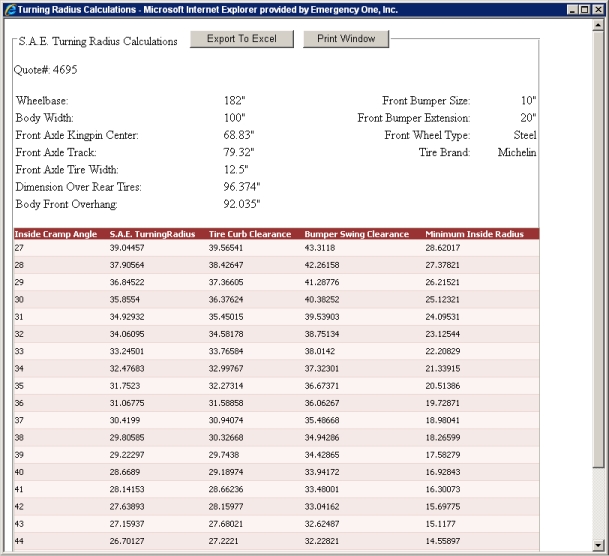
Turning Radius Calculation On the Reports tab a new Turning Radius report has been added. You'll find the link directly under the Quick Quote. It's currently available for E-One chassis only. Commercial chassis will be added at a later time.
On the Reports tab a new Turning Radius report has been added. You'll find the link directly under the Quick Quote. It's currently available for E-ONE chassis only.
Commercial chassis will be added at a later time.
Click the View Report link. The Turning Radius Calculations window appears.
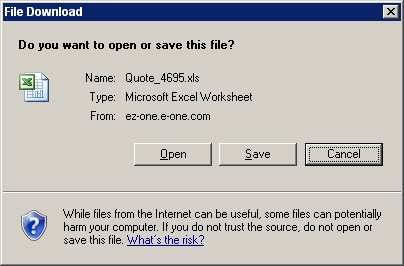
Click the Export To Excel button to export the data to Excel. The File Download dialog box appears.
Click the Open button to open Excel with exported data. The results are displayed on the Header tab.
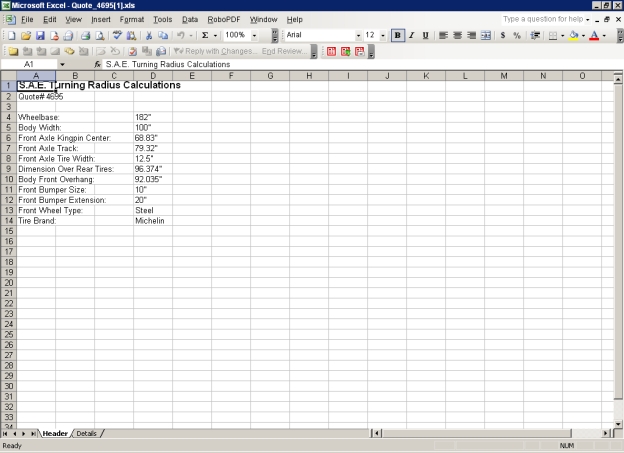
Click the Details tab for the rest of the data.
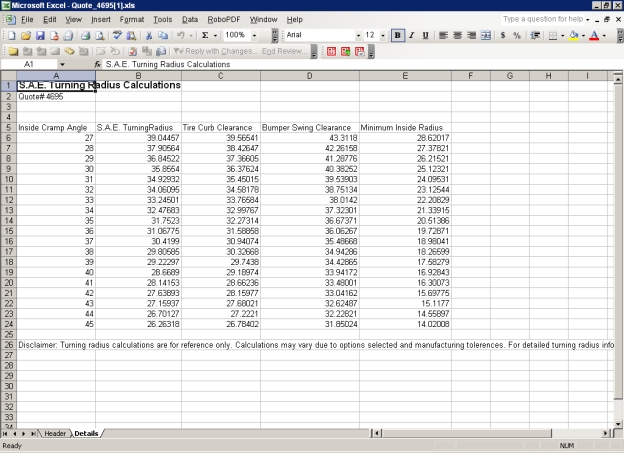
Click the Print Window button to send the hard copy of the Turning Radius Calculations window to the printer.
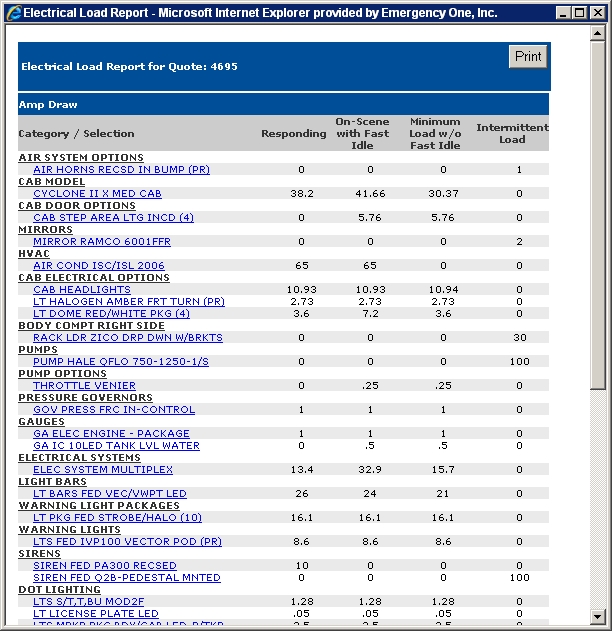
AMP Draw Report
On the Reports tab for Mainline Pumpers and Aerials a new report has been added. The report summarizes the AC WATT and DC AMP Draw for the quote. It will tell your if you alternator or generator is underpowered for your configuration. This can be run with any valid configuration.
Click the View Report link.
The Electrical Load Report window appears. Click the Print button to send the hard copy to the printer.
The Specification MS-Word: section allows you to generate a dealer specification using the dealer's defined Specification Print Sort Order or using E-ONE's default Specification Print Sort Order. The Specification MS-Word: section consists of these four links:
E-One Default w/ Adds (E-One Default with Add ons)
Open Microsoft® Word® first.
Click the Dealer link to generate the quick spec. A new Internet Explorer® window will open.
The File Download window appears. Click the Open button to open the quick spec.
The quick spec appears in Word®. Close the new Internet Explorer® window.

Click the E-One Default link to generate the quick spec. A new Internet Explorer® window will open.
The File Download window appears. Click the Open button to open the quick spec.
The quick spec appears in Word®. Close the new Internet Explorer® window.
At this point you can save the report by clicking File > Save As from the menu bar.
Clicking File > Print from the menu bar will send the hard copy to the printer.
Install the Spec Format Macros from the Info Library tab Displays the Info Library page.CR Request Form, Change Order Request Form, Commercial Chassis Request Form, Order Completion Checklist, New Customer Information Request Form, Updated - Local Ez-ONE Uninstall Directions, Ez-ONE Local Uninstall Assistant Application, Dealer Add Ons Template, Dealer Portal User's Guide, Spec Format Macros, Dealer Agreement, E-One Agreement, E-One Extended Terms Acknowledgment & Approval, Specification for New Spec-One Hose Restraint Options links. of the Dealer Portal by clicking on the Spec Format Macros link and follow the system prompts.
Open Microsoft® Word®.
Open an existing quote.
Under the Quick Spec: heading, click the Dealer link. A new Internet Explorer® window will open.
The File Download window appears. Click the Open button to open the quick spec.

The quick spec appears in Word®. Close the new Internet Explorer® window.
Click the Ez_Main macro When this icon is clicked, the Comply Yes/No dialog box appears. Clicking the Yes button will add the table of contents, format pages, page numbers, and the bid comply table to a generated quick spec The Specification MS-Word: section on the Report tab of the Quote window Displays the Quote Number:, Unit Information:, Customer Information:, Dealer Reference:, Date Information: and Quote Actions: sections. allows you to generate a quick specification in Microsoft® Word® using the dealer's defined Specification Print Sort Order or using E-ONE's default Specification Print Sort Order.Quote window allows you to generate a quick specification in Microsoft® Word® using the dealer's defined Specification Print Sort Order or using E-ONE's default Specification Print Sort Order.Quote window allows you to generate a quick specification in Microsoft® Word® using the dealer's defined Specification Print Sort Order or using E-ONE's default Specification Print Sort Order.Quote window allows you to generate a quick specification in Microsoft® Word® using the dealer's defined Specification Print Sort Order or using E-ONE's default Specification Print Sort Order.Quote window allows you to generate a quick specification in Microsoft® Word® using the dealer's defined Specification Print Sort Order or using E-ONE's default Specification Print Sort Order.Quote window allows you to generate a quick specification in Microsoft® Word® using the dealer's defined Specification Print Sort Order or using E-ONE's default Specification Print Sort Order.Quote window allows you to generate a quick specification in Microsoft® Word® using the dealer's defined Specification Print Sort Order or using E-ONE's default Specification Print Sort Order.Quote window allows you to generate a quick specification in Microsoft® Word® using the dealer's defined Specification Print Sort Order or using E-ONE's default Specification Print Sort Order.Quote window allows you to generate a quick specification in Microsoft® Word® using the dealer's defined Specification Print Sort Order or using E-ONE's default Specification Print Sort Order.Quote window allows you to generate a quick specification in Microsoft® Word® using the dealer's defined Specification Print Sort Order or using E-ONE's default Specification Print Sort Order.Quote window allows you to generate a quick specification in Microsoft® Word® using the dealer's defined Specification Print Sort Order or using E-ONE's default Specification Print Sort Order.Quote window allows you to generate a quick specification in Microsoft® Word® using the dealer's defined Specification Print Sort Order or using E-ONE's default Specification Print Sort Order. in Word®. to add the Bid Comply Y/N table to the quick spec.

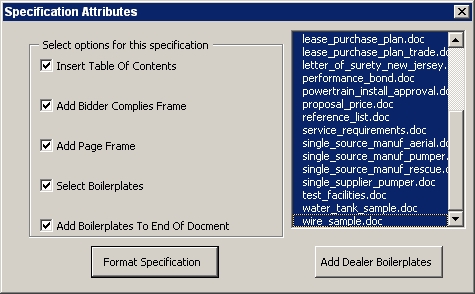
The Specification Attributes dialog box Allow you to add a table of contents, format pages, page numbers, and the bid comply table to a Quick Spec when the selection are made and the Format Specification button is clicked. appears with four check boxes, a boilerplates window, and two buttons.
Insert Table of Contents check box: Check this box to add a table of contents to the Quick Spec.
Add Bidder Complies Frame check box: Check this box to add the bid complies frame to the Quick Spec. This will appear on every page.
Add Page Frame check box: Checking this box will add a page frame on every page.
Select Boilerplates check box: Checking this box will display the boilerplates in the right window. Select the boilerplates you want to add to the Quick Spec.
Add Boilerplates To End of Document: Checking this box will add your boilerplates to the end of your spec.
Format Specification button: Click this button to format the specification based on your selections made.
Add Dealer Boilerplates button: Click this button for information on how to add your own boilerplates to the Quick Spec.
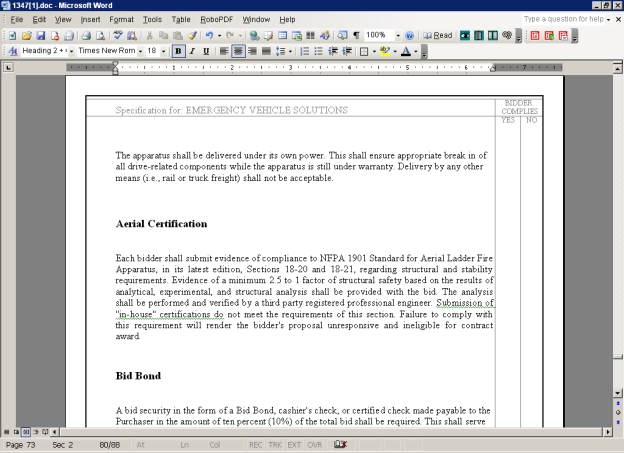
The Quick Spec appears in Word® with the table of contents, formatted pages, page numbers, and the bid comply table added. Also the boilerplates are sorted alphabetically ascending by default and are at the end of the spec on page 73.
At this point you can save the report by clicking File > Save As from the menu bar.
Clicking File > Print from the menu bar will send the hard copy to the printer.
The Available Reports: section consists of the following links:
Click the Quotation Summary Report link to generate a quotation summary report.
The E-ONE Report Viewer window appears with the generated proposal. Click the Print Report icon and from the Print dialog box, click Print to send the hard copy to the printer.
To export the report to Microsoft® Word® Rich Text Format (RTF), click the Export Report icon in the E-ONE Report Viewer window .
The Export Report dialog box appears. Select Microsoft Word - Editable (RTF) from the File Format: drop down list.

Enter the path for the file name in the File name: field (e.g. C:\My Documents\Quotation Summary Report.rtf) and click the OK button or click the Browse... and navigate to folder where you want to save the file, enter a filename, click Save from the Save As dialog box, and then click OK from the Export Report dialog box. The Report Viewer Export dialog box appears.
Click the Yes button to open the report. The report appears in Word®.
At this point you can save the report by clicking File > Save As from the menu bar in Word®.
Clicking File > Print from the menu bar will also send the hard copy to the printer.
Click the 'X' in the upper right corner to close the E-ONE Report Viewer window.
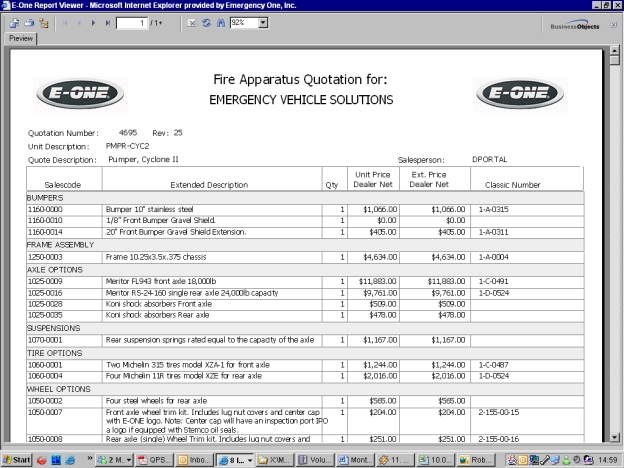
Click on the Classic Stripper with Classic Part Numbers link to generate the form.
The E-ONE Report Viewer window appears with the generated form.
To export the report to Microsoft® Word® Rich Text Format (RTF), click the Export Report icon in the E-ONE Report Viewer window.
The Export Report dialog box appears. Select Microsoft Word - (RTF) from the File Format drop down list.

Enter the path for the file name in the File name: field (e.g. C:\My Documents\Classic Stripper Quote.rtf) and click the OK button or click the Browse... button and navigate to folder where you want to save the file, enter a filename, click the Save button from the Save As dialog box, and then click OK from the Export Report dialog box. The Report Viewer Export dialog box appears.
Click the Yes button to open the report. The report appears in Word®.
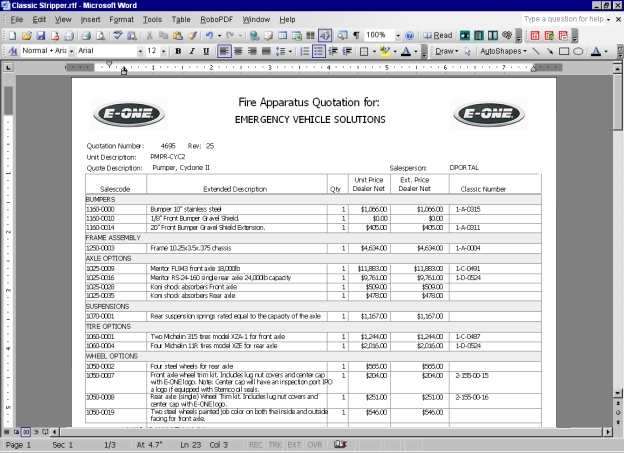
At this point you can save the report by clicking File > Save As from the menu bar in Word®.
Clicking File > Print from the menu bar will also send the hard copy to the printer.
Click the 'X' in the upper right corner to close the E-ONE Report Viewer window.
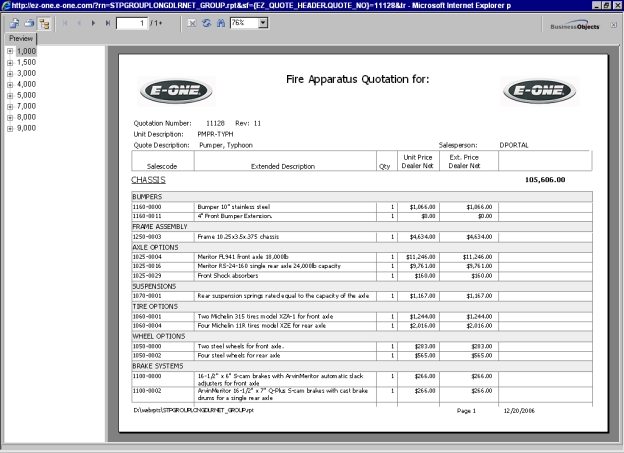
Click the Stripper With Grouped Pricing link to generate the form.
The E-ONE Report Viewer window appears with the generated form.
To export the report to Microsoft® Word® Rich Text Format (RTF), click the Export Report icon in the E-ONE Report Viewer window.
The Export Report dialog box appears. Select Microsoft Word - (RTF) from the File Format drop down list.
Enter the path for the file name in the File name: field (e.g. C:\My Documents\Stripper With Grouped Pricing.rtf) and click the OK button or click the Browse... button and navigate to folder where you want to save the file, enter a filename, click the Save button from the Save As dialog box, and then click OK from the Export Report dialog box. The Report Viewer Export dialog box appears.
Click the Yes button to open the report. The report appears in Word®.

At this point you can save the report by clicking File > Save As from the menu bar in Word®.
Clicking File > Print from the menu bar will also send the hard copy to the printer.
Click the 'X' in the upper right corner to close the E-ONE Report Viewer window.
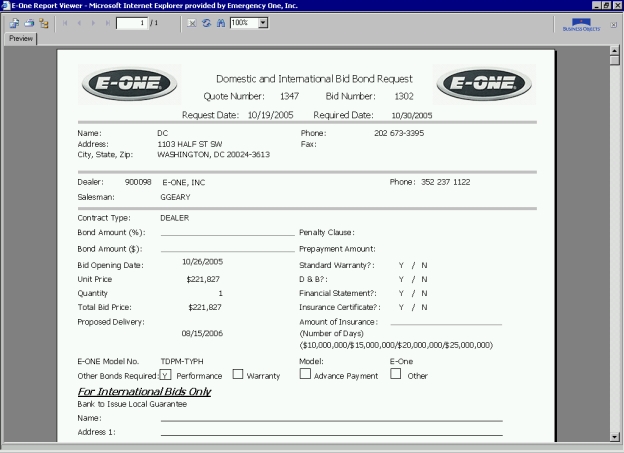
Click on the Bid Bond Request Form link to generate the form.
The E-ONE Report Viewer window appears with the generated form.
To export the report to Microsoft® Word® Rich Text Format (RTF), click the Export Report icon in the E-ONE Report Viewer window.
The Export Report dialog box appears. Select Microsoft Word - Editable (RTF) from the File Format drop down list.
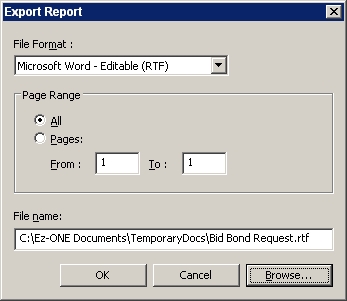
Enter the path for the file name in the File name: field (e.g. C:\My Documents\Bid Bond Request.rtf) and click the OK button or click the Browse... button and navigate to folder where you want to save the file, enter a filename, click the Save button from the Save As dialog box, and then click OK from the Export Report dialog box. The Report Viewer Export dialog box appears.
Click the Yes button to open the report. The report appears in Word®.
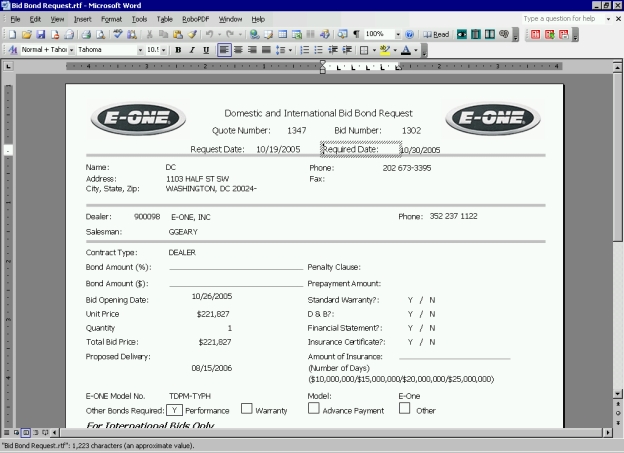
Fill in the pertinent data for Workflow Workflow is the electronic method used to send a quote for a bid bond request, concession request and/or as an order to the appropriate group. This will speed up the turnaround time for requests on quotes. .
Save the form using File > Save As from the menu bar in Word®.
Print out and sign the form and scan it in a as file.
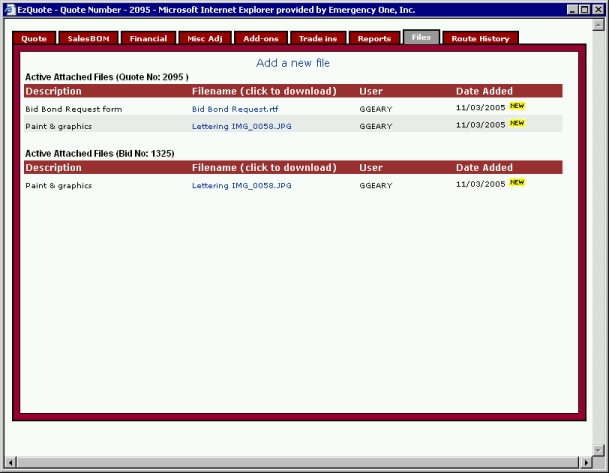
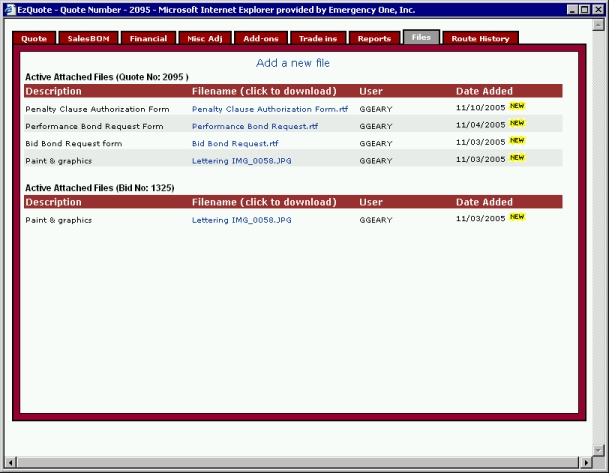
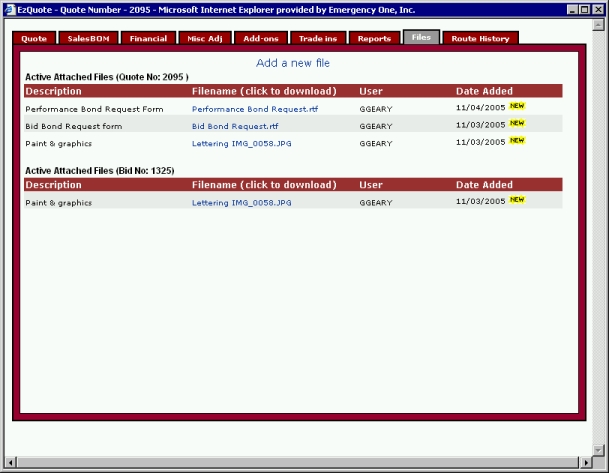
Click the Files tab of the Quote window.
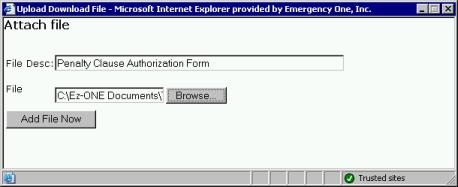
Click the Add a new file link at the top of the window to attach the file. The Upload Download File window Appears after the Add a new file link is clicked from the Files tab of the Quote window.Add a new file link When this link is clicked, the Upload Download File window appears. is clicked from the Files tab This tab on the quote window, allows you to add individual files to a quote. of the Quote window.Add a new file link is clicked from the Files tab of the Quote window.Add a new file link is clicked from the Files tab of the Quote window.Add a new file link is clicked from the Files tab of the Quote window.Add a new file link is clicked from the Files tab of the Quote window.Add a new file link is clicked from the Files tab of the Quote window.Add a new file link is clicked from the Files tab of the Quote window.Add a new file link is clicked from the Files tab of the Quote window.Add a new file link is clicked from the Files tab of the Quote window.Add a new file link is clicked from the Files tab of the Quote window.Add a new file link is clicked from the Files tab of the Quote window.Add a new file link is clicked from the Files tab of the Quote window. appears.
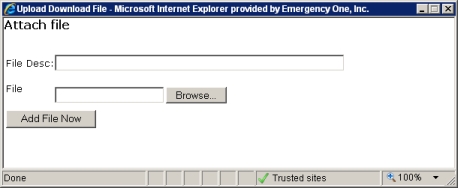
In the File Desc: field, enter the description of the file you want to attach to the quote.
Click the Browse button to navigate to folder where the scanned file resides. The Choose file window After the Browse button is clicked this window appear so that you can navigate to folder where the file resides and attach it to the quote. appears.
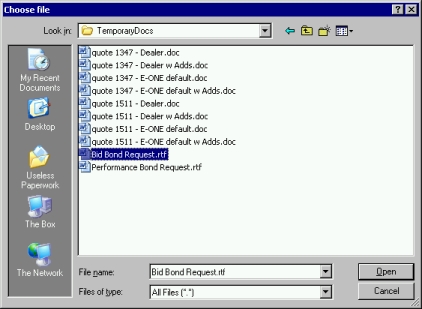
Select the scanned file you want to attach and click the Open button. The path and filename appears in the File field.
Click the Add File Now button Attaches the file you selected to the quote to attach the scanned file to the quote. The Files window now displays the information about the scanned file you attached to the quote and bid.
Clicking File > Print from the menu bar in Word® will send the hard copy to the printer.
In the E-ONE Report Viewer window, click the Print Report icon and from the Print dialog box, click Print to also send the hard copy to the printer.
Click the 'X' in the upper right corner to close the E-ONE Report Viewer window.
On the Quote window, click the Financial tab Displays the monetary values and information associated with the quote along with the Quote Number, Information Requiring Approval and the Adjustment sections.. The Financial page appears.
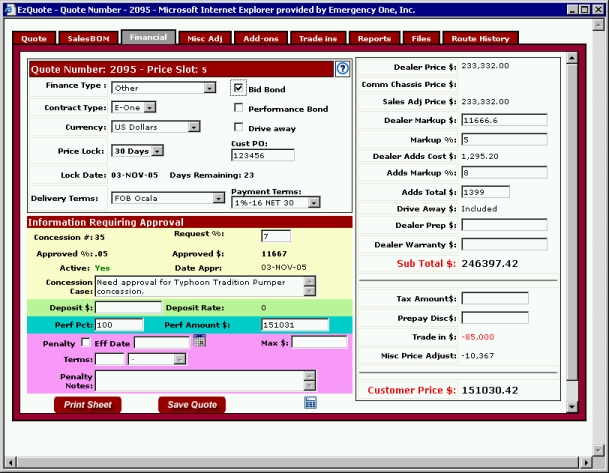
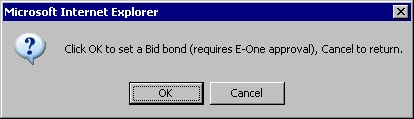
Check Bid Bond box for Bid Bond on this quote. Click the OK button from the dialog box to set the Bid Bond.
Price lock the quote from the Price Lock: drop down list. Select either 30 Days or 45 Days from this drop down list. The Lock Date: field is automatically filled in and counts down each day the price is locked. This will prevent an issue on a price increase when a new price slot is posted to the Dealer Portal.
Click the Save Quote button.
Click this link to go the Quote tab Displays the Quote Number:, Unit Information:, Customer Information:, Dealer Reference:, Date Information: and Quote Actions: sections on the quote window. section and learn how to Workflow this quote: Bid Bond Request. Be sure to select Bid Bond Request Group in the Send To: field of the Workflow quote window.
Click the CR Detail Report link to generate a Customer Request report.
The E-ONE Report Viewer window appears with the generated report. Click the Print Report icon and from the Print dialog box, click Print to send the hard copy to the printer.

To export the report to Microsoft® Word® Rich Text Format (RTF), click the Export Report icon in the E-ONE Report Viewer window.
The Export Report dialog box appears. Select Microsoft Word - (RTF) from the File Format: drop down list.
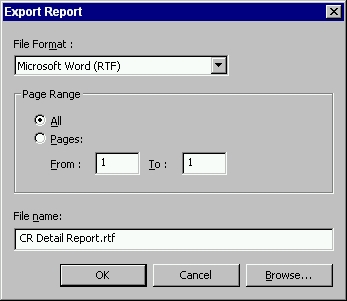
Enter the path for the file name in the File name: field (e.g. C:\My Documents\CR Detail Report When this link is clicked from the Reports tab of the Quote window, the E-ONE Report View window Displays the generated Bid Bond Request Form, Bid Summary Report w/ tabs, a quote or a proposal. appears with the generated Customer Request.E-ONE Report View window appears with the generated Customer Request.E-ONE Report View window appears with the generated Customer Request.E-ONE Report View window appears with the generated Customer Request.E-ONE Report View window appears with the generated Customer Request.E-ONE Report View window appears with the generated Customer Request.E-ONE Report View window appears with the generated Customer Request.E-ONE Report View window appears with the generated Customer Request.E-ONE Report View window appears with the generated Customer Request.E-ONE Report View window appears with the generated Customer Request.E-ONE Report View window appears with the generated Customer Request.E-ONE Report View window appears with the generated Customer Request.E-ONE Report View window appears with the generated Customer Request.E-ONE Report View window appears with the generated report.E-ONE Report View window appears with the generated report.E-ONE Report View window appears with the generated report.E-ONE Report View window appears with the generated report.E-ONE Report View window appears with the generated report.E-ONE Report View window appears with the generated report.E-ONE Report View window appears with the generated report.E-ONE Report View window appears with the generated report.E-ONE Report View window appears with the generated report.E-ONE Report View window appears with the generated report.E-ONE Report View window appears with the generated report.E-ONE Report View window appears with the generated report.E-ONE Report View window appears with the generated report.E-ONE Report View window appears with the generated report.E-ONE Report View window appears with the generated report.E-ONE Report View window appears with the generated report.E-ONE Report View window appears with the generated report.E-ONE Report View window appears with the generated report.E-ONE Report View window appears with the generated report.E-ONE Report View window appears with the generated report.E-ONE Report View window appears with the generated report.E-ONE Report View window appears with the generated report.E-ONE Report View window appears with the generated report.E-ONE Report View window appears with the generated report.E-ONE Report View window appears with the generated report.E-ONE Report View window appears with the generated report.E-ONE Report View window appears with the generated report.E-ONE Report View window appears with the generated report.E-ONE Report View window appears with the generated report.E-ONE Report View window appears with the generated report.E-ONE Report View window appears with the generated report.E-ONE Report View window appears with the generated report.E-ONE Report View window appears with the generated report.E-ONE Report View window appears with the generated report.E-ONE Report View window appears with the generated report.E-ONE Report View window appears with the generated report.E-ONE Report View window appears with the generated report.E-ONE Report View window appears with the generated report..rtf) and click the OK button or click the Browse... button and navigate to folder where you want to save the file, enter a filename, click the Save button from the Save As dialog box, and then click OK from the Export Report dialog box. The Report Viewer Export dialog box appears.
Click the Yes button to open the report. The report appears in Word®.
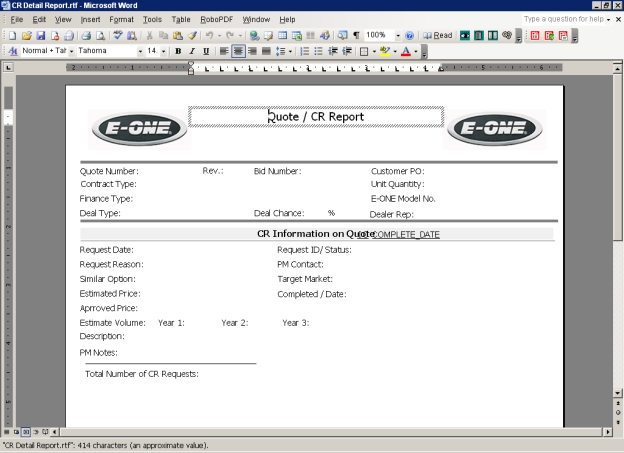
At this point you can save the report by clicking File > Save As from the menu bar in Word®.
Clicking File > Print from the menu bar will send the hard copy to the printer.
In the E-ONE Report Viewer window, click the Print Report icon and from the Print dialog box, click Print to also send the hard copy to the printer. Click the 'X' in the upper right corner to close the E-ONE Report Viewer window.
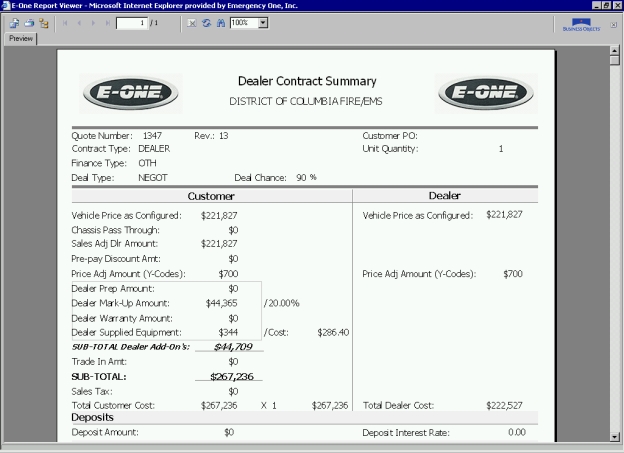
Click the Dealer Financial Summary Report link to generate the report.
The E-ONE Report Viewer window appears with the generated report. Click the Print Report icon and from the Print dialog box, click Print to send the hard copy to the printer.
To export the report to Microsoft® Word® Rich Text Format (RTF), click the Export Report icon in the E-ONE Report Viewer window.
The Export Report dialog box appears. Select Microsoft Word - Editable (RTF) from the File Format: drop down list.
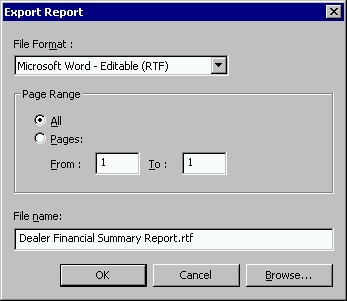
Enter the path for the file name in the File name: field (e.g. C:\My Documents\Dealer Financial Summary Report.rtf) and click the OK button or click the Browse... button and navigate to folder where you want to save the file, enter a filename, click the Save button from the Save As dialog box, and then click OK from the Export Report dialog box. The Report Viewer Export dialog box appears.
Click the Yes button to open the report. The report appears in Word®.
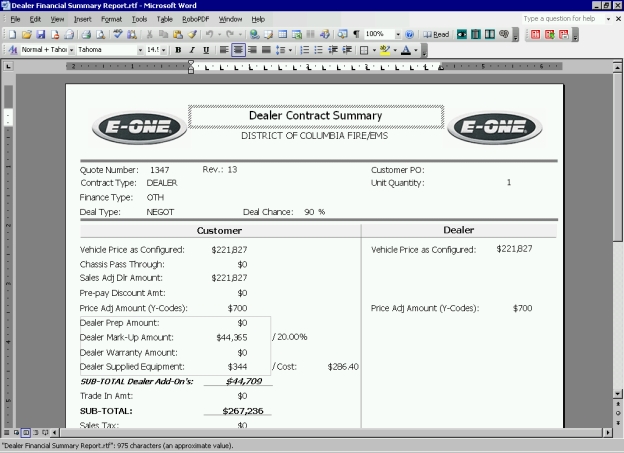
At this point you can save the report by clicking File > Save As from the menu bar in Word®.
Clicking File > Print from the menu bar will send the hard copy to the printer.
In the E-ONE Report Viewer window, click the Print Report icon and from the Print dialog box, click Print to also send the hard copy to the printer. Click the 'X' in the upper right corner to close the E-ONE Report Viewer window.
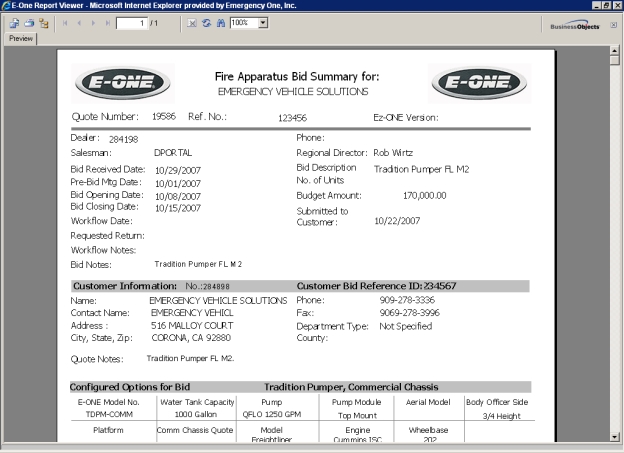
Click on the Bid Summary Report w/ Tabs link to generate the report.
The E-ONE Report Viewer window appears with the generated report. Click the Print Report icon and from the Print dialog box, click Print to send the hard copy to the printer.
To export the report to Microsoft® Word® Rich Text Format (RTF), click the Export Report icon in the E-ONE Report Viewer window.
The Export Report dialog box appears. Select Microsoft Word (RTF) from the File Format drop down list.
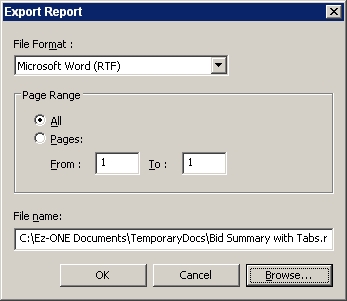
Enter the path for the file name in the File name: field (e.g. C:\My Documents\Bid Summary Report with tabs.rtf) and click the OK button or click the Browse... button and navigate to folder where you want to save the file, enter a filename, click the Save button from the Save As dialog box, and then click OK from the Export Report dialog box. The Report Viewer Export dialog box appears.
Click the Yes button to open the report. The report appears in Word®.
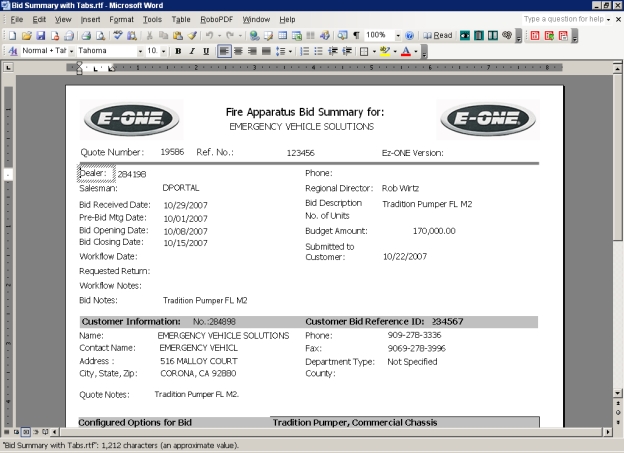
At this point you can save the report by clicking File > Save As from the menu bar in Word®.
Clicking File > Print from the menu bar will send the hard copy to the printer. Click the 'X' in the upper right corner to close the E-ONE Report Viewer window.
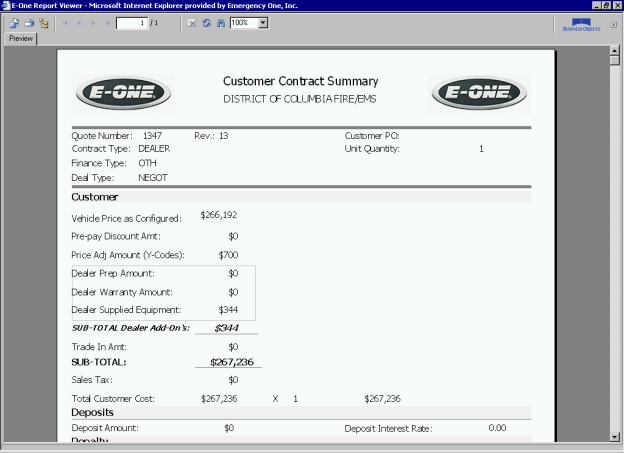
Click the Customer Financial Summary Report link to generate the report.
The E-ONE Report Viewer window appears with the generated report. Click the Print Report icon and from the Print dialog box, click Print to send the hard copy to the printer.
To export the report to Microsoft® Word® Rich Text Format (RTF), click the Export Report icon in the E-ONE Report Viewer window.
The Export Report dialog box appears. Select Microsoft Word - (RTF) from the File Format: drop down list.

Enter the path for the file name in the File name: field (e.g. C:\My Documents\Customer Contract Summary.rtf) and click the OK button or click the Browse... button and navigate to folder where you want to save the file, enter a filename, click the Save button from the Save As dialog box, and then click OK from the Export Report dialog box. The Report Viewer Export dialog box appears.
Click the Yes button to open the report. The report appears in Word®.
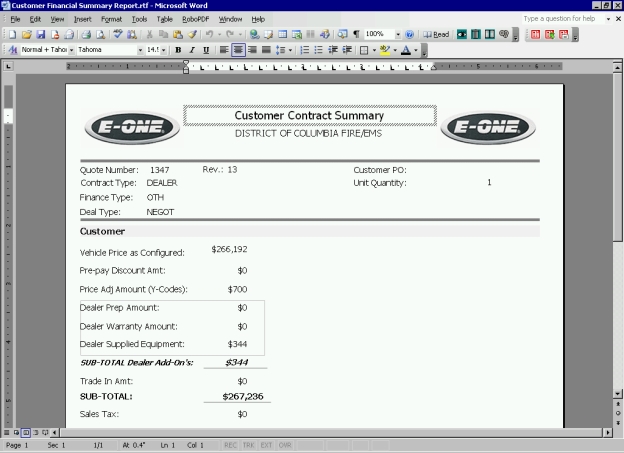
At this point you can save the report by clicking File > Save As from the menu bar in Word®.
Clicking File > Print from the menu bar will send the hard copy to the printer. Click the 'X' in the upper right corner to close the E-ONE Report Viewer window.
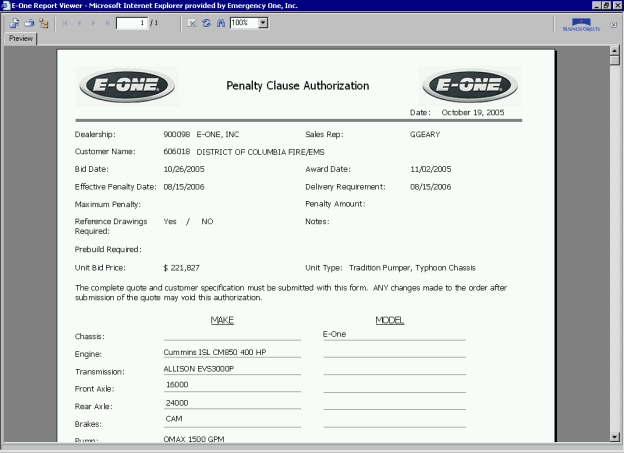
Click the Penalty Clause Authorization Form link to generate a penalty clause authorization form.
The E-ONE Report Viewer window appears with the generated form.
To export the report to Microsoft® Word® Rich Text Format (RTF), click the Export Report icon in the E-ONE Report Viewer window.
The Export Report dialog box appears. Select Microsoft Word - Editable (RTF) from the File Format: drop down list.
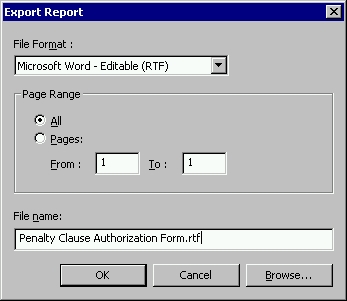
Enter the path for the file name in the File name: field (e.g. C:\My Documents\Penalty Clause Authorization Form.rtf) and click the OK button or click the Browse... button and navigate to folder where you want to save the file, enter a filename, click the Save button from the Save As dialog box, and then click OK from the Export Report dialog box. The Report Viewer Export dialog box appears.
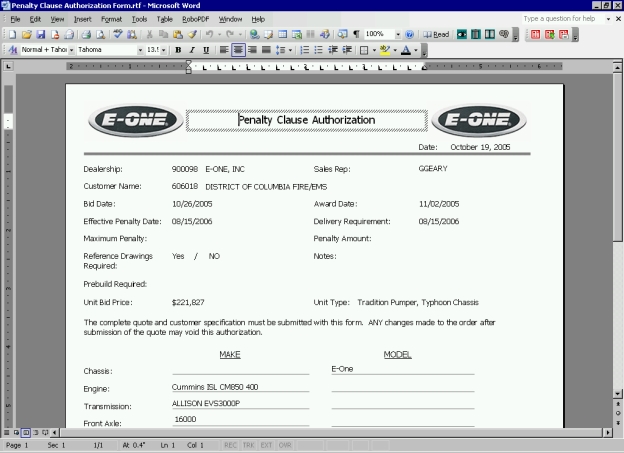
Click the Yes button to open the report. The report appears in Word®.
Fill in the pertinent data for Workflow.
Save the form using File > Save As from the menu bar in Word®.
Click the Files tab of the Quote window.
Click the Add a new file link at the top of the window to attach the file to the quote. The Upload Download File window appears.
In the File Desc: field, enter the description of the file you want to attach to the quote.
Click the Browse button to navigate to folder where the file resides. The Choose file window appears.
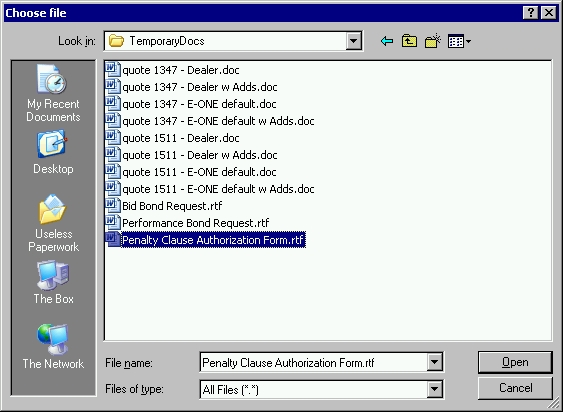
Select the file you want to attach and click the Open button. The path and filename appears in the File field.
Click the Add File Now button Attaches the file you selected to the quote to attach the file to the quote. The Files window now displays the information about the file you attached to the quote and bid.
Clicking File > Print from the menu bar will send the hard copy to the printer.
In the E-ONE Report Viewer window, click the Print Report icon and from the Print dialog box, click Print to also send the hard copy to the printer.
Click the 'X' in the upper right corner to close the E-ONE Report Viewer window.
Now you can click the Quote tab and the Workflow Quote link to Workflow the quote for a Penalty Authorization Request. Be sure to select Penalty Authorization Request Group in the Send To: field of the Workflow quote window.
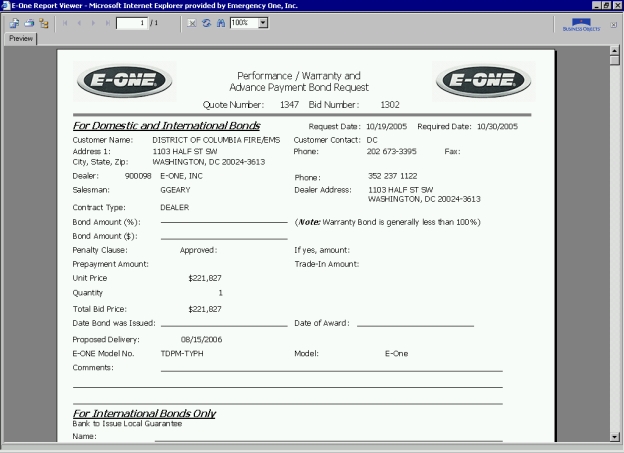
Click the Performance, Warr, Advanced Pmt Bond Request link to generate the report.
The E-ONE Report Viewer window appears with the generated report.
To export the report to Microsoft® Word® Rich Text Format (RTF), click the Export Report icon in the E-ONE Report Viewer window.
The Export Report dialog box appears. Select Microsoft Word - Editable (RTF) from the File Format: drop down list.
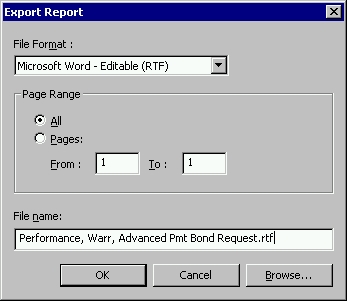
Enter the path for the file name in the File name: field (e.g. C:\My Documents\Performance, Warr, Advanced Pmt Bond Request.rtf) and click the OK button or click the Browse... button and navigate to folder where you want to save the file, enter a filename, click the Save button from the Save As dialog box, and then click OK from the Export Report dialog box. The Report Viewer Export dialog box appears.
Click the Yes button to open the report. The report appears in Word®.
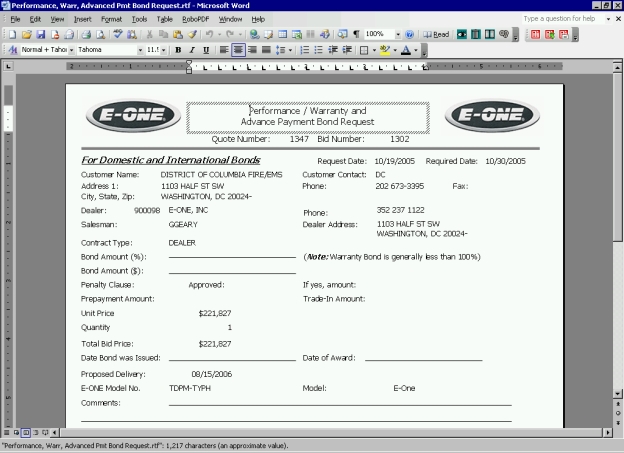
Fill in the pertinent data for Workflow.
Save the form using File > Save As from the menu bar in Word®.
Click the Files tab of the Quote window.
Click the Add a new file link at the top of the window to attach the file to the quote. The Upload Download File window appears.
In the File Desc: field, enter the description of the file you want to attach to the quote.
Click the Browse button to navigate to folder where the file resides. The Choose file window appears
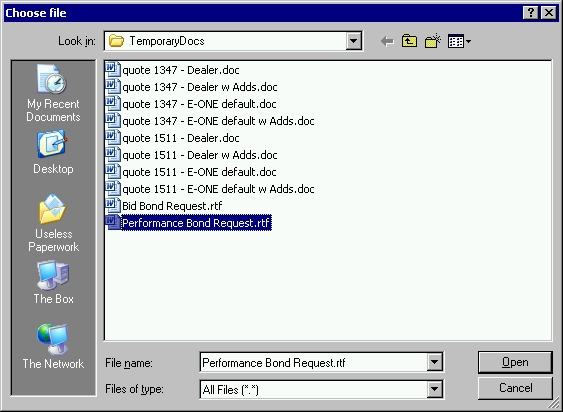
Select the file you want to attach and click the Open button. The path and filename appears in the File field.
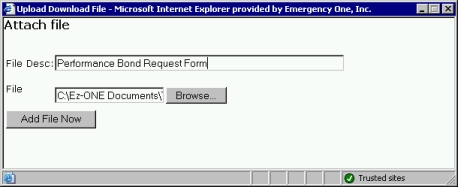
Click the Add File Now button Attaches the file you selected to the quote to attach the file to the quote. The Files window now displays the information about the file you attached to the quote and bid.
Clicking File > Print from the menu bar will send the hard copy to the printer.
In the E-ONE Report Viewer window, click the Print Report icon and from the Print dialog box, click Print to also send the hard copy to the printer.
Click the 'X' in the upper right corner to close the E-ONE Report Viewer window.
On the Quote window, click the Financial tab. The Financial page appears.

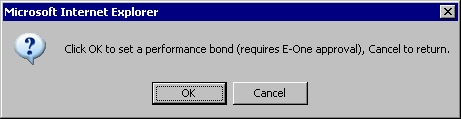
Check Performance Bond box if you want a Performance Bond on this quote. Click the OK button from the dialog box to set the Performance Bond.
Now you can click the Quote tab and the Workflow Quote link to Workflow the quote for a Performance Bond Request. Be sure to select Performance Bond Request Group in the Send To: field of the Workflow quote window.
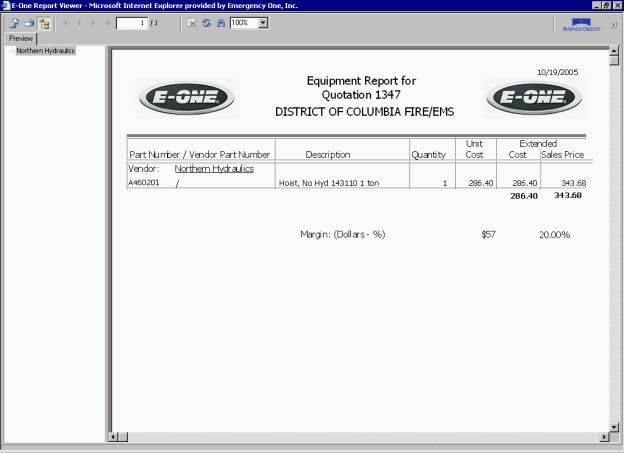
Click the Equipment Report by Quote / Vendor link to generate the report.
The E-ONE Report Viewer window appears with the generated report. Click the Print Report icon and from the Print dialog box, click Print to send the hard copy to the printer.
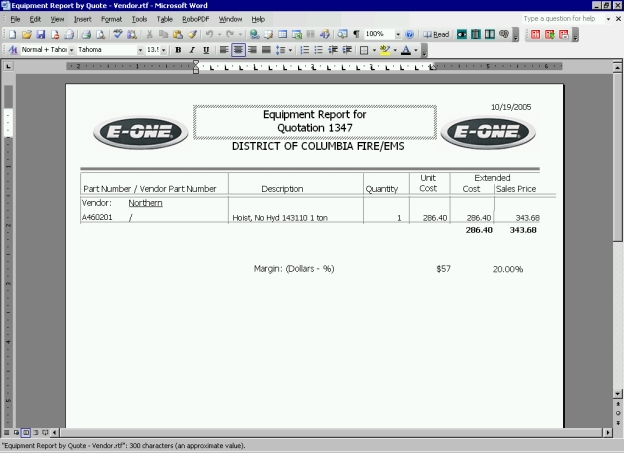
To export the report to Microsoft® Word® Rich Text Format (RTF), click the Export Report icon in the E-ONE Report Viewer window.
The Export Report dialog box appears. Select Microsoft Word - (RTF) from the File Format: drop down list.

Enter the path for the file name in the File name: field (e.g. C:\My Documents\Equipment Report by Quote - Vendor.rtf) and click the OK button or click the Browse... button and navigate to folder where you want to save the file, enter a filename, click the Save button from the Save As dialog box, and then click OK from the Export Report dialog box. The Report Viewer Export dialog box appears.
Click the Yes button to open the report. The report appears in Word®.
At this point you can save the report. Click the 'X' in the upper right corner to close the E-ONE Report Viewer window.
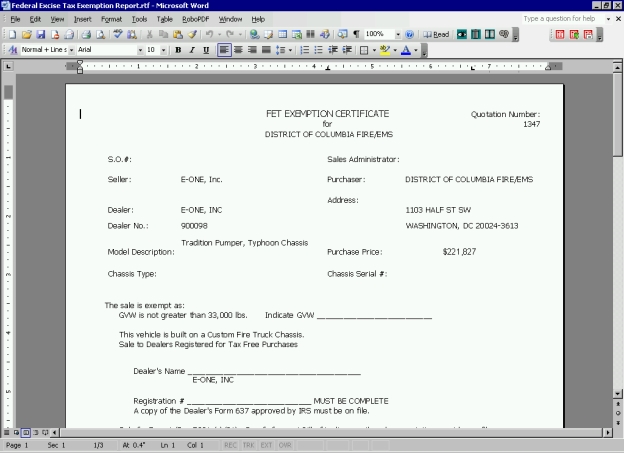
Click the Federal Excise Tax Exemption Report link to generate the report.
The E-ONE Report Viewer window appears with the generated proposal. Click the Print Report icon and from the Print dialog box, click Print to send the hard copy to the printer.

To export the report to Microsoft® Word® Rich Text Format (RTF), click the Export Report icon in the E-ONE Report Viewer window.
The Export Report dialog box appears. Select Microsoft Word - Editable (RTF) from the File Format: drop down list.
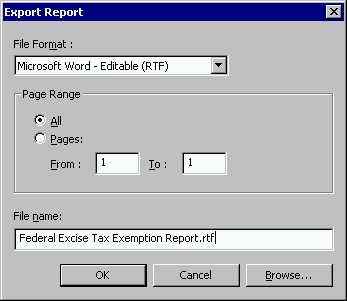
Enter the path for the file name in the File name: field (e.g. C:\My Documents\Federal Excise Tax Exemption Report.rtf) and click the OK button or click the Browse... button and navigate to folder where you want to save the file, enter a filename, click the Save button from the Save As dialog box, and then click OK from the Export Report dialog box. The Report Viewer Export dialog box appears.
Click the Yes button to open the report. The report appears in Word®.
At this point you can save the report. Click the 'X' in the upper right corner to close the E-ONE Report Viewer window.
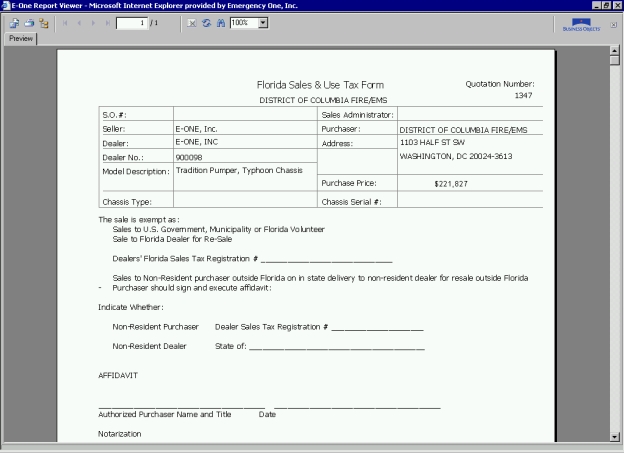
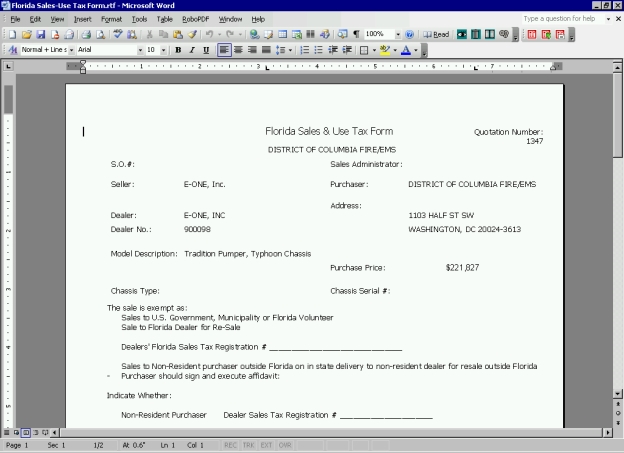
Click the Florida Sales / Use Tax Form link to generate the form.
The E-ONE Report Viewer window appears with the generated form. Click the Print Report icon and from the Print dialog box, click Print to send the hard copy to the printer.
To export the report to Microsoft® Word® Rich Text Format (RTF), click the Export Report icon in the E-ONE Report Viewer window.
The Export Report dialog box appears. Select Microsoft Word - (RTF) from the File Format: drop down list.

Enter the path for the file name in the File name: field (e.g. C:\My Documents\Florida Sales-Use Tax Form.rtf) and click the OK button or click the Browse... button and navigate to folder where you want to save the file, enter a filename, click the Save button from the Save As dialog box, and then click OK from the Export Report dialog box. The Report Viewer Export dialog box appears.
Click the Yes button to open the form. The form appears in Word®.
At this point you can save the form. Click the 'X' in the upper right corner to close the E-ONE Report Viewer window.
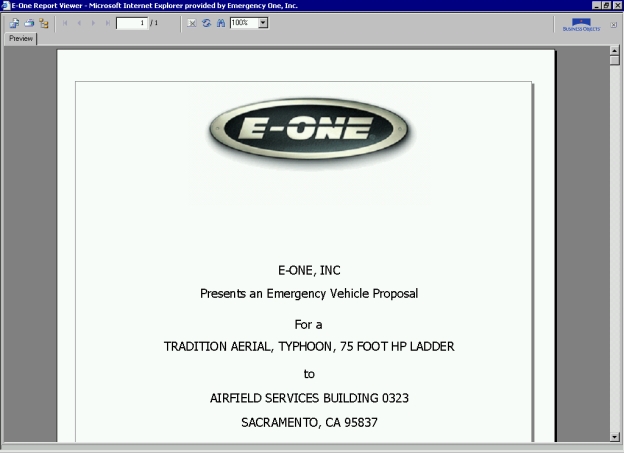
Click the Specification Cover Page link to generate a specification cover page.
The E-ONE Report Viewer window appears with the generated proposal. Click the Print Report icon and from the Print dialog box, click Print to send the hard copy to the printer.
To export the cover page to Microsoft® Word® Rich Text Format (RTF), click the Export Report icon in the E-ONE Report Viewer window.
The Export Report dialog box appears. Select Microsoft Word - (RTF) from the File Format: drop down list.

Enter the path for the file name in the File name: field (e.g. C:\My Documents\Specification Cover Page.rtf) and click the OK button or click the Browse... button and navigate to folder where you want to save the file, enter a filename, click the Save button from the Save As dialog box, and then click OK from the Export Report dialog box. The Report Viewer Export dialog box appears.
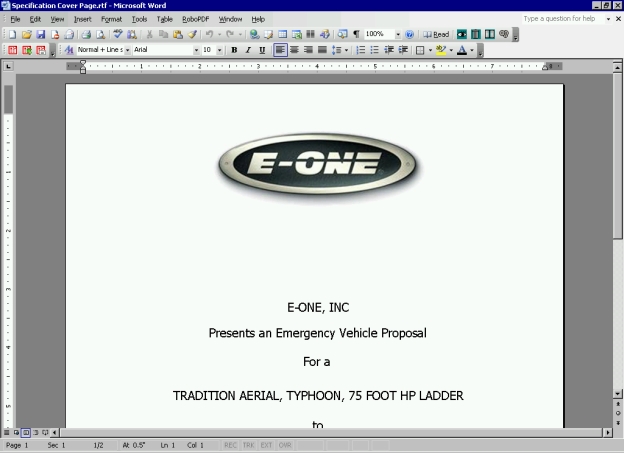
Click the Yes button to open the specification cover page. The specification cover page appears in Word®.
At this point you can save the specification cover page. Click the 'X' in the upper right corner to close the E-ONE Report Viewer window.
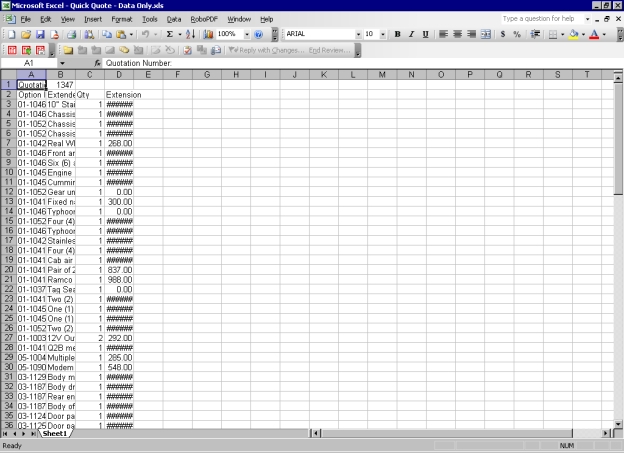
Click the Quick Quote to Excel link to generate an Excel spreadsheet for export to MS Excel - Data Only.
The E-ONE Report Viewer window appears with the generated data.
To export the report to Microsoft® Excel®, click the Export Report icon in the E-ONE Report Viewer window.
The Export Report dialog box appears. Select Microsoft Excel - Data Only (XLS) from the File Format: drop down list.
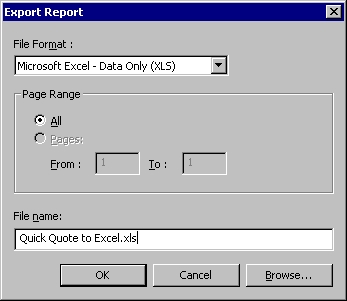
Enter the path for the file name in the File name: field (e.g. C:\My Documents\Quick Quote to Excel.xls) and click the OK button or click the Browse... button and navigate to folder where you want to save the file, enter a filename, click the Save button from the Save As dialog box, and then click OK from the Export Report dialog box. The Report Viewer Export dialog box appears.
Click the Yes button to open the report. The report appears in Excel®.
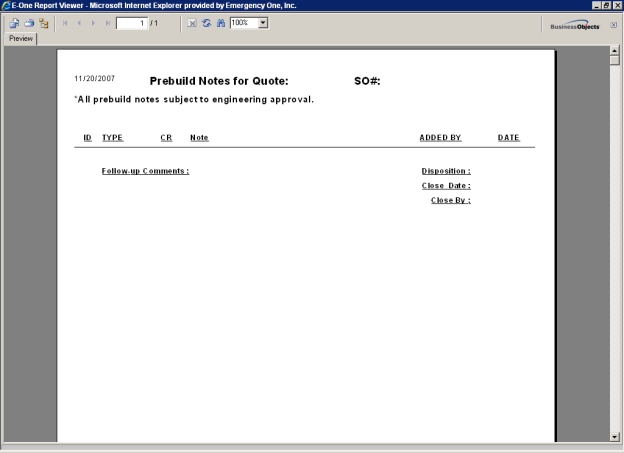
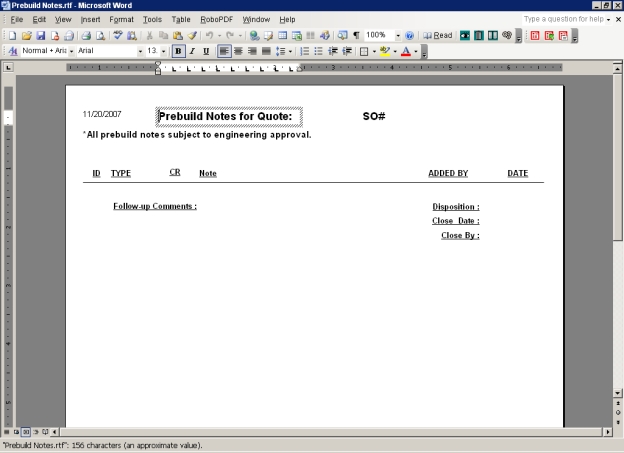
Click the Prebuild Notes link to generate a Prebuild Notes Report.
The E-ONE Report Viewer window appears with the generated report.
To export the cover page to Microsoft® Word® Rich Text Format (RTF), click the Export Report icon in the E-ONE Report Viewer window.
The Export Report dialog box appears. Select Microsoft Word - (RTF) from the File Format: drop down list.

Enter the path for the file name in the File name: field (e.g. C:\My Documents\Prebuild Notes.rtf) and click the OK button or click the Browse... button and navigate to folder where you want to save the file, enter a filename, click the Save button from the Save As dialog box, and then click OK from the Export Report dialog box. The Report Viewer Export dialog box appears.
Click the Yes button to open the prebuild notes. The prebuild notes appears in Word®.
At this point you can save the specification cover page. Click the 'X' in the upper right corner to close the E-ONE Report Viewer window.
Related Topics: